D6: More about fields
This tutorial contains more advanced stuff with fields.
Table of contents
Drupal projects discussed in this chapter: Field group, CCK, Fivestar & Voting API.
 This
chapter is incomplete and not fully updated for Drupal 7. It was last updated in 2009. You probably need to look elsewere for up to date information.
This
chapter is incomplete and not fully updated for Drupal 7. It was last updated in 2009. You probably need to look elsewere for up to date information.
Introduction
An earlier chapter titled Creating content types has shown how the core fields module can be used to create new content types for Drupal. Building on that I shall go on to show how to do more with fields.
Adding groups
Under D7, needs http://drupal.org/project/field_group
Sometimes, you may want to organise an input form so that fields that belong together is placed inside a separate panel with its own heading heading. In CCK, such a collection of fields is referred to as a “group”.
For the DSLR camera content, you may want to add a group where a user can link to vendors that sell this particular camera model.
To create a group, navigate to the manage fields screen, scroll down to the panel, and fill out the form. Use the label “Vendors” for this group, and set its machine readable group name to “group_vendors”. The label can be changed later, but not the machine readable group name.

After creating the group you need to configure it. Click on in the group's row.
The panel have a section that determines how the group initially appears. A collapsed group hides the group's input fields, and users first must open the group to expose the input fields. If you set the style to be , the input fields are always visible. If the style is , the fields in the group are initially exposed, but the user may hide them if they want to. In this tutorial you should set set the style.
The help text will appear at the top of the panel in the input form, and can be used to instruct the users about how to fill in the field.

The group configuration form also contains a panel for where you may enter text that will appear at the beginning of the group display. In this tutorial, you should leave this empty.
When you finish configuring the group by clicking on , you're back in the field management screen and your new “Vendors“ group has been added at the bottom of the list of fields.
Next, you should create a text field with the label “Vendor” (singular) and field name “field_vendor” to hold the individual vendors in the vendors group. There are no screen shots from this process since this is the third custom field you create in this tutorial.
For the “Vendor” field, you should select the field type and the widget . You should configure it to have an input form length of 60 characters, to not be required, to allow an unlimited number of values, to use filtered text processing (to automatically turn URLs into hyperlinks), and to be of unlimited maximum length.
For good measure, you should also add a “See also” group. This group can be used to refer to other camera models by means of entity references. You should also create a field with the label “Alt. model” to hold such entity references. The details about how to do this is left as an exercise to the reader.
When you finish configuring the text field by clicking on , you're back in the field management screen and your new “Vendor” field has been added at the bottom of the list of fields.
You can now rearrange the fields using drag&drop. You push the “Vendors” and “See also” groups up above the built-in “Menu settings”. You then should include the “Vendor” text field in the “Vendors” group by moving it immediately below the group and then pushing it to the right. Likewise, you should include the “Alt. model” entity reference field in the “See also” group. You should end up with a list of fields looking like this:

Click to save layout of the entry form for DSLR camera content.
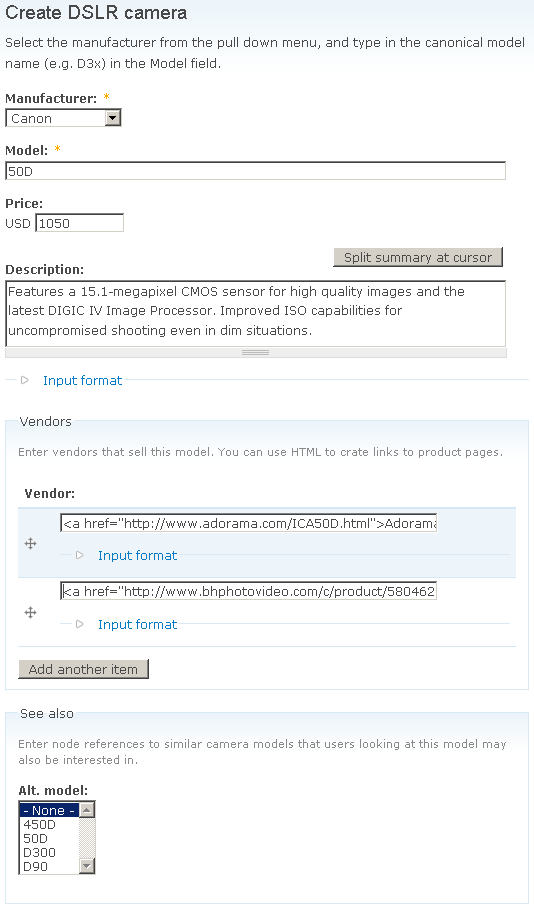
Once everything is in the right place, you can look at how the user form will look with the “Vendors” group added. Navigate to . Below is a filled-in form with data about the Canon 50D, including link to the product pages of two vendors of this model. The user may add additional vendors by clicking , and may select more than one camera from the list of alternative models by holding down the Ctrl-key while clicking
As always, remember to click to save the content.
You must also remember to set the permissions for your additional fields, so that ordinary users have access to them. Navigating to , scroll down to the section with the heading , and tick the required permissions.
when you've set the permissions you want.Export & import
Looking at the menu at the top of , we notice two tabs, and that we have yet to discuss.
Together, they provide a powerful facility to effectively copy and paste content types, whole, or piece by piece.
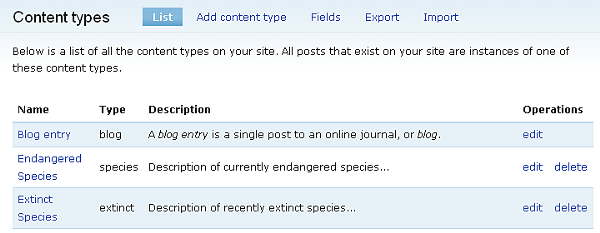
For argument's sake, let's assume that the «DSLR camera» content type is close but not quite the same as an «SLR camera» content type that is going to be added. Instead of recreating the new content type from scratch, we can duplicate the «DSLR camera» type and modify it during the Export process, before importing it as the new type.
Click on the tab and select the «DSLR camera» content type, and click . This brings up a list of field and group definitions that should be included in the export:
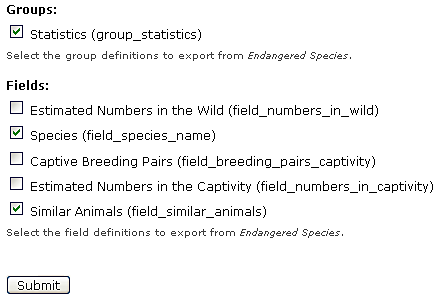
For somewhat macabre reasons, we no longer need to include any of the fields previously held in the group. Although, the group itself can be used to house other stats about the extinct species. Accordingly, only the and fields need to be exported to the new content type.
Clicking on , brings up the text area, containing the information that will be used by the feature to build the new content type. Copy this code and then click on the tab and paste it into the space provided:

In this instance, the Content type is left as the default option, <Create>, because we do not want to import these group and field definitions into any of the current content types. If you did want to add a field or two into one of the existing content types, you would select that from the drop-down list and add the new field definition (obtained from your own site or someone else's site — wherever) into the section.
The export definition contains the content type value. In this case, we can't directly import the new definition because the species content type already exists, so Drupal would report a failure to import the type because is already there. To get around this, edit the first few values of the Import data as follows:
$content[type] = array (
'name' => 'Extinct Species',
'type' => 'extinct',
'description' => '',
'title_label' => 'Common name',
'body_label' => '',
Now we are effectively importing a completely new type of content (called extinct) that happens to be based on the existing species content type. Clicking will add the new type to your list and you can now view it as expected.
You might find that there are field definitions in other content types (yours or someone else's) that could be imported instead of being recreated when modifying content types. In this case, go through the process again, selecting the relevant content type to export from, and then, choose the field to export, copy the export code across to the section, and add the field to the relevant content type.
Adding contributed fields
The CCK module is designed to allow contributors to create new custom field types that, when enabled, can be assigned to any content type.
By means of example, we're going to take a quick look at how you can use a special Fivestar Rating type that is defined in the Fivestar module. Together with the Voting API module, this can be used to let users rate the DSLR cameras listed.
If you've gone through the basic fields tutorial, you've already got those modules installed and enabled. If not, go ahead and install them now.
Global settings for the Voting API module is under . The global settings let you set the time limit for anonymous vote rollover, and how often votes should be counted. On a busy site, administrators can use this setting to postpone the calculation of vote results to save resources.
Global settings for the Fivestar module is under . The global settings let you select widget display (stars, hearts, flames, etc.) and colour scheme (for custom colour widgets).
In this tutorial, we'll go on using the default setting for both modules, so you don't need to change anything here. But check them out! This will give you an overview of the options that are available.
Before you start to use Fivestar, you should know that the module has two completely separate modes of operation:
- Node mode. In this mode, the rating widget lets an end-user rate a particular node. To enable this mode for a specific node type, navigate to , and click in the row for the content type you want to enable voting for. Scroll down and expand the panel named and tick . This will make the rating widget appear when a user is viewing a node (or commenting on a node). Clicking on the widget registers a vote for that particular node.
- Review mode. In this mode, the user is presented with a widget to rate something (i.e. not necessarily the node itself) while editing a node. To enable this mode, add a field with type set to to the node using the CCK module.
If you enable , in node mode users have the option of putting the rating in comment instead of the the root node. This provides a lightweight review facility, because users can write a review of the root node in the comment and then accompany their review/comment with a rating.
In the review mode, the value of the rating is saved in the node when a node is created. What is rated is set explicitly, and is referred to as the voting target.
In this tutorial we are going to use in full review mode.
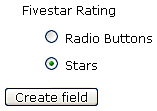
Navigate to . and click in the “DSLR camera” row and add a new field named field_rating), set its type to Fivestar Rating, and select as the form element.

Scroll down the page untill you get to the option.
Choose an option and click to add it to the content type, and then, ensure that you set the configuration options to something appropriate for you — each option is fairly well explained. Bear in mind that the field is the most important because it determines exactly, the node that receives the value of the rating. In this case, it's time to dust off your PHP skills and use it to dynamically select the appropriate node ID — admittedly, this isn't ideal but it does serve to illustrate the process for adding a contributed field, regardless of what it is.
From here on, the text discusses node mode.
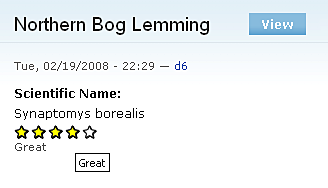
For example, a post of the Endangered species type, with Fivestar enabled, looks like this:
Whenever a user makes a vote, the widget registers it for that specific node. How these votes are tallied, displayed, and so on, can all be configured from the Fivestar and Voting API pages under Site configuration.
Don't be surprised if you click the widget only to find the vote is not registered immediately. It is possible to set the widget to update straight away, but more than likely you can leave this to update with the cron run using the Voting API section in Site configuration.
By playing around with Fivestar settings, the rating widget can end up looking like this:

In this case, Fivestar actually provides dual functionality, in that it is possible to provide a voting widget for users to rate a given piece of content, as well as a contributed field type that is utilised by posters of content — this could be useful if, for example, a danger level rating should be supplied with each Endangered species post.
Of course, each contributed field will come with its own entourage of settings and configuration parameters, so be careful to ensure that you are entirely clear on how the contributed functions work before making it available to the site's content posters.
Last update: 2009-04-10 [gh].