Using fields
One of the main features of Drupal 7 is that it is possible to enhance existing content types and even create new content types for a website using the GUI. Also the user entity can be expanded in a similar way. This is done by means of the core Field module. This chapter demonstrates how to use the Field module to add custom fields to a content type to cater for various types of content.
Table of contents
- Introduction
- Enabling the required modules
- Creating a new content type
- Managing fields
- Adding fields
- Creating content
- Displaying a custom content type
- Final word
Introduction
One of the main features of Drupal is that its entities are extensible by means of Drupal's administrative GUI without requiring any custom code. I.e.:
- Any existing entity (such as a specific type of content) can be modified by adding or subtracting fields.
- You can define new content types of the content entity that will work within the same framework as Drupal's pre-defined content types.
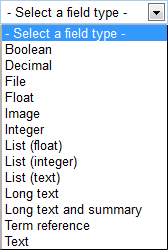
The term field refers to a given piece of content within an entity. A field is characterised by having a field name, field type and widget. Drupal comes with a set of core field types (as shown in the menu reproduced to the right). A widget in this context can be a HTML5 form element or jQuery widget that is to be used for data entry.
The content that makes up a Drupal websites is a collection of entities stored in the site's database. An entity can be viewed as a container for fields, where the term field refers to a typed piece of content. A field is characterised by having a field name, field type and widget. The bundle of fields that make up a Drupal entity is called a bundle.
The purpose of the core Field module is to manage fields. It allow administrators add to or subtract from the fields that constitute a bundle. In other words, the Field lets the site builder make custom subtypes of the Drupal content entity, without having to do any programming.
 The
content entity is Drupal's main container for content. Since
“content” is a generic term, and the content entity is stored
in the
 {node} base table in the database, the term “node
content type” is sometimes used to refer to types of the content
entity in order to distuingish it from other types of
entities, such as
users, comments, taxonomy terms and files. However,
in the Drupal community, when you see the term “content type” it
always means “node content type” (i.e. a type of the content entity – not a type of some other entity).
Also, in the Drupal community, the term “node” always means “instance of node content type”.
The core only comes with a few basic field types and widgets to handle input. To go beyond what is provided in the core, Drupal let website designers add field types by enabling contributed modules. In the Drupal ecosystem, there exists projects that provide modules for a number of typed fields, such as date fields, entity reference fields, and link fields. See the chapter Introduction to projects to learn about how use contributed projects to add field types to a site.
 This
chapter is about how to create specific node content types by means of fields.
Beware that Drupal fields can be used with any entity, not only content.
For instance, to add fields to the user entity, navigate to
and add new or existing fields to the user entity.
Enabling the required modules
First make sure the the three modules required to work with fields are enabled. They are part of core and should be enabled by default, but just to make sure, log in as an administrator, and navigate to and scroll down to see that there is a tick mark in the box to the left of the three modules and .
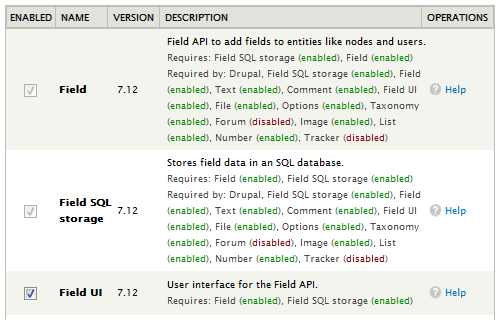
Notice that tick mark next to and is greyed out. This is because both are required by . Drupal will not let the administrator disable a module if the module is required by another enabled module.
Finally, scroll down to the bottom of the page and click .
Creating a new content type
For an alternative tutorial, see the chapter describing how to create a Guestbook content type.
In this tutorial, we shall by means of example create a content type that can hold information about cameras.
(If you want to modify an existing content type (such as “Article”) instead of creating a new one from scratch, skip ahead to the section with the title “Adding fields”.)
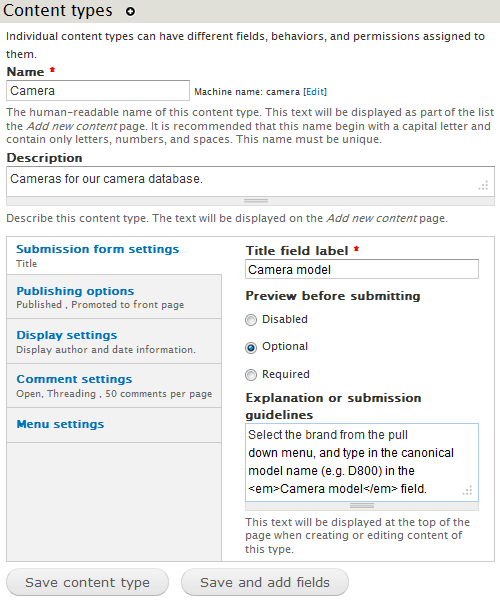
To create this new content type, navigate to . First, you need to give the new content type a (e.g. «Camera»). It also needs a machine name for internal representation. The computer suggests «camera», and that's fine. The machine name is used to to construct the URL of the create content page for the content type, and must be unique. You should also add a brief of the content type. This description will show up in the list of content types, and when the user click on and are prompted to pick a content type.
After giving the new content type a and a , scroll down to set up the workflow for adding content of this type.
First, set the to something sensible for this particular content type
In the case of the content type, it doesn't really make sense to have a . Instead entities should be headed with a “Camera model” designation.
Also take the time to fill in an to help the user understanding what is expected. Later, we're going to create a pull down menu to select the brand of the camera. That is why we refer to a pull down menu in the submission guidelines for this content type.
The radio-button sets whether preview should be set to one of , or (the option is guaranteed to annoy users).
The left half of the lower half of this forms works as tabs that gives access to more options when clicked. The current setting is shown. Here's a brief summary:
- – title field label, etc. (expanded in screen shot below).
- – defaults for publishing, and radio-button for multilingual support.
- – whether to display author and date information.
- – whether to allow comments, etc.
- – default parent menu item.
The screen shot below shows the -form with filled-in fields.
When done, click . Now the content type has been created. It is a subtype of the content entity.
Managing fields
You are now ready to begin customising this new content type. Note that it is possible to do this with any entity, but most common entity to customise in this way is subtypes of the content entity. The Camera content type we've just created is a subtype of the content entity.
Start by navigating to . If you just installed Drupal, you'll see the two default content types (Article and Basic page that is part of core and enabled by default) and the new content type we just created (Camera).
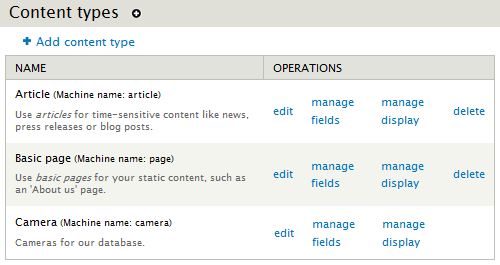
First click on in the row. Locate the Title field label and change it from “Title” to “Camera model”. Then press .
To configure the fields that make up the new content type, click on in the row. This brings up a form that show what fields are already present in the Camera content type, and where we can delete or add fields to the content type. This form will look like the screen shot below:

As seems un the screen shot above, two fields are already present. They are labelled “Camera model” and “Body”. It is possible to delete the “Body” field (press in the column). But we shall keep it, as it will be handy for long text descriptions of camera models, we are just going to a few details. To do that, click .
This takes you to a large form that let you edit a lot of settings. It is divided into to major parts: and . The portion apply only to the Description field when used in the Camera content type. The part apply to the Description field everywhere it is used (not only in the Camera content type).
The screen shot below only show the top of the part of the form, where we replace the “Body” with “Description” and type in some .
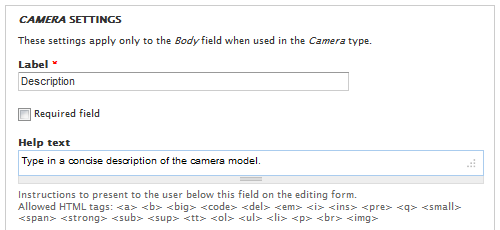
As for the elements of this form, is is a brief summary of all the settings:
- Camera settings:
- – The label to use for the field (here: “Description”).
- – check this box if this field can not be left empty.
- – Instructions to the user to help him or her when entering data for this field.
- – whether to apply text filters field's input.
- – the default number of rows for the text area widget
- – check this box to allow authors to type in an explicit summary.
- – a default value that is already filled in and visble to the user when the field is exposed (or none).
- Description field settings:
- – maximum number of values the user can enter for this field.
 It
is not possible to set the default filtered text format in this form.
The radio button toggles
whether the text format menu below the text field is enabled.
Whenever the text format menu is enabled
(radio button set to ), the
default format is always the formats with the lowest weight (to set up
weights, navigate to
).
Click when done fine tuning the Camera and Description field settings.
Adding fields
Now, we are going to add a couple of custom field to the Camera content type.
Start by navigating to . If you just installed Drupal, you'll see the two default content types (Article and Basic page that is part of core and enabled by default) and the new content type we just created (Camera).

The field will be used to indicate camera brand. To add it, go back to the list of content types, and click on in the row. This takes us back into the field manager. This time, we are going to add a new field where the user can pick the camera brand from a menu widget (Select list). The screen shot below shows how to fill in the row to add a new field labelled “Brand”.
Click on the link “manage fields” for the content type you want to modify (i.e. “Camera”). This brings you to the follwing screen.
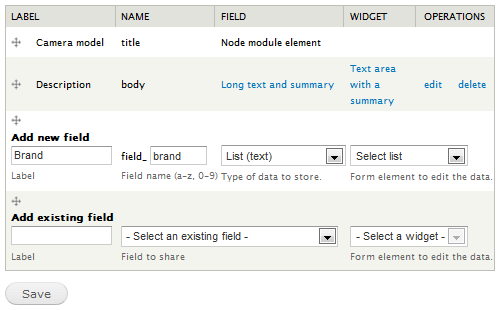
The first element () is the human readable label that is going to be used in various displays. You can change this later if you want to. For now, enter the label “Brand” into the form.
The second element () is the name that is going to be used internally by the database for the field. This name can not be changed later. Use the field name “field_brand” for the brand field.

The third element is the field type and is labelled . We pick the field type from a drop-down menu of available field types. The field type initially selected can not be changed, sp choose this carefully. With the only the default Drupal 7 core installed, the following field types appear in this menu:
- – For single line text.
- – For multi-line text areas (without or with summary).
- – For numeric content fields in various formats. Menus are stored as integers.
- – For boolean content fields.
- – Enumerated lists.
- – Taxonomy term reference.
- – External items that must be uploaded.
If contributed modules have been installed and enabled, more field types may appear in this menu.
You want to store the information about the brand in a compact and efficient format. Since there is only a limited number of camera brands in the world, an enumerated list with all of those we're interested in will work well. This is why we set “field_brand” to be of field type
The fourth and last item () determines the interface or widget to use for user input. Depending on the field type of data, the following alternatives exists in core:
- Text:
- - user types in the text.
- Long text, Long text and summary:
- - user types in the text.
- Integer, Decimal, Float:
- - user types in the numeric value.
- Boolean:
- – user selects the alternative from a controlled set by means of checkboxes or radio buttons. To not show the null option (“N/A”), tick “Required field”.
- – user ticks a checkbox (only two values possible). If you use the default value for booleans (1 and 0), the label will be empty unless you tick “Use field label instead of the "On value" as label”.
- List (float|integer|text):
- - user selects an item from a drop-down menu with controlled set of alternatives.
- - user selects the alternative from a controlled set by means of checkboxes or radio buttons.
- Term reference:
- - user selects an existing entity/user from a drop-down menu of titles/names.
- - user selects the entity/user by means of checkboxes or radio buttons.
- - user starts to type a entity title or user name, and a menu pops up with valid matches.
- File:
- - file upload form.
- Image:
- - image upload form.
 A
widget is an object for capturing, editing and validating
user input and possibly also displaying data, tied to the field type
of the data. In the field creation form, the widget is referred to as
“Form element to edit the data”. Installing a contributed project may
provide additional field types and widgets.
Picking the widget lets the designer create a list of DSLR camera brands that can be exposed to the user by means of a pull-down menu, radio buttons, or checkboxes.
After filling in or selecting appropriate values for and , click to save the Camera content type with the new field added.
After the
The is used to create a list of allowed of alternatives. It is possible to do this in two ways. The simplest method is to enter a list of values, one for each line. In that case, the value entered will be used a both key and label. Alternatively, the list may consists of pairs where a vertical bar character is used to separate the a key from a label. The key is the internal value stored in the database. The label is the string that will be displayed in pull.down menus, etc.
The screen shot below shows the allowed value list filled in. It is simply a list of allowed camera brands, one per line.
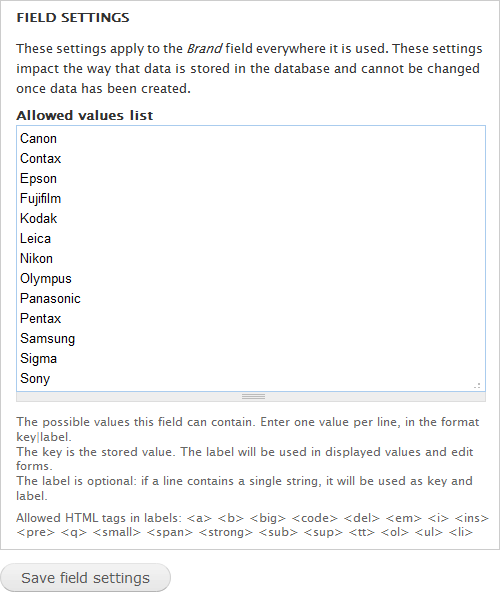
Click to save this list. This takes you back to the the the panel for the Camera content type. Now, to complete the configuration of the Brand field click on the link in the column.
We've already visited this form, when we set up the , etc. for the camera Description field. However, since the field type and widget is different (i.e. List (text) and Select list instead of Long text and summary and Text area with a summary), the list of settings are slightly different.
- Camera settings:
- – The label to use for the field (here: “Brand”).
- – check this box if this field can not be left empty.
- – Instructions to the user to help him or her when entering data for this field.
- – a default value that is already filled in and visble to the user when the field is exposed (or none).
- Brand field settings:
- – maximum number of values the user can enter for this field.
- – List of key|label pairs allowed for this field.
We want to make the brand a , and we also want to provide a sensible . Make sure is set to one.
After we've finished specifying the list of allowed values, we need to click on to save the list. This will take us back to the field management page. To complete the Camera content type, we are going to add an additional field, indicating the approximate selling price of the particular camera model.
We want the price to be in whole USD, so we set the type of data to store to . However we want the user to type in the price, instead of selecting from a list of controlled values. This is how to make a field for the price of the camera.

After filling in the form, click to save the price field. Then click on the link to the right of . This takes to a form where we can specify Camera settings and Price field settings:
- Camera settings:
- – The label to use for the field (here: “Brand”).
- – check this box if this field can not be left empty.
- – Instructions to the user to help him or her when entering data for this field.
- – Minimum allowed integer value (or blank).
- – Maximum allowed integer value (or blank).
- – Prefix to use for field (e.g.: USD).
- – Suffix to use for field (e.g. kg).
- – a default value that is already filled in and visble to the user when the field is exposed (or none).
- Price field settings:
- – maximum number of values the user can enter for this field.
We do not want to make the field required. Use the setting to indicate the currency of the price (e.g. “USD ” – notice the space). should be set to one.
When done, click , which again takes you back to the field management page for the Camera content type where the two newly created custom fields, “Brand” and “Price” appear at the end of the list of fields.
Before you leave the field management screen, rearrange the fields so that they appear in logical order in the form the user is going to fill in when creating camera content. Place at the top (before ). Place between and .
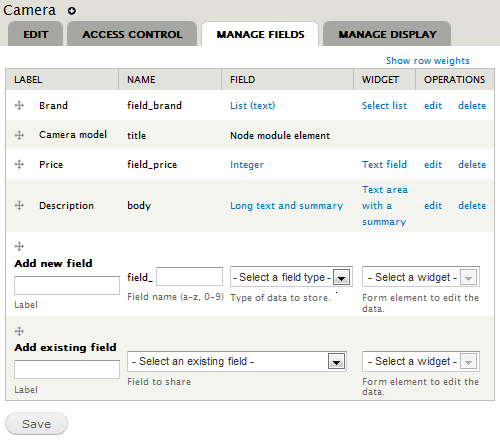
Drupal provides a drag&drop interface that makes it very easy to rearrange the sequence of fields in a form. Put the cursor over the the cross-shaped arrows on the and press the left button on the mouse. Drag the element into position using the mouse, and then release the button.
After arranging the fields in the appropriate sequence, remember to click to save the changes.
Ordinary users should be able to work with content of this new DSLR camera content type. This means that we must give the users permissions to create, edit and delete DSLR camera content. This is done by navigating to , checking the required permissions as shown below.
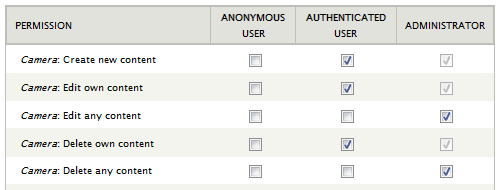
In the example, all authenticated users are allowed to create, edit and delete own camera content, but only the users that has the role of administrator are allowed to edit or delete camera content created by others.
Creating content

Now we're done creating the Camera content type. The next step is to test the new type. Log out of the Administrator account, and log on again as an ordinary user. Expand the menu. should appear, after the built-in types and .
Click on the link, and the form to create content of type Camera shall appear. The form shown below has been filled in with data about the Nikon D90.
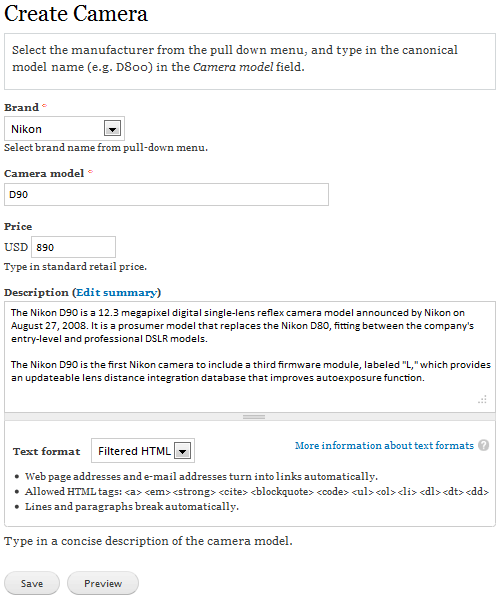
After filling in this form with data about a particular camera model, clicking the button below the form will save the content in the database.
Displaying a custom content type
So far, our interactions with the custom content type have all used the panel as a starting point. This panel lets us control how the fields are presented in the form that is displayed in the form, but does not determine how the content is displayed after it has been created. Now is the time to configure how this content type is to be displayed.
Click on the tab. This takes us to a form where we can set up various display formats. The display settings that are shown initially are for a Default format.
If the menu isn't expanded, click on it to expand it.
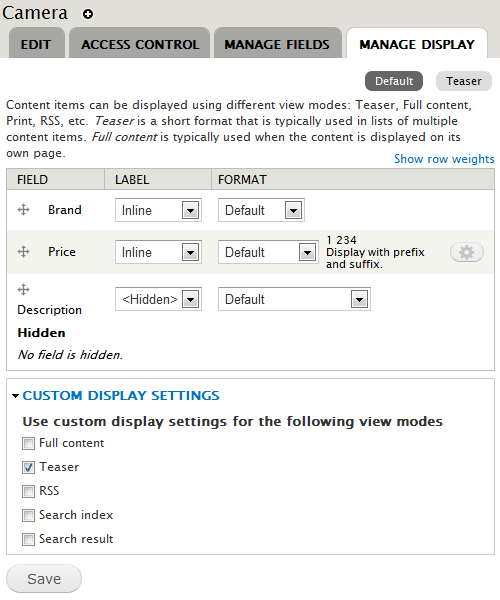
In the screen shot above, notice the tick mark next to the view mode. This means that we can customise how content is shown in the Teaser view mode by setting up a Teaser format. The Default format will at least be used for the Full content view mode. The Full content view mode is typically used when the content is displayed on its own page. It is also possible to create a custom format for the three other view modes (i.e. RSS, Search index, and Search result). We may do that eventually, but in this tutorial, we are going to leave those alone, which means that the Default view mode will be used for all view modes except Teaser.
Whenever we enable a custom view mode by placing a tick mark next to it in menu (and clicking to effectuate), a button corresponding to the view mode appear next to button near the top of the form. Clicking on the button takes to a form where we can configure the custom view mode.
But first, we shall configure the Default view mode.
We start out by reordering the fields. We want both the Brand and Price to appear above the Description, so we use use the mouse to drag them into the right order.
Each field has a column to determine where the label is to appear relative to the content stored in the field. The three options are:
- – show the label above the field data.
- – show the label in front of the field data, on the same line.
- – do not show the label.
The column determine how the content is displayed. The options available through the pull-down menu depends on the field type, but there is always a option to hide the content of the field. In this case, we just rely on the format for all three fields.
In the row, notice that an icon of a little cogwheel is present. Next to the cogwheel is a little summary of the current settings. In the screen shot above, the space in the sequence “1 234“ signify that space is used in an integer as thousands separator, and that any prefix and suffix is integrated into the display.
Clicking on the cogwheel icon expands the row and let us further customise how the price is displayed.
After setting up the Default view mode, click on the button below the form to save the settings.
If we set up the default display for the Camera content type as described above, the screen shot below shows how the display of a specific DSLR camera may look like:
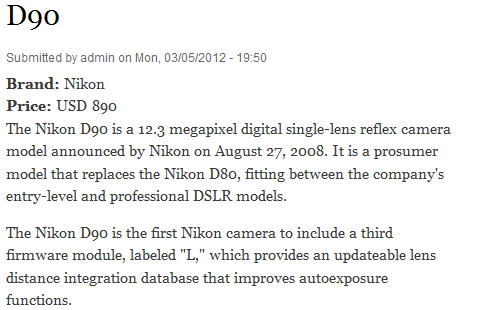
After we've verified that the default display is nice, we need to go back and configure the Teaser view mode. Again, we start out by putting the fields in the right order. However, in Teaser mode, we do not want show the full description, but only a trimmed version. Select the format for the Description field. Then click on the cogwheel icon to set the trim length to 300 characters.
The Teaser view mode is typically a shorter format that is used by Drupal in lists of multiple content items.
Final word
The Field module that is part of the Drupal 7 core is a very powerful tool in capable hands. This tutorial has demonstrated how to use the Field module to create a basic custom content type.
 Note
that we've just scraped the surface.
The Field module is anong the most powerful and versatile tools in the Drupal tool-chest.
You may want to visit the
community documentation
for more comprehensive coverage.
Last update: 2018-03-11.