Internationalisation
This chapter is intended to give you a basic understanding of how to create multilingual site using Drupal.
Table of contents
- Introduction
- Setting up
- Set site language
- Setting up a minimum multilingual environment
- Content translation
- Translations for custom projects
- Troubleshooting
- Additonal projects
- Final word
Drupal projects discussed in this chapter: Entity Translation, Internationalization, Localization update, Title, Variable.
Introduction
Drupal 7 lets you create multilingual websites where a page may exist in alternate versions in two or more languages. If no alternate version exist for the user's preferred language, the version in the primary language will be shown instead.
Setting up
To use other languages than English, you first need to enable the Locale module. This is a core module, but it is disabled by default. To enable it, navigate to and scroll down the list of modules until you locate the “Locale” module. Place a tick-mark in the box to the left of the module name, and scroll down to the bottom of the page and click on the button labelled “Save configuration”.

You also need to import translations of the GUI. Drupal offer several alternative ways of importing translated strings into a site. However, the best way is to make use of a module called Localization update to automate the process. If this module is not installed and enabled, do it now before proceeding.
You may also want to customise at least the following settings:
- : Set Default country, First day of week, Default time zone, Whether users may set their own time zone.
- : Set up formats to suit local conventions.
Set site language
Drupal has excellent support for using a language different from English as the site language.
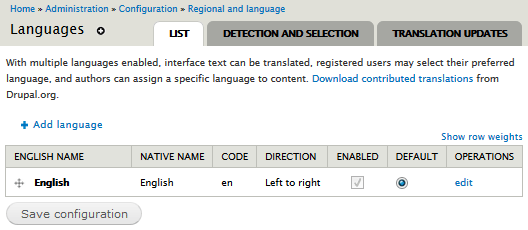
After enabling the Locale module, there will be a setting for in the section of the configuration page. Navigate to . There will be a language selection panel like the one shown below. Initially, “English” will be the only enabled language. However above the table listing enabled languages, there is a link labelled “Add language”.

When you click on the link, you will be shown a pull-down menu with additional languages. Select the additional language you want to use, and click on the button labelled “Add language”.
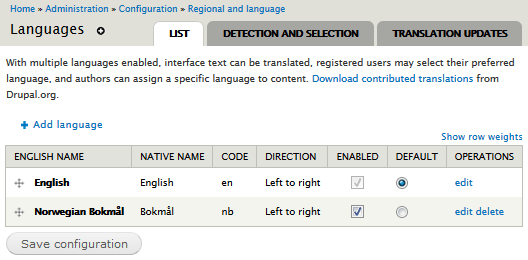
Now the added language will appear along with English in the table of enabled languages in the language selection panel. However, English will still be the default language. To make another language the default, toggle the radio-button in the column.

The “Translation updates” tab only appear if the Localization update module is enabled. It lets you configure a number of settings for your translations, including the path for the translations directory.

The “Detection and selection” tab let you set up detection method to determine what language to display to the user. You may use this to create a multi-lingual website where there are alternate versions of each page in different languages. However, the default setting is to have a default site language, and always use this language.

Just enabling a new language and setting it to be the default will not actually transform the user interface of the site into the new default language. Drupal will always fall back on English if there is no translation for the default language available. And so far, we've just set the default to be something different from English, but we've not imported any translated strings yet.
To do so, navigate to , and press “Update translations”. This will import updated translations for Drupal core and all enabled modules.
After importing the translations, you should clear the cache to make sure that pages are regenerated with new strings immediately.
Setting up a minimum multilingual environment
To set up a minimum multilingual environment for Drupal 7.
- Locale (core): Adds language import, and a non-English UI.
- Localization update: To automate translation downloads.
Here is a step-by-step description:
- Activate the core Locale module. This adds the Language switcher block, but do not activate it yet.
- Download and activate the Localization update module. While not strictly necessary it makes it much simpler to import translations.
- Navigate to the languages interface () and add a new language. In this chapter, I'll be adding Norwegian (bokmål).
- Navigate to and make sure all translations are up to date.
It may be a good idea to check that there is a “Path prefix
language code” (e.g. nb for Norwegian bokmål) for the all
non-deafult languages. You find this setting when you edit the
language. For the default language (e,g. English) leave this
blank. Alternatively, you may specify a “Language” domain” – but
doing so may break existing URLs.
Before you go ahead and translate contents, you need to enable “Multilingual support, with translation” for each of the content type that you needs translation.
To do that for a content type, navigate to and click on the “edit” link for the content type you want to translate. Under the vertical tab “Publishing options”, look for “Multilingual support” and activate the “Enabled, with translation” radio button. Then click the “Save content type”-button. Repeat for all content type that need a language specific translation.
This will produce a “Translate” tab on contents that has this enabled if the user has the permission to “Translate content”.
When at least one translation exists for a node. There will be a link to translations.
You may also want to activate the Language switcher block which will allow users to switch between languages. Navigate to . Look for Language switcher and set the region. Click the “Save blocks” button at the bottom of the page. Go to your Home page and check that the block is showing. Clicking the different languages will switch the interface back and forth between them.
If you enable one of the options for detecing what language to use listed if you navigate to , that method will be used to detect to select what language to show the user. The recommended pratice is to setit to “URL”. This will modify the path with the “Path prefix language code” or “Language” domain” set up for a language.
Content translation
To enable simple tranlation of nodes, enable the core Content translation module.
For configuration instructions, see DO: Translating content.
If you make content translatable, you probably also want to install and enable the following contributed module:
- Internationalization: Translation for front page content, site name, menus, taxonomies, field labels, views, webforms, etc.
If your site front page is a listing of promoted notes (the default in Drupal), enable the Multilingual select module (a submodule of the Internationalization module). If you've set up criteria for language "Detection and selection", only nodes with the selected language will appear on the front page.
If you're using a single node, or if you want to use a different path per language for the front page, the front page will not switch automatically depending on the language detection. You need to use the Variable translation module (also a submodule of the Internationalization module) to specify the default front page path for each language. This also makes the "Site name" a multilingual variable that can be translated.
Source DO HowTo: Different home page (default front page) for each language.
 There
is also the contributed module Entity
Translation. It allows (fieldable) entities to be
different languages. This is similar to the approach in Drupal 9 and later.
Translations for custom projects
For projects that have no tagged versions hosted on Drupal.org, you
may import local .po-files by uncommenting two lines in
the project's .info-file:
; Uncomment next two lines to import translations.
;version = "7.x-1.x"
;project = "hnm_console"
You normallly want those commented out when using drush
ups to check for updates, because the “project”
key will make drush look for a release on Drupal.org and not
finding one produces an error.
Troubleshooting
When updating translations, you may see the error message “translation strings were skipped because they contain disallowed HTML”. The watchdog log (recent log messages) will tell you what translations are affected.
There is a list of legal HTML markup The function that
in /includes/locale.inc (in
function locale_string_is_safe, line 562 in Drupal
7.60). The list currently looks like this:
'a', 'abbr', 'acronym', 'address', 'b', 'bdo', 'big', 'blockquote', 'br',
'caption', 'cite', 'code', 'col', 'colgroup', 'dd', 'del', 'dfn', 'dl',
'dt', 'em', 'h1', 'h2', 'h3', 'h4', 'h5', 'h6', 'hr', 'i', 'ins', 'kbd',
'li', 'ol', 'p', 'pre', 'q', 'samp', 'small', 'span', 'strong', 'sub', 'sup',
'table', 'tbody', 'td', 'tfoot','th', 'thead', 'tr', 'tt', 'ul', 'var'
In addition, “<br/>” is not allowed in translated strings, but “<br />” (notice space before slash) is.
Source: https://www.drupal.org/node/353908.
Additonal projects
- Variable: API for handling variable translation. Translate test and settings stored in variables.
- Entity Translation: Needed for other entities, such as those in Drupal Commerce.
- Title: To translate field titles.
Final word
[TBA]
Last update: 2020-10-10 [gh].