CKEditor
The CKEditor module will let users edit Drupal textarea fields with CKEditor. This is a so-called «WYSIVYG» (what you see is what you get) editor that lets users input rich text without having to use HTML markup.
 This
chapter contains links to Wikipedia. While Wikipedia is often helpful
by providing definitions, explanations and other useful information in
plain language, it is not an authoritative source. Content
on Wikipedia may be misleading and erronous. Use Wikipedia to read up
on and get acquainted with an unfamiliar subject, but do not
rely on it being factual. Citing Wikipedia in essays and other
scholarly writings is deprecated.
Table of contents
- Introduction
- Installing and enabling the module and library
- Disable Advanced content filter
- Drupal-specific classes
- Media file upload
- Test that media insertion works
- Enable Advanced content filter
- Create a WYSIWYG text format
- Configuring a WYSIWYG filter
- Installing foreign plugins
- Updating CKEditor
- Troubleshooting
- Final word
Drupal projects discussed in this chapter: CKEditor, Src whitelist, WYSIWYG Filter.
Introduction
By default, Drupal 7 expect users to use HTML markup to enter rich text. While most web developers are comfortable with this, it can deter casual contribution from other members of the user community who are not familiar with HTML markup.
To remedy this, the site builder may install a so-called «WYSIWYG» (what you see is what you get) editor that uses JavaScript to replace the Drupal textarea input field with an interactive editor interface that allows users to create and format their posts the same way you would in a typical word processor.
 An
alternative for adding WYSIWYG editing to a Drupal site
is a module named WYSIWYG. This is an API to
integrate several editors (including the library version of CKEditor) into a Drupal
7 site. The WYSIWYG module is incompatible with the
standalone version of the CKEditor module.
Do not install both.
There exists many JavaScript WYSIWYG editors, and most of them can be used with Drupal, but this chapter will focus on the standalone version of the CKEditor module. This module is the most popular choice for Drupal 7, and is part of core in Drupal 8/9.
Installing and enabling the module and library
To install the module, we start, as usual, by downloading the project and installing it below the modules directory on the site. You may do this with drush:
$ drush dl ckeditor -y
This downloads the Drupal 7 bridge module for the CKEditor library. This project does not include the Javascript editor library, which is a third party component, and not part of Drupal.
To get the editor library, go to the CKEditor.com website and click on the “download” link. At the time of writing there are four main alternatives to choose from: Basic Package, Standard Package, Full Package, Customize.
- In most cases, you should get the Full Package (currently
ckeditor_4.17.1_full.zip), unless you know your configuration require specific plugins. - Alternatively, you may build customized version of the Full preset with extra plugins.
If you customise, you should make a note of your customisations, so that you can reproduce the same configuration if you later need to update the library.
In this tutorial, the Full Package will be downloaded.
 To
create a customized version, first, click on “Online Builder” for the
“Customize” option, This takes you to a screen that let you choose a
preset (select the preset named “Full”). Then,
locate Widget under “Available plugins” and click on
the left arrow to move it to “Selected plugins”, select a “skin”
(“Moono” is nice), and add languages (if required). When done, agree
with the terms, pick the optimized version of the library and download
the zip-archive of the editor library.
Place the downloaded zip-archive inside the
main /sites/all/libraries directory and use a command
similar to the following command to unpack (the file name will include
a version number and a hash, indicated by the ellipises in the
example):
$ unzip ckeditor_…_….zip
Now is the time to enable the module, for instance using drush:
$ drush en ckeditor -y
Navigate to
and press the “edit” link for the “CKEditor Global Profile”. Verfy
that
“Path to CKEditor” is set to “%l/ckeditor” and that
“Path to the CKEditor plugins directory” is set to “%l/plugins”
(the %l refers to the directory ckeditor in the libraries directory)
The “CKFinder” file manager will not be installed, so its path can be anything.
Use the default settings for the radio buttons. I.e. aggregation disabled and Drag&Drop enabled.
This is all that is required to set up a default configuration of CKEditor on the site. To check it out, first clear all caches because all the settings of CKEditor is cached. With drush, you can do it with the following command.
$ drush cc all
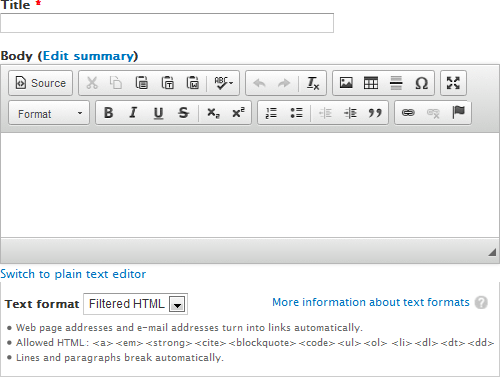
Then go ahead and create some content and be sure to select a text format recognised by CKEditor (e.g. Filtered HTML or Full HTML). You should now see the default text area replaced with CKEditor like in the screenshot below:
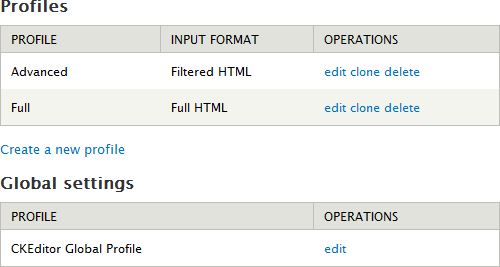
If you navigate to , you'll set that CKEditor already has been linked to two of the built-in text formats: Filtered HTML and Full HTML.
However, if you use filtered text formats to secure the site from bad markup by non-trusted users (and you should), using CKEditor without first configuring it is going to provide a strange user experience. Out of the box CKEditor will present the user with a larger repertoire of styles than the default text format for untrusted users (i.e. Filtered HTML) allows. If ACL is disabled (see below), all will appear to work fine inside the editor, but it will not be rendered on the site after the node has been saved. This means what the user will get (after saving her work) is not what she saw in the WYSIWYG editor.
As already noted the Filtered HTML text format permits the following markup:
<a> <em> <strong> <cite> <blockquote> <code>
<ul> <ol> <li> <dl> <dt> <dd>
What is permitted and possible in CKEditor is not synchronised with what is permitted and possible in Drupal 7. If you want this to be consistent, you must fix it yourself.
CKEditor, by default, supports several HTML elements that
are not recognised by Drupal's Filtered HTML, including
images. On the other hand it is not (yet) capable of rendering
descriptions list tags correctly, and also misses out on some other
markup such as <cite> and
<code>. To remedy this, you need to configure a
Drupal text format to match the capabilities of CKEditor, and
then adjust the GUI of CKEditor to match this format.
 Since
the editor emulates a typical browser using JavaScript, what is
rendered by the editor may not exactly match how a given browser will
render the same markup. For one thing, CKEditor knows
nothing about how your site is styled with CSS. The CKEditor
will give the user a good idea of what the output will look like when
published, but it is really a wysiawyg (What You See Is Almost What
You Get) editor.
Disable Advanced content filter
By default, CKEditor will filter content. To provide a consistent user experience, the “Advanced content filter” (ACF) should be enabled.
However, setting up CKEditor to use media plugins with ACF enabled is difficult. Until everything is confirmed is set up right and working correctly, ACL makes troubleshooting plugins harder.
So before configuring CKEditor for to use a plugin media file upload, navigate to both the CKEditor profiles (“Advanced” and “Full”), and disable the “Advanced content filter”.

It will be enabled again later.
Drupal-specific classes
The Drupal bridge module comes with some Drupal-specific classes that is in the subdirectory css of the module. To learn more about this, see the CKeditor support site.
Media file upload
By default CKEditor only allows images to inserted by means of a link, not by uploading them to the server. As noted in the chapter about security, this is not secure,
So the first thing to do is to get rid of the CKEditor tool to link to images files stored off-site.
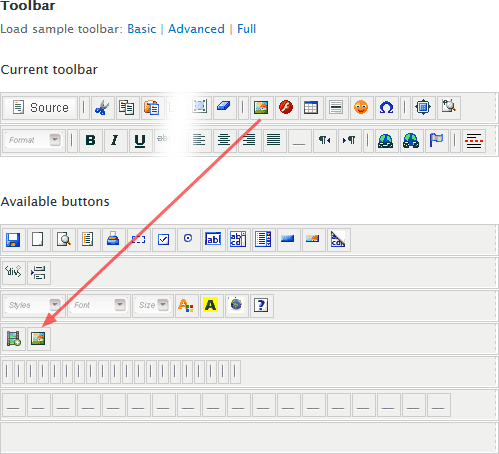
Navigate to . Then click on “edit” for the profiles that are going to use WYSIWYG. Expand the dialogue “Editor appearance” and scroll all the way down to “Toolbar”. Locate the icon for the “Image tool” on the “Current toolbar” and move it down to the “Available buttons” toolbar, as suggested by the red arrow in the illustration below.
 The
graphical appearance of these tools may vary.
However, the the Image tool will show the tooltip "Image" when you hover above it.
To manage digital media assets, you need to install a file uploader and/or digital asset manager. Refer to the chapter about managing media to learn how to install this component..
Test that media insertion works
At this point, you should have a working WYSIWYG editor and some means to upload media content. Before proceeding, test that inserting media into content works.
Enable Advanced content filter
After confirming that you're able to insert media content, you should turn ACF back on.
Navigate to and open the Advanced and Full profiles, and then for each expand the tab for “Advanced content filter”. Click the radio button to make ACF “Enabled”. Then click “Save”.
By default ACF works in automatic mode. This means that allowed content is automatically determined by whatever plugins, buttons, and commands are enabled in the GUI under the “Advanced content filter” for the profile.
However, you may want to allow more elements, attributes, styles
and classes than what is automatically allowed. You do this by adding
extra allowed content to the JavaScript configuration
variable config.extraAllowedContent. The syntax is:
elements[attributes]{styles}(classes)
For details about the syntax see under the heading “Custom mode example” on this page.
The Drupal CKEditor bridge module let you do this by filling in the text box with the title “Extra allowed content” under the tab “Advanced content filter”. Example:
div[*](*);iframe[*](*);img[!src,alt,title,width,height](*);code;dl;dt;dd
The example above allows the <div>
and <iframe> with any attributes and classes,
the <img> with the attributes listed and any classes, and the
<code>, <dl>, <dt> and
<dd> tags without any attributes, classes and styles.
 Some
may be surprised to see the
 <iframe> here, given that the <iframe>
HTML element is insecure. However, ACL is not a text sanitation whitelist filter,
so excluding it from ACL will not really improve the security of the site. Since we are going to
permit whitelisted iframe URLs, we also need to tell ACL about it.
To adjust the Format pull-down menu of the CKEditor GUI, adjust text box with the title “Font formats” under the tab “Cleanup and output”. The default is:
p;div;pre;address;h1;h2;h3;h4;h5;h6
I prefer to exclude <h1> because this tag is
reserved by Drupal for the title field and I don't want to
encourage users to create a one or more <h1>
headlines within the body of a node. I also prefer to exclude
the <address>-tag since it is not much used. The
following setting is what I use:
p;div;pre;h2;h3;h4;h5;h6
The Drupal bridge module also provide a text box for JavaScript assignments. This is “Custom JavaScript configuration” under the tab “Advanced options”. This means that you can also set configure “Extra allowed content” and “Font formats” here. The following assignmnts is equivalent to those set above:
config.extraAllowedContent
   = 'div[*](*);iframe[*](*);img[!src,alt,title,width,height](*);code;dl;dt;dd';
config.format_tags = 'p;div;pre;h2;h3;h4;h5;h6';
However, you use JavaScript to set these if these values are already set under “Extra allowed content” and “Font formats”.
After you've configured the ACL, you must click “Save” to save the CKEditor configuration.
 ACL
is not a text sanitation whitelist filter. Users
can bypass it by using CKEditor is source mode. However, ACL can be
configured to purge the junk markup that is included when content is
pasted into CKEditor from MS Word and other sources with messy markup. Unfortunately, ACL is not well understood, and many tutorials
about setting up CKEditor suggest you disable ACL (typically
suggesting the following JavaScript
assignment:
 config.allowedContent = true;). Don't do
this. Take the time it takes to configure ACL correctly for your
site.
Finally, we want to adjust the editor appearance for the Advanced profile to make it correspond to the Filtered HTML text format: Click on the edit “edit” link for the Advanced profile and expand the “Editor appearance” tab. Scroll down to the toolbar area and load the sample toolbar named “Basic”. This toolbar is a much better match for the Filtered HTML text format that by default is linked to the Advanced profile, so to save it, scroll down and click on “Save” to save the modified Advanced profile.
Create a WYSIWYG text format
Both the predefined text formats that is defined by the core has
the text filter “Convert line breaks into HTML”, enabled. This filter
replaces a <br><br> with
a </p><p>. This misfeature breaks up the
paragraph. If the content author uses <br> to make
a class such as rtecenter apply to multiple lines, this
replacement implemented by this filter only makes the first line
centered.
Changing predefined text formats is undesirable. To create a new text format, without this misfeature, navigate to and click on “Add text format”. Select a name for the format (e.g. call it “Wysiwyg”). Enable it for all user roles.
As for enabled filters:
- If Scald is used for media management, “Embedded atoms” must be enabled.
- Optional: “Convert URLs into links” and “Correct faulty and chopped off HTML”.
If you use all three filters, the recommended filter processing order is the following:
- Embedded atoms (if Scald is installed)
- Convert URLs into links
- Correct faulty and chopped off HTML
After configuring the text format, scroll down to the bottom of the acreen and press “Save configuration”.
Configuring a WYSIWYG filter
The just created “Wysiwyg” text format has no restrictions what markup the user may input. This is inscure. Before untrusted users can be allowed access to the advanced features of CKEditor we need to set up custom text sanitation on the user input.
The text filter that is in core to restrict user markup (i.e. “Limit allowed HTML tags”) is too coarse for this task. Luckily, there exists contributed projects that let us set up a sufficiently fine grained text filter.
There are quite a few contributed projects created for this purpose, but in this tutorial, we are going to describe how to use the WYSIWYG filter and the Src whitelist filter to whitelist user input. You may want to read the section about text sanitation to see what markup is safe.
First download, install and enable the WYSIWYG Filter and Src whitelist projects. With drush:
$ drush en wysiwyg_filter -y
$ drush en srcwhitelist -y
Navigate to and click on “Configure” for the filter named “Wysiwyg”.
Enable the “WYSIWYG Filter” and “Src whitelist” in addition to those already enabled for this format. If you use all five filters, make sure the filter processing order is the following:
- WYSIWYG Filter
- Src whitelist
- Embedded atoms (if Scald is installed)
- Convert URLs into links
- Correct faulty and chopped off HTML
Whitelist image and iframe sources
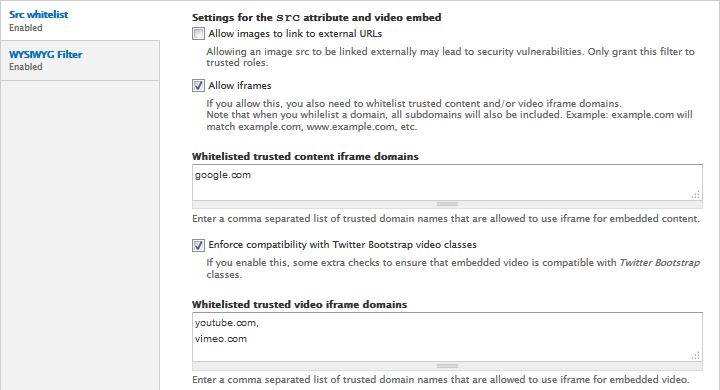
Scroll down to the “Filter settings” for the “Src whitelist” filter. Do not allow images to link to external URLs, as this is insecure. However, if you want users to use link to embed contents such as Google maps and YouTube videos, you need to Check the box “Allow iframes”. List the iframe domains you wish to whitelist for cotent and for video. If you use Twitter Bootstrap you may also want to check the box to enable this, some extra checks to ensure that embedded video is compatible with Twitter Bootstrap classes.
After configuring the filter, scroll down to the bottom of the acreen and press “Save configuration”.
 An
alternative to Src whitelist is the
Video Filter module.
There is also a tutorial about how to apply it to CKEditor:
WebWash: How to Embed Videos using Video Filter in Drupal 7.
For more options, see: Embed media in Ckeditor field for Drupal 7.
HTML elements and attributes
Scroll down to the “Filter settings” for the “WYSIWYG Filter”.
The whitelist for HTML elements is written using the syntax of the TinyMCE valid_elements format. The general format are:
element[attributes],
- Element definitions are separated by “
,”. - Attributes are enclosed by “
[]” and separated by “|”. - Some special characters In the list of attributes:
- The character “
@” is used to whitelist a common set of attributes for all allowed HTML elements. - The character “
!” is used to make an attribute required. - The character “
<” is used to introduce a list of legal values separated by“?”.
- The character “
The following differs from the semantics of TinyMCE:
- The character “
@” applies to all allowed elements (not only to the following). - The character “
/” triggers a bug (do not use it).
The following is an example:
@[class],
a[!href|title],
div[align<center?justify?left?right],
p[align<center?justify?left?right],
img[src|alt|title|width|height],
h2,h3,h4,h5,h6,
span,em,i,strong,b,u,strike,s,
blockquote,pre,address,sub,sup,
ul,ol,li,hr,br,
table,tbody,caption,tr,td,
iframe[src|allowfullscreen|width|height|frameborder]
The image tag are usually considered insecure because
certain attributes makes it a vector for XSS attacks. In the example,
I've included the <img> tag in the suggested
whitelist, but only with the whitelisted attributes. By whitelisting
only these attributes, and by not allowing users to link to
external URLs (see the previous section),
letting untrusted users insert images in
content is no longer a security risk.
However, in the end you need to decide what markup to use yourself.
If you use Scald for media management, you need to
whitelist following attributes to <div> to allow
pictures to be inserted:
div[align<center?justify?left?right|data-scald-align|data-scald-context|
  data-scald-options|data-scald-sid|data-scald-type]
In addition, Scald requires HTML comments to be enabled. There is a radio button that lets you set that.
The style attribute
If you allow usage of the style attribute (not
recommended), you must whitelist which style properties are allowed
and/or specify explicit matching rules for them using the checkboxes
in the “properties” section. By default, all properties are
disallowed.
Attributes class and id
If your HTML elements and attributes whitelist allows
the class attribute, you need to either whitelist the
class names to allow in the text field “Rules for Class Names” or check
“Bypass Rules for Class Names”.
The same goes for the id attribute.
Policy
This section lets you set a policy for the rel attribute.
Finishing WYSIWYG filter configuration
To save the configuration you've created for the WYSIWYG filter, press “Save configuration”.
After saving the Wysiwyg text format, allow non-trusted users to access it, and make it the default by moving it to the top of the list of text formats, as shown in the screen shot below.

After creating the Wysiwyg text format, the format must be linked to a CKEditor profile to be usable.
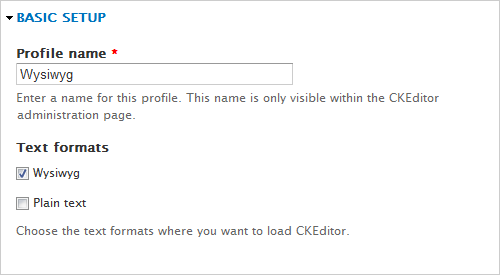
Navigate to and open the Full profile. Expand the “Basic setup” tab and link it to the Wysiwyg text format.
 You
should test your configuration of the carefully before
proceeding. In particular: Make sure that you are able to insert
images into content, save the content, and reopen it for editing
without losing the image.
Finally, create a CKEditor editor profile: Navigate to and clone the Full profile. Expand the “Basic setup” tab and name the cloned profile Wysiwyg. Link it to the Wysiwyg text format.
Installing foreign plugins
There exists plugins for CKEditor that doesn't have a supporting Drupal module for easy integration and don't work with the toolbar drag & drop feature. It is still possible to add such plugins to an existing Drupal CKEditor configuration.
 First,
you need to review installation instructions that comes with
the plugin. These do not take the Drupal CKEditor
bridge module into account and will typically suggest that you add lines
like
 config.extraPlugins to CKEditor's config.js.
You should not follow such instructions to the letter. They need to be adapted for Drupal.
It is recommended to not edit the config.js
configuration file that is distributed with CKEditor, because you may
overwrite it accidentally when you update the editor.
The CKEditor module is designed to allow for most configuration
through the configuraton section in the Drupal administrative GUI.
If you need to, you can adjust CKEditor to your needs by changing the ckeditor.config.js configuration file
in the main module directory.
As an example, I shall install the commercial plugin Bootstrap Panel that adds a widget to insert a Bootstrap panel in the text. This particular plugin that does not work with the toolbar drag & drop feature that can be used for most plugin installs, so we need to add the widget icon for this plugin to the toolbar manually.
First, after downloading the plugin, unpack it in the plugins directory inside the Drupal CKEditor directory
(after doing this, the directory /sites/all/modules/ckeditor/plugins/bootstrapPanel should exist).
Now you're ready to add the plugin to your CKEditor configuration. If you're unable to add the plugin by means of the toolbar, you may turn off the toolbar and add the plugin-icon manually.
To turn off the toolbar, visit the adiministrative GUI on your Drupal site and navigate to . Under “Global settings”, click on “edit” for the “CKEditor Global Profile”. Scroll down to the bottom of the screen and select “Disabled” for “Use toolbar Drag&Drop feature”. Then press “Update the global profile”.
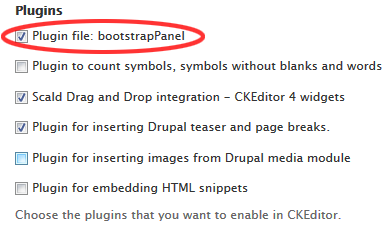
You can now navigate to . Under “Profiles”, click on “edit” for the profile you want to change Expand “Editor apperance” and scroll down to the “Plugins” section. Enable the “bootstrapPanel” plugin by ticking its checkbox, as shown in the screenshot below.
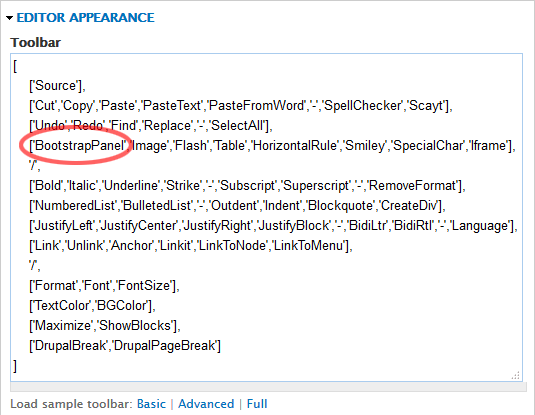
Next, scroll up to the “Toolbar” section. This section is now a text field exposing the plugins that shall appear on the toolbar. Add “BootstrapPanel” as shown in the screenshot below:
Finally, press “Save” to save your changes, and clear all Drupal caches.
If you've updated a plugin, you also need to clear the browser’s cache for the changes to have any effect.
 For a more extensive discussion of how to add plugins manually,
may also want to read Adding CKEditor Plugins Manually in Drupal
by Margot Kapačs. He describes how to add a plugin as part of the CKEditor module, how to create a standalone module for adding
a plugin, plus some really helpful hints about troubleshooting a plugin installation.
Updating CKEditor
Updating the CKEditor module
If you use use drush to download a new version of CKEditor from Drupal.org.
If the Javascript library lives vbelow the bridge project (deprecated),
it is recommended to back up the ckeditor subdirectory before downloading.
For instance you may do the following:
$ mv ckeditor/ckeditor ckeditor_backup
$ drush dl ckeditor
$ rm -rf ckeditor/ckeditor
$ mv ckeditor_backup ckeditor/ckeditor
Updating the CKEditor library
If you're using the CDN version of CKEditor, what version
is pulled is determined by this constant
in ckeditor.module. It will be updated as part of the
PHP codebase when new versions become available.
define('CKEDITOR_LATEST', '4.17.1');
If you've downloaded and installed a library, you need to update the library.
You may want to update the CKEditor for two reasons:
- To run a newer version of the library.
- To change to a custom built version.
To determine the version of the CKEditor library installed on your
site, look in your site's status report
(i.e. ) or in the
file CHANGES.md in the library's top directory.
To check if there is a more recent version the editor library, go to the CKEditor.com website and click on the “download” link.
If you want to update, first build the zip-file of the version you
want. If you need to update a customized version of the library,
refer to your notes from the you first installed the library, to make
sure you build te same configuration. When done building the zip-file,
download it, and place it the
/sites/all/libraries directory.
To be able to roll back, first rename the existing library subdirectory to include the version number. Then unzip the new vesion. If you're updating a full version from 4.16.2 to 4.17.1, the following commands will do it quietly:
$ mv ckeditor ckeditor_4.16.2
$ unzip -q ckeditor_4.17.1_full.zip
Unzip may not set the right permissions. If your site is on a server provided by HNM AS, you can use fixperms in the siteroot to fix this.
For example, if the siteroot is /var/www/eample.org, do:
$ cd /var/www/example.org
$ fixperms
If you don't have access to fixperms, use chmod to make all the library files readable by the web server.
Clear the browser's JavaScript cache to get rid of the old version. Test it out. If you're confident all works well, you may delete the backup copy of the library. E.g.:
$ rm -rf ckeditor_4.16.2
Troubleshooting
To check if the bridge module is able to locate the library,
navigate to . The bridge module looks for the library in two
directories:
sites/all/libraries/ckeditor/ and
sites/all/modules/ckeditor/ckeditor/. It should be
under libraries.
One of the most common errors with CKEditor is a JavaScript error where the node edit-body field does not display. Instead there is just an unresponsive gap. What this tells you is that the JavaScript is not working, but not why it is not working. Unfortunately, there is a lot of things that can go wrong. Below are some troubleshooting suggestions.
- First make sure that JavaScript works on the site and in the user's browser. Test some other site feature that uses JavaScript.
- In the CKEditor profiles, expand the “Editor appearance” section and make sure “Language” is set to “English”.
- Check version of the library. If it is outdated, upgrade it.
Hints for troubleshooting inline images:
- If SCALD is used for image media, and the widget to insert images in the body does not appear, check the settings for the content type's body field. Make sure that both “Drag'n'Drop” and “MEE” are enabled.
- If images appear inside the WYSIWYG editor, but not on the saved page, check “Text formats”. Make sure your format does not use a filter that strips images.
Final word
As an alternative to a WYSIWYG editor, many websites prefer to provide their users with a non-WYSIWYG content creation tool that is based upon some lightwight markup language is combination with a plain text editor. The two most widespread lightweight markup languages are BBCode and Markdown.
The BBCode markup language is much used on online message boards, including the Ultimate Bulletin Board. To make this language available to Drupal users, install the Bbcode project.
The Markdown markup language is used on a number of popular websites, including StackExchange, reddit, Diaspora, OpenStreetMap, GitHub and SourceForge. To make this markup language available to Drupal users, install the Markdown project.
Last update: 2019-10-02 [gh].