Drupal: Taxonomy access control module
This chapter introduces the Drupal 7 taxonomy framework, with some examples of how to use taxonomies.
Table of contents
Introduction
Let's say you use Drupal 7 as the CMS for a website and you want to do any of the following:
- having groups of users, where each group only have access to its own content area,
- assign writers and editors to work on only specific sections of the site;
- use the site to receive collectively authored student assignments;
- create a locus of collaboration for parallell workgroups.
What all the above scenarios have in common is that they require a type of group access control this is not easy to implement using Drupal's standard role based access control as implemented in projects such as Content access, where access rules are tied to.
However, there is a module to let us do this. This is Taxonomy access. There are four steps:
- Categorize the site with the Taxonomy module.
- Create user roles.
- Set role access control with the Taxonomy access module.
- Assign users to the newly-created roles.
The rest of this tutorial will use as an example a website that will have content areas for two groups: academic and business. The goal is to restrict access and editing of each group's area to members of that group.
Before starting, make sure the Taxonomy module is enabled, and that the Taxonomy access module is installed and enabled.
Step 1: Taxonomy
Go to Structure → Taxonomy → Add vocabulary. Add a vocabulary called “Group”,
with the two terms: “Academic“ and “Business.“
Set up the Article content type to be tagged with this vocabulary.
When users an article, they will have a chance to categorize it under one
of these groups. So far, anyone can write for any group. The next four
steps will restrict that privileges.
Step 2: Roles
Go to administer → user management → roles. Add a
role called “academic staff.“ Click “edit
permissions“ for that role. Check everything under “node
module“ except for “administer content types.“ This
gives your editors the ability to edit. Add another role called
“Business staff“ and give them the same
permissions. Ensure that you have disabled “edit page
content“ and “edit story content“ under Node
Module.
Step 3: Access Control
Download and install the taxonomy_access
module if you haven't already done so. Read the module's documentation
now, or what follows may not make sense. Go to administer →
user management → taxonomy access: permissions. Click on
“edit“ next to “authenticated user.“ Expand
the “Groups“ menu. You should see three rows:
“Default,“ “Academic,“ and
“Business.“ Set View to Allow, Update to Deny, and Delete
to Deny for both groups and the default. Check “List“ and
uncheck “Create“ for both groups and the default. This
ensures that average users won't be able to modify any group's
area.
Now go back a screen and edit the academic staff's permissions. Since you're currently editing the academic staffers' privileges, you want to enable editing of their group's content and disable editing of the Business group's content. Set Update and Delete to Allow in the Academic row. Check “Create“ in the academic row. Check “List“ in both rows. Set everything else to Ignore. Repeat the process for Business.
Step 4: Assign Users to Roles
Go to administer → user management. Click “edit“ next to a username and assign the user to either group. That user will now be able to edit her group's area, but not the other. If you want, you can give users access to both by assigning them to both roles.
It is important to remember that the “areas“ you have created are really an abstract thing. A node is part of an area simply by virtue of its categorization. To make your areas more concrete, you can pages that automatically list the nodes for the group. To do that, you can make a link or a menu item like this:
<a href="taxonomy/term/1">Academic</a>
where 1 is the term id for Academic.
These steps create an editor role that has full executive control over its group. You will probably also want to create writer roles with scaled-back powers (probably just Create and not Update or Delete).
Introduction
This tutorial was inspired by the above article. But we take things a little bit further, describing a solution with even more fined-grained control using the same taxonomy-based approach. This first tutorial addresses the 'groups' functionality in our requirements. A second tutorial http://drupal.org/node/201673 adds powerful multisite functionality using exactly the same approach.
We need a solution with the following requirements:
- Separate content area for each group or department of an organization (private zone)
- Members of a group must be able to create any type of content
- Assign writers and editors to specific sections of an online publication, or create a locus of collaboration for each of organization's clients.
- Access to some content on each private part must be able to be limited to a group of people. Groups need to be able to have their own Group pages.
- Anonymous user can see only content marked as "Public"
- Authenticated user can view and create "Public" and "Restricted" content.
What all the above scenarios have in common is that they require access control – that is, access to certain parts of your site must be restricted to certain users.
In order to satisfy the group requirements you might come up with a pretty solution based on the Organic Groups family modules, installing at least 2-3 additional modules.
This tutorial describes an alternative, probably cleaner, solution for groups using the core taxonomy module and the contributed taxonomy_access modules
When building a site you must consider future changes and upgrades to next Drupal releases. Therefore it is better to use as much as possible from the Drupal core and as few as possible contributed modules. The updating of contributed modules can be very slow and sometimes the author of a module might even abstain from upgrading his module for a newer Drupal release.
This tutorial assumes a reader has a basic knowledge about drupal system.
Implementation
This tutorial will describe how to build the required solution step by step. There are 6 steps:
- Install Drupal.
- Install Taxonomy_access module.
- Categorize the site with the taxonomy module.
- Create user roles and assign users to the newly-created roles.
- Set role access control with the taxonomy_access module.
- Test.
The rest of this tutorial will use as an example a company website (example.local) that will have site areas and content for two groups :
finance department and planning department. The goal is to restrict editing of each department's area/content to members of that department. But also we need to restrict the visibility of some content only to department members, other content to general authenticated users in the company, while some content should be visible on the homepage of the company website.
1. Install Drupal
The process of Drupal installation is described very well in its INSTALL.txt.
This tutorial is written for Drupal 5.x version
Thus we are not going to go here into details. Make sure you have installed Drupal, created a database and you have successfully created the first user (username 'admin')
2. Install the taxonomy_access module
We need this module to achieve a fine-grained access policy for our departments. In the folder where you have you drupal files go to the sites/all folder and create a new folder "modules" here. Download (http://drupal.org/project/taxonomy_access) and extract the
taxonomy_access module in the newly created folder. This tutorial is based on the dev version, taxonomy_access-5.x-2.x-dev
(http://drupal.org/node/153216). This newer version introduces some important SQL optimisations, which drastically reduce the number of database records required for sites with a large number of terms and roles. The admin interface has been updated to allow you to keep your access rules lean and mean.
Login as your admin user and go to Administer > Site building > Modules. Tick taxonomy_access checkbox and click "Save configuration" button. That's it.
3. Categories
Next we are going to categorize the site with the taxonomy module. If you are not familiar with it, the taxonomy help page explains simple usage of it. Go to administer > content management > categories.
3.1 Groups
First we will define a vocabulary that will contain our groups (departments). Create a new vocabulary "Groups". On creating the new vocabulary make sure you select all content types you want to be categorised by terms in this vocabulary (e.g. Page, Stories) . Leave 'hierarchy' disabled for now. You can build your groups hierarchy later. Check the "Multiple select" checkbox - this allows nodes to be assigned to more than one group (required in cases where you want your content to be available to more than one group).
Then add new terms in your Groups vocabulary. First is our Finance department and second is the Planning department. That is it for groups. You can extend this vocabulary as you want.
3.2 Access
Now we are going to declare levels of access using another vocabulary. Create a new vocabulary and name it "Access". On creating this vocabulary make sure you have selected the same content types as you've done for the Groups vocabulary. Disable 'hierarchy'. Check the
"Required" check-box - this assures that every node must have at least one access level.
Add the following terms:
- Public - A node marked as "Public" will be visible for anyone in the world (anonymous users)
- Restricted - visible only for Authenticated users
- Private - only group members can see it
This vocabulary just declares our Access levels. Next we are going to define them and make it all work as each term indicates.
4. Create user roles - and users.
Before defining our access policy we should add one more component: Roles.
In this tutorial we allow an authenticated user to create stories. Edit the role "authenticated user" (administer > user management > access control) and give it these permissions: "access content", "create story content" , and "edit own story content".
"Groups As Roles": there must be a one-to-one relationship between the terms in our Groups vocabulary and corresponding roles. We need a role for each of our groups.
Go to administer > user management > roles and add two new roles:
- "group - finance" - Assigning this role to a user we will make that user a member of Finance Group
- "group - planning" - Assigning this role to a user we will make that user a member of Planning Group
These groups are just simple labels so far and we are not going to assign any permissions for them.
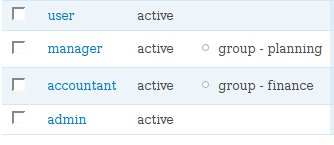
Don't forget about users. Create two new users in your system:
- username: 'accountant' (choose your own password) - and make that user a member of the Finance group, by giving the user the "group - finance" role.
- username: 'manager' - and make that user a member of the Planning group, by giving that user the "group - planning" role.
For testing purpose add one more user. This user should not be a member of any group: username: 'user'. Do not assign any role. All registered users have the authenticated role assigned by default.
Your User's list should look like this.
5. Set role access control with the taxonomy_access module
First read the module's documentation, that will help you to understand things better. (Administer > Help > Taxonomy Access Control)
Go to administer > user management > taxonomy access: permissions. You should see a list of roles registered in your system.

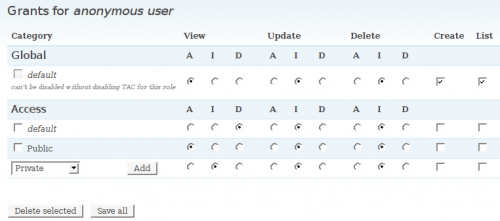
5.1 Permissions for anonymous user.
Rule: By default, an anonymous user must be denied access to any content which is not categorised as "Public".
Click on "edit" next to "anonymous user." There is a drop-down list box at the bottom just above the delete and save buttons. Select the "default" item under "Access".
Set View to Deny, and for Update and Delete, set Ignore. Untick the checkboxes for Create and List.
Press the "Add" button and "Save All". Removing the ticks for Create and List mean that the user cannot create nor list any content categorized by the Access vocabulary.
This is the default access policy for an anonymous user. We just denied the user access to any categorised content. But we need to give the user permission to see content from the "Public" category. Thus, we need to define an exception to the above "default" rule.
Select "Access - Public" in the drop-down list. Set View to Allow, and for Update and Delete, set Ignore.
Untick the checkboxes in Create and List. Press the "Add" button and "Save All". We have granted access to view "Public" content. You might set "List" checked, then your visitor will see a "Public" link in each node. But we removed it because visitors should not know about our access categories.
Your screen should look like this:
5.2 Permissions for authenticated user
Rule: All authenticated users are allowed to access, create and list "Public" and "Restricted" content, but not "Private" content, unless a user is member of a group. Users should know about all groups existence.
Next, go back to administer -> user management -> taxonomy access: permissions.
Click on "edit" next to "authenticated user". We must explicitly define grants for all access levels for this role, because all registered users have this role by default.
Select "Access - Private" in the drop-down list. Set View to Deny, and for Update and Delete, set Ignore. Untick the checkboxes for Create and List. Press the "Add" button and "Save All".
Select "Access - Public" in the drop-down list. Set View to Allow, and for Update and Delete, set Ignore. Tick the checkboxes for Create and List. Press the "Add" button and "Save All".
Select "Access - Restricted" in the drop-down list. Set View to Allow, and for Update and Delete, set Ignore. Tick the checkboxes for Create and List. Press the "Add" button and "Save All".
And we must let our users to be aware about the existence of groups. Select "Groups - default" in the drop-down list. Set Ignore for View, Update and Delete. Tick the List check-box only, and untick the Create check-box. Press the "Add" button and "Save All".
Your screen should look like this:

5.3 Permissions for groups.
Rule: Group members must conform to the access policy defined by the "authenticated user" role. But additionally they must be able to access, create and list "Private" content assigned to a group of which they are a member.
A user cannot become a group member unless the user is a registered user of the site. Once a user registers and joins a group, the user receives permissions given to the "authenticated user" role and those given to the "group - NAME" role as well as grants (defined in taxonomy access) for each role.
Users with multiple user roles: Allow/Ignore/Deny options are interpreted only within one user role. When a user belongs to multiple user roles, then user gets access if ANY of his user roles has the access granted. In this case, permissions for the given user are calculated, so that the permissions of ALL of his user roles are "OR-ed" together. Meaning that Allow will take precedence over Deny.
First we define grants for the "Finance" role/group.
Go back to administer -> user management -> taxonomy access: permissions. Click on "enable" next to "group - finance".
Select "Access - Private" in the drop-down list. Set Ignore for View, Update and Delete. But tick the checkboxes for Create and List. Press the "Add" button and "Save All".
But our rule requires that a user should not be allowed to create content in a group of which that user is not a member.
Therefore, select "Groups - default" in the drop-down list. Set Ignore for View, Update and Delete. Untick the checkboxes for Create and List. Press the "Add" button and "Save All".
But a user must be able to access, create and list all content of his group.
Select "Groups - Finance" in the drop-down list. Set Allow for View and Ignore for Update and Delete. Tick the checkboxes for Create and List. Press the "Add" button and "Save All".
If you want your group members to be able to edit content written by other members in the same group, you might set Allow to Update in that group. Or you might define a new role (group-finance-admin) for that and configure grants within that role. But here we keep it simple.
The result should look like this for your Finance group.

Repeat the whole process for the Planning Group. Go back to administer -> user management -> taxonomy access: permissions. Click on "enable" next to "group - planning". Use the "Planning" item under "Groups" in the drop-down list now.
After you have finished, the result for Planning should look like this.

Remember that you need to rebuild the node access permissions on existing pages before the changes you make will be effective. You can do this under "Post Settings"
6. Test
Let us now see how it works.
To make it easier to see how it all plays out, let us create a block with a list of our groups. Each item in that list will be a link to the content of the corresponding group.
Go to Administer > Site building > Blocks. Click on the "Add block" link. In the "Block description" field put "Groups". Then put the following PHP code inside the "Body" text-box:
<?php
$vid = 1; // The vid is the vocabulary id of the Groups we wish to list terms from.
$items = array();
$terms = taxonomy_get_tree($vid);
foreach ( $terms as $term ) {
  $items[] = l($term->name, 'taxonomy/term/' . $term->tid);
}
if (count($items) ) {print theme('item_list', $items);}
?>
Below "Body", expand "input format section" and select the "PHP code" option. Click the "Save" button.
Next define a region for this new block. Choose "left sidebar" and set the Weight to 1. Click "Save". Add a block title by clicking "configure" next to block. Put "Groups" in the Block title field. Save.
Your block should now look like this.

Log in as the "accountant" user. Click on the "Create content" link. Then create a story. Being logged in as the accountant user (member of Finance group) you can see only "Finance Group" in the Groups list box.
The accountant user cannot create any content in other groups.
Fill the Title text box, select Finance Group in Groups list-box, and make this a Public announcement by selecting Public (anonymous users) from the Access drop-down list. Write something in the Body text-box and submit it.

Log out and check if the anonymous user can see the new story.
Then, if you create another story and set Access to "Restricted" your public site visitors will not be able to access this story. Only registered users will be able to - including Our "manager" and "user".
Next try to create a private story.

In this case, neither "manager" (a member of another group) nor "user" (simple user) nor anyone (anonymous user) from the world can access the private story, only Finance group members.
Conclusion
It is important to remember that the "areas" you have created are really an abstract thing. A node is part of an area simply by virtue of its categorization.
Everything described here was fully tested. A database dump with the configuration described in this tutorial is available for download and import into your own database. (This configuration assumes you have put the taxonomy_access module in the ./sites/all/modules/ folder.)
Download database dump: http://drupal.org/files/gar_tutorial_nb_dump_sql_tar.gz
We would be happy to answer your questions related to the approach described. But we also ask for your feedback on this approach,
whether it has advantages over others, or whether there are problems we have not realised.
Please also see our second tutorial http://drupal.org/node/201673 showing how to extend this approach to create a multisite installation.
Final word
[TBA]
Last update: 2012-02-23 for D7 [gh].