Building your first apps with Xamarin
Mumble
Table of contents
Introduction
This tutorial provides step by step instructions about creating a “Hello World”-app using Xamarin Forms.
There are detailed instructions in a 5:03 YouTube-video embedded from: docs.microsoft.com: Build your first Xamarin.Forms App. The same place provide step by step written instructions.
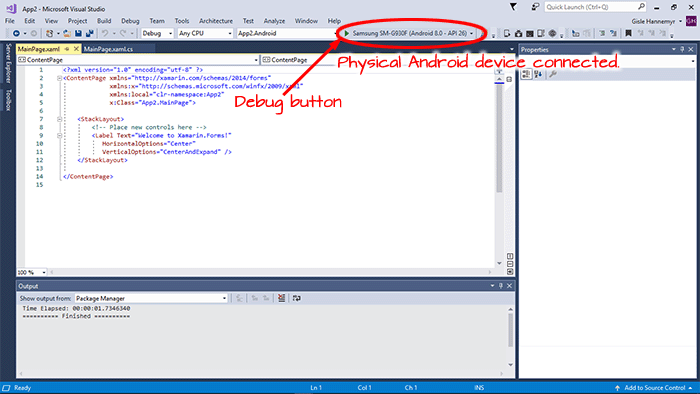
Before starting, make sure there is a physical Android device attached via USB cable. The screenshot below shows how its shows up in Visual Studio when a solution is loaded.

Note that your Android project gets its Xamarin support through a set of NuGet Packages. (NuGet is a package manager designed for the Microsoft development platform.) If they are updated, you will have to wait for new versions are installed.
Create minimal app
The Xamarin start up screen has two blocks:
- Start page
- Output
Steps:
- Under the heading “New project”, click “Create a new project”.
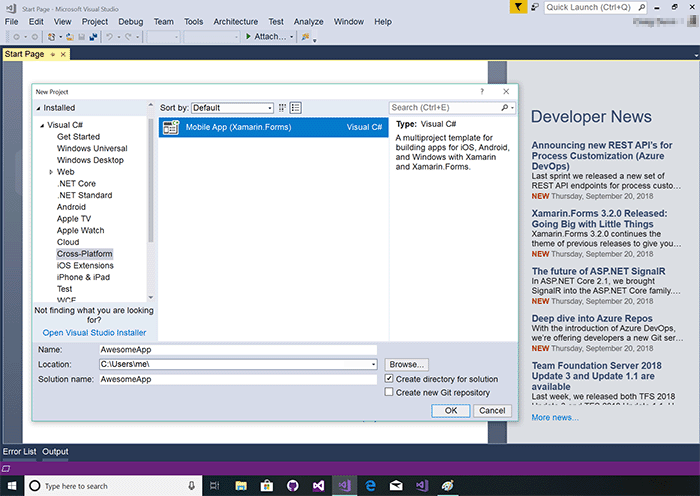
- This pops up a modal named “New project”. Select “Cross-Platform” and “Mobile App (Xamarin Forms). you may fill in the fields “Name”, “Location” and “Solution name”, or accept the defaults.

- Click “OK”. This pops up another modal that let you select a “Blank” template for the app. Also, for this first project we will only develop for Android. As for code sharing strategy, select “.NET Standard”.

 The
alternative to .NET Standard is Shared Project. I think .NET
Standard is a better choice because a Shared Project provide no
IntelliSense support for using XAML to define your Xamarin.Forms (and
XAML is a great way to design your Xamarin.Forms).
- Click “OK” and wait until the NuGet packages are restored (a "Ready" message will appear in the status bar at the bottom of the screen).
- Activate the Solution Exlorer () to examine the solution. Two projects has been created:
- A .NET standard library project.
- An Android project.
- The component named App.xaml in the .NET standard library is where you would add any shared resources, such as colours.
Expanding it reveals
App.xaml.cs, which is the actual C# produced. Note that the application, when it starts, will create a new main page (see code snippet below). It also creates some lifecycle event such asOnStart(),OnSleep()andOnResume.
public App()
{
    InitializeComponent();

    Mainpage = new MainPage();
}
- Expanding
MainPage.xaml, we see the bulk of the application. TheStackLayoutis where you stack various controls on top of each other. The only control there now is a label that says: “Welcome to Xamarin.Forms!”
<StackLayout>
    <!-- Place new controls here -->
    <Label Text="Welcome to Xamarin.Forms!">
      HorizontalOptions="Center"
      VerticalOptions="CenterAndExpand"
</StackLayout>
- Launch Android emulator by pressing the Debug-button or by selecting the the menu item). In the status bar at the bottom, status messages such as “Deploying to …” will appear until the app shows up on the device.
- To terminate the app, press the stop debuggibg control (looks like a squre), or by selecting the menu item.
Adding a button
This section explains how to...
Go to the solution explorer block, and edit MainPage.xaml. Add this before the end of the </StackLayout>:
<Button Text="Click Me" Clicked="Button_Clicked" />
This adds a button to the layout with the text “Click Me”, a “Clicked” event and also an event handler for the click named “Button_Clicked”.
Then edit MainPage.xaml.cs. Add an empty event handler to the nd of the MainPage class:
void Button_Clicked(object sender, System.EventArgs e)
{
}
Then add a local variable named “count” and set it equal to zero. In the event handler, increment the account every time the button is clicked. Also add a statement that outpust a text changing the butten text when it receives a message where the button is the sender.
int count = 0;
void Button_Clicked(object sender, System.EventArgs e)
{
    count++;
    ((Button)sender).Text = $"You clicked {count} times.";
}
Debug the app on the physical Android device. It should look like this.<(p>

Final word
Last update: 2019-04-07 [gh].