Internationalisation
This note is intended to give you a basic understanding of how to create a non-english and multilingual site using Drupal 8 and later.
Table of contents
Drupal contributed projects discussed in this note: Twig Tweak.
Introduction
A multilingual website is one where a page may exist in alternate versions in two or more languages. If no alternate version exist for the user's preferred language, the version in the primary language will be shown instead.
Drupal 8 and later does not require you to set up the site to use English. The installer will let you choose the site's default language and not choosing English is valid. To have a website in another language than English, that is all that is required.
 If
you set up a language other than English as the default language, keep
it as the default language even if you later add English. Never
change the default language, things will break if you do.
Source: Multilingual guide
Setting up
Enabling the required extensions
Most of the functionality that you need to build a multi-lingual site is provided by the following four modules in Drupal core.
- Language
- Locale - User interface translation
- Content translation
- Configuration translation
To enable these modules, navigate to , and locate the "Multilingul" section. Enable all four modules. Press "Install".
https://www.thesavvyfew.com/insights/customize-language-switcher-drupal-8 https://www.ostraining.com/blog/drupal/d8-multi-lingual/Adding languages
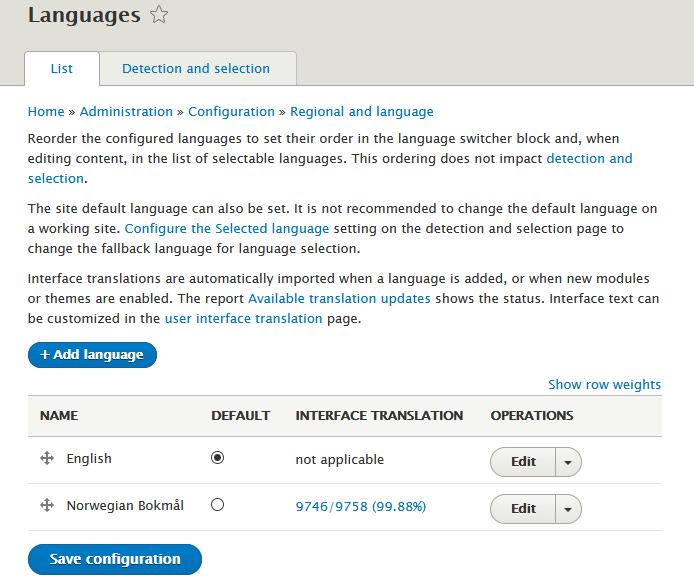
After enabling multilingual support, there will be a setting for “Languages” in the “Regional and language” section of the configuration page. To set site default language, navigate to . There will be a language selection panel like the one shown below.

Any additional language will appear along with English in the table of enabled languages in the language selection panel. However, English will still be the default language. To make another language the default, toggle the radio-button in the "Default" column. You should not change the default language after any content has been translated.
- Navigate to the language configuration page: .
- Click “+ Add language” to add the languages you want. This will take some time to complete the first time you do it.
- The default language indicated was set up during installation of Drupal. Never change the default language, things will break if you do.
- Click “Save configuration”.
The site is now set up as a multilingual site.
Language detection
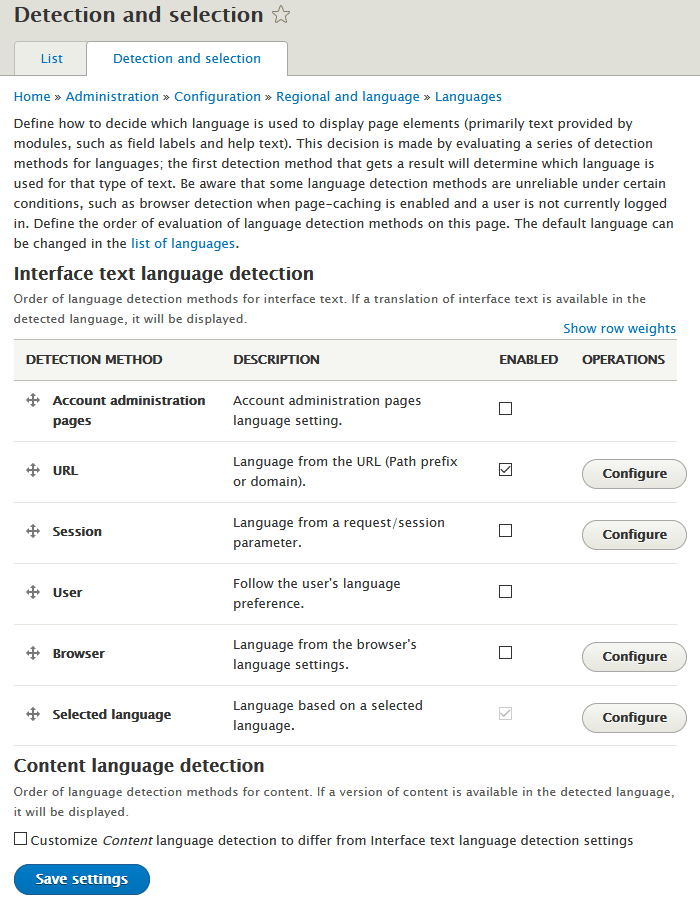
You can enable and re-order interface select language detection through the user interface by navigating to the 'Detection and Selection' tab: .
The Language allows administrators and users to configure languages and how page languages are chosen, and apply languages to content.
You may also want to customise at least the following settings:
- : Set Default country, First day of week, Default time zone, Whether users may set their own time zone.
- : Edit date and time formats to suit local conventions. Remember to also edit formats for other languages.
The “Detection and selection” tab let you set up a detection method to determine what language to display to the visitor. You may use this to create a multi-lingual website where there are alternate versions of each page in different languages.

Click “Configure” in the “Operations” column to configure the
options. The “URL” detection method may use a “Path prefix” or the
“Domain” to determine language. The Path prefix is a two character
language code. For Norwegian Bokmål, the default path prefix is “nb”.
Example: https://example.com/nb/node/1 will display the
Norwegian Bokmål version of node 1 if one exists. Otherwise, it will
show the default language version.
Add the Language switcher block
To add a language switcher to the site, you can navigate to , locate the region Click "Place blocks".
For a more customised look, check out: TheSavvyFew.com: How to customise the language switcher in Drupal
 If
you get "Unknown drupal_view() function", install Twig Tweak.
To style it as a menu:
.language-switcher-language-url {
  list-style-type: none;
  margin: 0;
  padding: 0;
  overflow: hidden;
  //background-color: $light;
}
.language-switcher-language-url li {
   float: left;
}
.language-switcher-language-url li a {
  display: block;
  color: blue;
  text-align: center;
  padding: 2px 2px;
  text-decoration: none;
}
Default behaviour
If English is the default language and Norsk Bokmål(selector “nb”) is the secondary language, you shall not be able to use the “en” language selector. So if node 42 exists and is translated:
http://example.com/node/42exists.http://example.com/nb/node/42exists.http://example.com/en/node/42does not exist.
If a node is not translated to the selected language, the default behaviour is to show the untranslated version. If it is translated, but unpublished, it will return a 403.
Translate specific items
User interface
The site interfaces are the translatable strings (wrapped in the t() function).
These translations are available as GNU gettext Portable Object files (.po-files).
For the core and contributed projects with a tagged release, translations are maintained at localize.drupal.org and you can configure Drupal to download translations from there by navigating to .
 Strings
in custom modules does not become avilable for translation until the the system has tried to translate them at least once. Also make sure you clear the cache
before trying to load the translated page.
Source: DO support forum.
To export translations from custom module navigate to
.
To get the untranslated strings, select a translation, and under "Export", only tick "Include untranslated text".
This will export the unstranslated strings into a file named "drupal.pot".
You probaly need to curate this file to isolate the strings belonging to your custom module.
Rename it to match the module's machinename.
To import, translate and save, and upload the translated file
(e.g. mymodule.nb.po) using the GUI, it will be placed in
the site's translation directory
(default sites/default/files/translations below the
webroot).
 Do
not edit the untranslated files in the
exported
 .pot file. If you do they will not match when
you import the file.
To check for translation updates, navigate to and press "Check manually". You can then install those that are not up to date.
 Background:
DO: Translating site interfaces,
DO: Downloading and uploading translation files.
Content
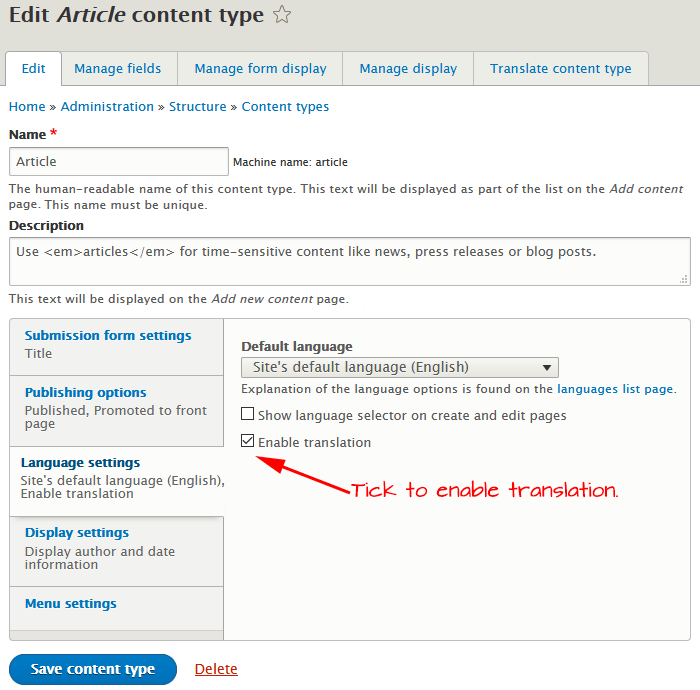
Content translation is not available for a content type before you enable it. The screenshot below shows how to enable translation for the “Article” content type.

In addition to enable translation for the content type, you need to make the individual fields that make up the entity translatable. Navigate to and make sure the field you want to translate are checked. As a minimun, check the following:
- Published
- Title
- Body
 If
you experience that the button to save a node says "Save (all
translations)" – and not "Save (this translation)" – it is
impossible to save individual translations. To fix this, make sure the field
"Published" is marked as translatable for the Content type.
Source DSE: "Save (this translation)" vs. "Save (all translations)".
For inline links to link to the correct language, make the language selector part of the path in translated content.
DO: Translating content.
DO: Images.
Content types
To translate content types, the user needs the following permissions:
- Use the toolbar
- Use the administration pages and help
- View the administration theme
- Administer content types
- Content: administer fields
That gives access
Custom blocks
To translate custom block content try the follwing:
- Navigate to .
- Under “Custom language settings” check the checkbox “Custom block”.
- This will result in a new page section with the heading “Custom block” being added by AJAX.
- In the new “Custom block” section, check the checkboxes for items you want to be translatable.
- Click “Save configuration”.
- Navigate to .
- You should get a page “Translations of block-name” with the currently enabled languages.
- Click add in the column “Operations” to create a translation of the block.
- Click “Save” (or the equivalent in the target language) to save the translation of the custom block.
Menus
- Navigate to
- Under "Custom language settings"
- Select the "Content" and "Custom menu link" checkboxes (don't hit save yet, an Ajax call will add two new sections with the same names to the page, listing elements that are translatable).
- In the "Content" section that appears below, select the "Translatable" checkbox for the content types and fields desired.
- In the "Custom menu link" section that appears, select the "Translatable" checkbox for "Custom menu link", "Menu link title" and "Description". This will add a "Translate" operation to custom menus.
- Lastly, select "Save configuration" button at the bottom of the page.
Source DO: Menu translation.
Configuration
https://www.drupal.org/docs/multilingual-guide/translating-configurationTo make configuration fields translateable:
https://drupal.stackexchange.com/questions/239797/d8-how-to-create-custom-configurational-form-translatableViews
Navigate to . Under "Operations", select "Translate" from the pulldown-menu for the View you want to translate.
Identify the language and click "Add" or "Edit" under "Operations".
You now see expandable panels for "Default display settings" and all displays with overrides. To translate the page title, expand "Display settings" and then "Display options". The field to translate is named "Display title".
To translate the formatted text area for these elements:
- Header
- Footer
- No results behaviour
… expand the panel, then "(Empty) text" and finally "The formatted text of the area".
Sources:
- SE.DA: How do I translate a view page title?
- SE.DA: Translate view header
Troubleshooting
The language switcher don't show if there is no detection method configured.
When updating translations, you may see the error message “translation strings were skipped because they contain disallowed HTML”. The recent log messages will tell you what translations are affected.
There is a list of legal HTML markup The function that
in /includes/locale.inc (in
function locale_string_is_safe, line 562 in Drupal
7.60). The list currently looks like this:
'a', 'abbr', 'acronym', 'address', 'b', 'bdo', 'big', 'blockquote', 'br',
'caption', 'cite', 'code', 'col', 'colgroup', 'dd', 'del', 'dfn', 'dl',
'dt', 'em', 'h1', 'h2', 'h3', 'h4', 'h5', 'h6', 'hr', 'i', 'ins', 'kbd',
'li', 'ol', 'p', 'pre', 'q', 'samp', 'small', 'span', 'strong', 'sub', 'sup',
'table', 'tbody', 'td', 'tfoot','th', 'thead', 'tr', 'tt', 'ul', 'var'
In addition, “<br/>” is not allowed in translated strings, but “<br />” (notice space before slash) is.
Source: https://www.drupal.org/node/353908.
Final word
[TBA]
Last update: 2021-09-14 [gh].