Drupal REST API
This note introduces the REST API that ships with Drupal 9.
Table of contents
- Introduction
- Authorization
- Setting up
- Testing and development tools
- Sending data out with the RESTful API
- Using Views to create REST APIs
- Consuming data from a RESTful API
- Making a POST request
- Making a PATCH request
- Libraries
- Troubleshooting
- Final word
Drupal contributed project discussed in this note: Key auth, REST UI.
Introduction
Representational state transfer (REST) is a style of software architecture. As described in a dissertation by Roy Fielding, REST is an "architectural style" that basically exploits the existing technology and protocols of the Web.
RESTful Web Services (RWS) is typically used to refer to web services implementing such an architecture.
The main reason for using RWS when working with mobile applications is to avoid having data duplicated over several different databases on different platforms, containing the same information.
Drupal 9 comes with extensive support for RESTful APIs are included in the core. I.e.: You may store the data in Drupal's relational database and then that data may be consumed by Android and iPhone mobile applications. You don't even have to use Drupal's native display engine to display the data. You just use Drupal to store nodes holding the information, and then use other front end frameworks such as AngularJS or React to display the data on the user's mobile device.
 For
introductions to RWS, please see
Acquia: Decoupling Drupal 8 Core,
Alex Rodriguez: RESTful Web services. Basic principles of REST Web services and
Zell Liew: Understanding And Using REST APIs.
For more background information you may also want to read the Wikipedia article about
Representational_state_transfer.
For
introductions to RWS, please see
Acquia: Decoupling Drupal 8 Core,
Alex Rodriguez: RESTful Web services. Basic principles of REST Web services and
Zell Liew: Understanding And Using REST APIs.
For more background information you may also want to read the Wikipedia article about
Representational_state_transfer.
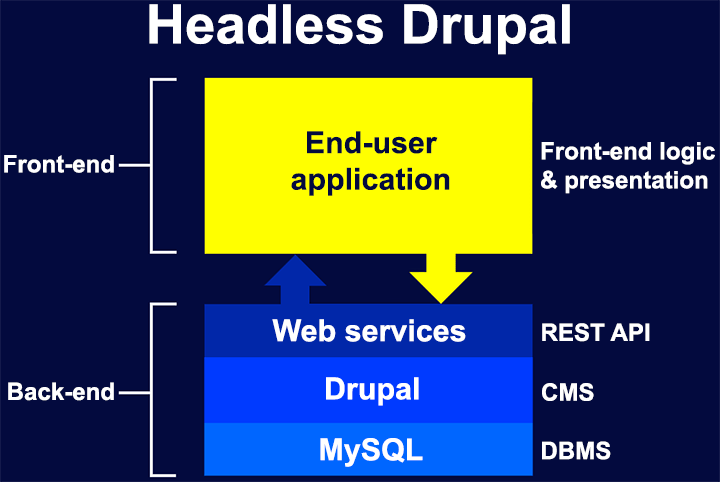
Headless Drupal (also sometimes known as decoupled Drupal) is an approach to building applications, where Drupal serves as the back-end content repository for content. The front-end is built in different technologies and communicates with Drupal via an REST API (e.g.: a native app, or a Jacascript framework such as React).
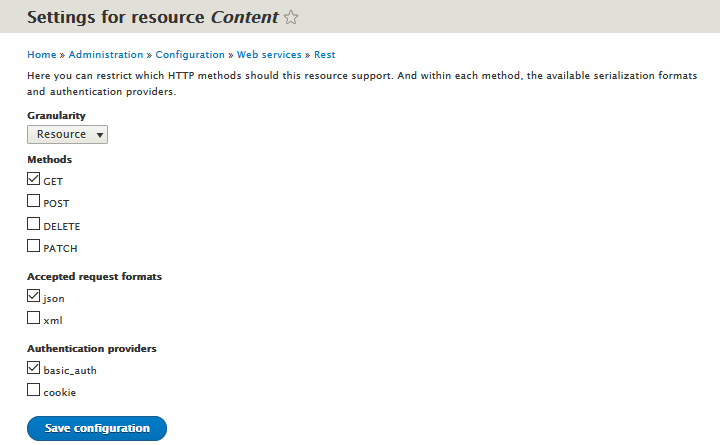
The Drupal RESTful API let you, for each REST resource, specify the supported method, and for each method, you can specify the serialization formats & authentication mechanisms. (There is also a simpler setting, where all methods of a resource use the same serialization formats and authentication mechanisms.)
Each REST resource has a Drupal\rest\RestResourceConfigInterface config entity that corresponds to a @RestResource plugin. Without such a config entity, the REST resource plugin will not be available for use.
Video tutorials:
- Imram Sarder: Learn Drupal 8 - REST API Part1 2015 (11:52)
- SpinSpire: Session 5 - Drupal 8 RESTful web services 2017 (1:02:02)
Authorization
REST APIs use authorization to ensure that client requests access data securely. If you're building an API, you can choose from a variety of auth models. If you're integrating a third-party API, the required authorization will be specified by the API provider.
The Drupal core packs two authentication providers. A third becomes available if you install the extension Key auth.
- basic_auth: The Drupal username and password of Drupal user that is permitted to access the data.
- cookie: Drupal session cookie sent in reqeust header. Can only be used when the request is made from the same Drupal instance as the one serving the requrst, so it is only usable for testing. (Explained at 13:15 in SpinSpire video.)
- key_auth: Provides simple key-based authentication on a per-user basis similar to basic_auth but without requiring usernames or passwords.
 You
may want to visit the Postman Learning Center for general tutorials such as
Authorizing requests.
Also recommended is ToolsQA.com: Basic Authentication in Postman.
Setting up
To prepare a Drupal 9 website to provide RESTful web sservices, navigate to and scroll all the way to the bottom and expand the Web services section. Enable the following four (all comes with the core):
HAL - Serialises entities using Hypertext Application Language /deprecated and replaced by JSON:API.- JSON:API -Exposes entities as a JSON:API-specification-compliant web API.
- HTTP Basic Authentication - Supplies an HTTP Basic authentication provider.
- RESTful Web Services - Exposes entities and other resources as RESTful web API
- Serialization - Provides a service for (de)serializing data to/from formats such as JSON and XML.
There is also one contributed project you need to install:
- REST UI - Provides a user interface to manage REST resources.
To download, use:
$ composer require 'drupal/restui:^1.21'
Go ahead and install them all.
Testing and development tools
Before getting your feet wet by actuall setting up a RESTful service, you should familiarise yourself with at least one of these testing and devlopment tools.
Postman
Postman is a popular web based API client that makes it easy for developers to create, share, test and document APIs, including REST APIs. This is done by allowing users to create and save simple and complex HTTP/s requests, as well as read their responses.
Website: www.postman.com.
Get started by signing up for a free account. Click "Sign in" (top right).
When logged in, clicking "Home" at top right takes you to your Postman home page. If the account is new, clicking "Create New" let you set up a new request in a workspace.
If you've already have set up a workspace, there are several entry points on the home screen to take you back to it.
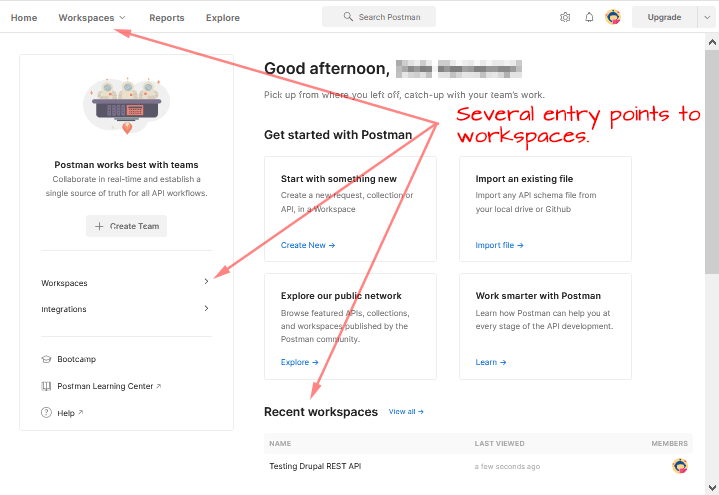
Inside a workspace, there is a "New" button that let you create many different items. The two most common are:
- Collection. A folder for saving requests for reuse.
- Request. A data request.
To create a JSON GET request in Postman, click on "New" and then on a request. In the popup, specify name and the collection to save it in.
In the next screen, you build the request. There is a "Method" pulldown, select "GET" for a basic request. Next to the method, there is a text field where you paste in the URL.
Next, set up authentication. We're going to use "Basic authentication", which is included in the Drupal core.
RESTED
RESTED is an add-on for Firefox, created by Espen Henriksen. It lets you test REST requests and examine the result. It features all the most commonly used HTTP methods, setting headers, saving requests to local storage, and more. It lets you use Basic auth.
To install visit Addons.mozilla.org: RESTED.
Source code and documentation; GitHub.
To see it in action, please see the screenshot below.
Sending data out with the RESTful API
Navigate to . Click the option named “REST”. You should be taken to a page to manage REST resources. It lists all the RESTful actions that we have access to. There is a lot of them, but initially they are all disabled. Enable the one named “Content”(if is not already enabled), which will set up REST endpoints for nodes. After enabling, click on “Edit”. This page let you set up the methods, accepted request formats and authentication providers for a specific RWS.
The first control is a pulldown menu that let you set “Granularity”. There are two choices:
- Resource - all Methods use the same Accepted request formats and Authentication providers.
- Method - for each Method, configure the Accepted request formats and Authentication providers.
In the screenshot below, we use the default setting (“Resource”). See DO: Move granularity away into an 'Advanced' tab for more about this.
The RESTful interface may use the following methods:
- retrieve:
GET. - index:
GET. - create:
POST. - replace:
PUT(create or replace the entire entity). - update:
PATCH(updates specific field in the entity). - delete:
DELETE.
 SO: Use of PUT vs PATCH methods in REST API real life scenarios.
For testing we just enable the Method GET, Accepted request format json and Authentication provider basic_auth.
Click “Save configuration” to save.
We can now go ahead and test these endpoints using one of the testing tools discussed below. You need to provide the following information (the values shown here is just an example):
- Method -
GET - URL -
https://guided.roztr.org/node/9?_format=json - Basic auth - username and password
 The export URL has the following format:
https://guided.roztr.org/node/9/?_format=json
The _format=json query string was introduced in version 8.5.0.
Change record: To access REST export views, one now MUST specify a ?_format=… query string.
The screenshot shows the result of retrieving this node using the RESTED Firefox plugin with the example values:

Using Views to create REST APIs
Reuesting full objects usually produces a lot more data than the app needs. We can use Views to create more targeted REST exports. In this example we shall produce a endpoint to request what is known as a “Primary” user in the GUIDed project, along with list of that user's list of emergency phone numbers.
Navigate to and click “+ Add view”. Five the view a name (in the example screenshot below “Primary users”), what entity you want to view, and in under “REST export settings”, tickmark “Provide a REST export”. Also specify a “REST export path”. Then click “Save and edit”.
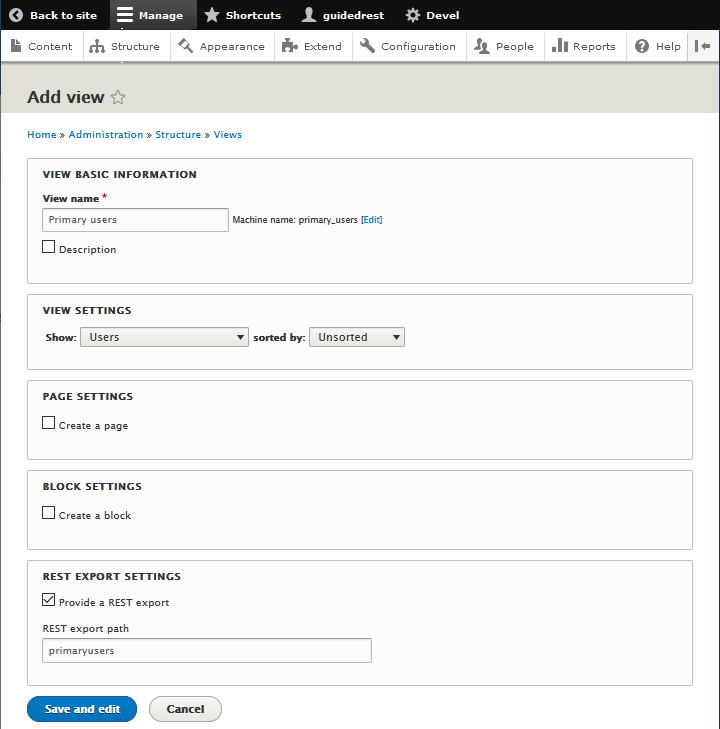
The next screen lets you preview and edit the view. Look under the “Preview” at the bottom of the screen. The JSON for all registered users should appear.
Next, do the path settings, under “Path setings”, set up a Path (e.g. “/users”) and Authentication (e.g “basic_auth”).
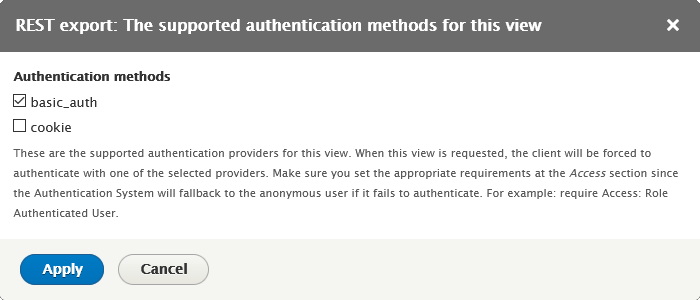
Also set up a permission (e.g. “View published content”).
 The “cookie” authentication method can only be used if the consumer of the endpoint is the same server as the one exporting it.
You shouls now be able to test the endpoint by filling in the method, URL, and Drupal credentials in the testing tool:
- Method -
GET - URL -
https://guided.roztr.org/users?_format=json - Basic auth - username and password
The view that has been set up will export a JSON containing all data about all users registered on the system. We are going to use fields in order to only display the fields we need. Under “Format”, click on “Entity” and change the radio button to “Fields”. To narrow it down further, you may use filters. For instance you may only export data about users that have a specific role.
The JSON will include a link to the user, to remove this, click on “User: Name” and remove the tick from the checkbox from “Link to user”.
[Add contextual filter.]
Source: PacktPub.com video - Drupal 8 for beginners: 2.8: Sending it out with REST-First
 How to do authentication with Views is still unclear,
Please see DO: REST API: How to use basic_auth with Views?.
 If
you need to set a custom key name for REST export in Views, click on "Settings" for fields. It provides a form to configure aliases for all fields.
Source DSE: Setting custom key names for exported JSON view fields.
Creating a custo RESTful service
Sources DO:Custom REST Resources, Valuebound: Creating a custom RESTful Web Service in Drupal 9, LearnWebTech: Create custom rest api in drupal 8/9 .
Consuming data from a RESTful API
We use the word "migration" as a generic term for any process that seeks to take data from some source external to a Drupal site, and use it to automatically create nodes, users, configuration, and any other component of your site. In short, automating what might otherwise be a tedious job of copying and pasting.
This post by Joe Shindelar on the Drupalize.me blog: Consuming REST APIs with Drupal 8 discusses four alternative
- -
- drupalize.me: Introduction to Migrations with Drupal
- LullaBot.com: Building Views Query Plugins for Drupal 8 (three-part series)
- code
- LullaBot.com: Migrate and JSON API (not REST API)
- Drupal.org: Migrate API
- Drupal.org: Migrating data from XML, JSON or SOAP source
Extensions that consume REST data (with number of installs on November 15 2022).
- Views JSON Source (1138)
Any JSON API can be configured to render the data directly from the JSON through views. The json content is not stored in Drupal. - External Data Source (356)
Can get fields from an external data source ???. - External Entities (275) Overrides field storage to use an external location (JSON or Wikipedia) for entity data.
Making a POST request
Enable the relevant modules and set up authentication.
To create a new node use the following REST endpoint:
https://example.com/node?_format=jsonwith the following body:
{
  "title":[{"value":"This is the title"}],
  "body":[{"value":"This is the body."}],
  "type":[{"target_id":"page"}]
}
 For
an alternative tutorial, see
Karma computing: How to POST to a RESTfull endpoint in Drupal 8 with basic authentication.
However, I could never get it work.
Making a PATCH request
This forum post describes how to do a basic PATCH request to update a field in an existing node: DO: Is installing JSON:API necessary for PATCH requests?.
Most documentation about PATCH suggests you enable the JSON:API module. Examples:
Libraries
[TBA]
Guzzle
Guzzle is a PHP HTTP client that integrates with Drupal and makes it easy to send HTTP requests and trivial to integrate with web services. Features:
- Simple interface for building query strings, POST requests, streaming large uploads, streaming large downloads, using HTTP cookies, uploading JSON data, etc.
- Can send both synchronous and asynchronous requests using the same interface.
- Uses PSR-7 interfaces for requests, responses, and streams. This allows you to utilise other PSR-7 compatible libraries with Guzzle.
- Abstracts away the underlying HTTP transport, allowing you to write environment and transport agnostic code; i.e., no hard dependency on cURL, PHP streams, sockets, or non-blocking event loops.
- Middleware system allows you to augment and compose client behavior.
Documentation:
- docs.guzzlephp.org (Top)
- docs.guzzlephp.org (Quickstart)
- Stack Overflow (tagged "guzzle")
- Gitter (guzzle/guzzle)
Installing Guzzle
To install Guzzle using composer, put the
following composer.json in the module that will
need Guzzle:
{
    "require": {
        "guzzlehttp/guzzle": "^6.3"
    }
}
When you later enable the module with drush, all dependencies will be sorted out.
Using Guzzle
For a Drupal module to be able to use Guzzle it needs the following two lines:
require_once 'sites/all/vendor/autoload.php';
use GuzzleHttp\Client;
Then the following may be used.
$client = new \GuzzleHttp\Client();
$res = $client->request('GET', 'https://api.github.com/repos/guzzle/guzzle');
echo $res->getStatusCode();
// 200
echo $res->getHeaderLine('content-type');
// 'application/json; charset=utf8'
echo $res->getBody();
// '{"id": 1420053, "name": "guzzle", ...}'

// Send an asynchronous request.
$request = new \GuzzleHttp\Psr7\Request('GET', 'http://httpbin.org');
$promise = $client->sendAsync($request)->then(function ($response) {
    echo 'I completed! ' . $response->getBody();
});
$promise->wait();
Here is an example of setting up basic authentication and checking the response.
$client = new GuzzleHttp\Client();
$res = $client->get('http://www.example.com/endpoint', [
    'auth' => [
        'username',
        'password'
    ]
]);
$statuscode = $res->getStatusCode();
debug($statuscode, 'statuscode');
Provided all went well, the call to debug() will
output “200”.
Troubleshooting
A malformed request or a syntax error produces an error. To locate the cause, turn on error reporting or examine the "Recent log messages" report. For instance:
Path: /node/9?_format=json%0A. Symfony\Component\HttpKernel\Exception\AccessDeniedHttpException: The used authentication method is not allowed on this route. in Drupal\Core\EventSubscriber\AuthenticationSubscriber->onExceptionAccessDenied() (line 134 of /var/www/guided.roztr.org/web/core/lib/Drupal/Core/EventSubscriber/AuthenticationSubscriber.php).
Here we see that the request had a newline
(%0A) which causes the format to not be recognised. This
is almost impossible to spot in the Postman GUI.
Faulty or not configured authentication results in 403:
{
  "message":"The used authentication method is not allowed on this route."
}
This usually means that basic_auth has not been selected for "Authentication" in the View generating the endpoint.
Failing to authenticate results in:
{
    "message": "The 'access user profiles' permission is required and the user must be active."
}
In a the path settings for a view, a too strict “Access” permission results in:
{
    "message": "The 'access content' permission is required."
}
Entity ID empty
DOF: REST API: ID in preview, not in Postman
Not acceptable format
When trying to access a node:
https://memasapp.com/node/40?_format=json
one gets:
message "Not acceptable format: json"
DSE: Not acceptable format: json.
Final word
There is a lot more that can be dose with the RESTful API items that now ship out with Drupal. However, this is a brief overview, just to learn you how to we can now send data out of Drupal.
You may also want to explore the GraphQL module. GraphQL is a modern querying language that replaces old school methods (like REST) to communicate with APIs. It is faster and only shows the results you are looking for – as opposed to all the unwanted baggage that comes with a REST API call. The Drupal GraphQL bridge module will enable your Drupal website to create GraphQL schemas and expose Drupal entities with GraphQL client applications.
Last update: 2021-09-09 [gh].