Creating pages and blocks
This chapter describes how to create pages and blocks in Drupal using code.
Table of contents
Introduction
Previous chapters in this ebook has described how to create content using the Drupal GUI, and how to create custom content types in the GUI using fields.
In this chapter you will describe how to create content without using the GUI. It will demonstrate how to create a block and the page with some minimal content.Create a custom module
To create a custom module first create a directory to hold the module. From the siteroot, do this:
$ cd web/modules/custom
$ mkdir helloworld
$ cd helloworld/
Then create
helloworld.info.yml:
name: 'Hello World'
description: 'Custom module to demonstrate of to create a block and page in code.'
core_version_requirement: ^9 || ^10
type: module
You shall now be able to enable the module:
$ drush cr
$ drush en helloworld
The “Hello world” page
To create a custom page programmatically, you need just two components in addition to the empty custom module framework already created:
- A Controller to output a render array with the contents of the page.
- A route to the Controller.
Start out by creating the directory the project's controller shall live in:
$ mkdir -p src/Controller
The Controller should be placed in
src/Controller/HelloWorldController.php.
This is how a minimal Controller may look like:
<?php

namespace Drupal\helloworld\Controller;

/**
 * Provides route responses for the Guided Custom module.
 */
class HelloWorldController {

    /**
     * Returns a simple page.
     *
     * @return array
     *   A simple renderable array.
     */
    public function sayhello() {
        $element = array(
            '#markup' => '<p>' . t('Hello world.') . '</p>',
        );
        return $element;
    }

}
To create a route, create the
file helloworld.routing.yml, in the top directory of the
custom module. Inside it, put this:
helloworld.hello_page:
  path: '/hellopage'
  defaults:
    _controller: '\Drupal\helloworld\Controller\HelloWorldController::sayhello'
    _title: 'Hello world'
  requirements:
    _permission: 'access content'
To test, clear the cache. Provided the
site's domain name is example.com, to visit the custom page,
go to the URL
http://example.com/hellopage.
The “Hello world” block
Start out by creating the directory the project's controller shall live in:
$ mkdir -p src/Plugin/Block
The custom block is defined as an extension of the
Drupal BlockBase class. We need to
follow PSR-4
standard code for it to be discoveed and autoloaded. The means that this call must be placed
in the /src/Plugin/Block directory you just
created.The class will be named HelloWorldBlock.php, and this file should
contain:
The annotation contains:
- id: A unique, machine readable ID for the custom block created.
- admin_label: The human readable name of the custom block, displayed in the admin interface.
- category: The human readable category the block belongs to, displayed in the admin interface.
<?php

namespace Drupal\helloworld\Plugin\Block;

use Drupal\Core\Block\BlockBase;

/**
 * Provides a 'Hello world' block.
 *
 * @Block(
 *   id = "hello_world_block",
 *   admin_label = @Translation("Hello world block"),
 *   category = @Translation("Hello World"),
 * )
 */
class HelloWorldBlock extends BlockBase {
  …
}
This is the class. The public function to construct the block must be named build():
class HelloWorldBlock extends BlockBase {

  /**
   * {@inheritdoc}
   */
  public function build() {
    $element = array(
        '#markup' => '<p>' . t('Hello, world!') . '</p>',
    );
    return $element;
  }

}
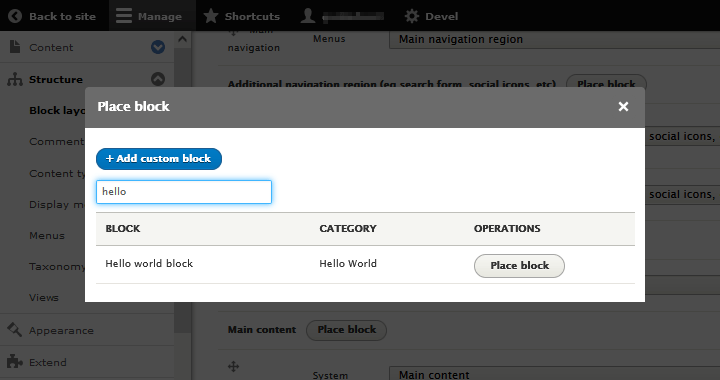
After creating the plugin and rebuillding the cache, navigate to and find a region where you want to inset the block, for example "Sidebar second". Press "Place block". A modal pops up, locate the block in the list of available blocks, and press "Place block" again.

You arrive at new modal to configure the block. After optionally changing the settings, press "Save block". You're taken back to the region overview, with the block inserted in the region. Scroll down and press "Save blocks".
When you go back to the website, the custom block is now visible in the region where the block is placed.
Methods available for the Block plugin
build()
This method will render a render-able array. In this tutorial a simple markup is returned. Even the complex contents like forms and views can also be returned.
blockAccess()
This method defines a custom user access logic. Example:
  /**
   * {@inheritdoc}
   */
  protected function blockAccess(AccountInterface $account) {
    return AccessResult::allowedIfHasPermission($account, 'access content');
  }
This access check calls the AccessResult class method
allowedIfHasPermission() to check if the current user has the permission to view this content.
blockForm()
This method returns the configuration form elements specific to this block plugin.
Blocks that need to add form elements to the normal block configuration form should implement this method.
blockSubmit()
This method is used to save the configuration defined in the previous method blockForm().
blockValidate()
This method validates the configuration form of the block.
Sources:
Final word
This chapter described how you may create blocks and pages programatically, rather than by using the GUI. Drupal also let developers create forms programatically. This is discussed in the chapters about the Form API, and in a case study of the ctools forms Wizard.
Last update: 2022-06-10 [gh].