Working with files in Drupal
This chapter is about working with files in Drupal 7. It discusses file attachments, the differences between the public and the private file system, how to control access to files, and the risks of allowing file uploads from threat agents. There is also a note about the SELinux file system access control.
Table of contents
- Introduction
- Download method
- The file field
- Uploading a file attachment
- SELinux
- Troubleshooting
- Final word
Contributed projects mentioned in this chapter: File permissions, Flexi Access.
Introduction
The core File module defines a File field type and the necessary functions to upload files to a Drupal site.
The module is also provides functions for validating and displaying file content.
Adding the File field to an entity permits files to be attached to content and managed as any other content in Drupal.
Download method
Before you enable file attachments in Drupal, you need to select a default download method and set up where these should be stored in the file system.
Drupal provide two different download methods: The public file system download method (file downloads are managed by HTTP), and the private file system download method (file downloads are managed by Drupal).
With the public file system download method, there is no way to manage access control for file attachments. You may restrict access to the node the file is attached to, but this will only make the file URL invisible. The file is still accessible and can be viewed and downloaded by anyone that knows or is able to guess its URL.
With the private file system download method, access to the files are managed by Drupal, and can be subject to Drupal's access control management. If the user knows the URL of the file, the user will only be allowed to see the file if the entity the file is attached to is viewable by that user. Otherwise, the will be served the access denied page when he or she tries to view the file.
Each of the two download methods requires a corresponding file system path to be configured.
The default Public file system path is by default a
directory under sites, which is below your webroot. You
can change it to a different path if you want to, but it must always
be accessible over the web.
There is no default Private file system path, and until you set up this path, you we'll not be allowed to use the private file system download method.
Before you can set up a Private file system path need to
make sure this path exists in the file system with the correct
permissions set. Provided the webmaster wants the
path to the private file system to be /var/private, and the
non-human web server user is assumed to be a member of the group
“apache”, the following CLI commands will create a
directory with the correct path and set the correct permissions for
the files directory:
$ sudo cd /var
$ sudo mkdir private
$ sudo chgrp apache private
$ sudo chmod g+w private
This creates a directory with the path /var/private that
can be used as the private file system path.
If your web server is set up with SELinux, you may also need to use this command to make this directory writable by the web server:
$ sudo chcon -R -t httpd_sys_rw_content_t files
In Drupal 7, you may set up the file system path and the download method via . The dialogue for this is shown below:
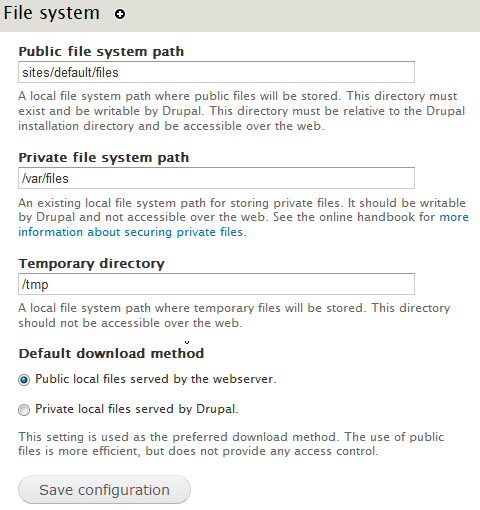
However, having this configuration setting only in the database
may bite you if you migrate a database from one site to another,
as the setting will be overwritten when a database is imported.
Best practice is to set this in settings.php.
$conf['file_public_path'] = 'sites/default/files';
$conf['file_private_path'] = '/var/private';
The default download method can be overridden in the settings for the file field, and only apply to new file fields.
(The radio button that let you select private file system download method as the default download method will not appear until after you've set up the Private file system path.)
You may use any valid path to a directory that is writable by the
web server user as the
Private file system path, but for best security, this
directory should be placed outside the webroot. For instance, if
your webroot is in the directory with the full path
/var/www, the path /var/private may be a
suitable value for the Private file system path.)
Using the public file system download method is the default. But you should never use the public file system download method for sensitive files, because these files are always available to anyone that knows their URL.
File access control
When you add a File field to a bundle, you can specify whether files uploaded by means of the site should be destined for Public files or Private files. If you want to subject files to access control, you must specify Private files as the upload destination. Public files have no access control, they can be hidden from casual users, but still viewed by anyone who knows their URL.
When you set up the directory for Private files, Drupal
will create a .htaccess-file to protect it. The presence
of this file will stop Apache from serving files from this directory.
In addition, if the Private file system path is outside the
webroot, the private files directory is not accessible by the web server.
 Make
sure that you test that the private files directory really is
inaccessible by adding a file to that directory without attaching to
any entity and verifying that you can't see it in your browser. If you
fail to set up the private files directory correctly, all the files in
this directory will be accessible to anyone who can guess the
URL. Also, if you're not using Apache, be extra careful.
Non-Apache web servers may need additional configuration to secure
private file directories.
Files stored in the private files directory will be inaccessible via a direct link. To access these files, you need to access them via the entity they're attached to. When somebody view an entity with a private file attached, a download link will appear and the file shall be viewable.
If you create a new node of a content type with two File fields, and make the upload destination for both private and upload two different files attached to it, you can explore how file access control works by publishing and unpublishing the node, by changing the visibility of the field, and by node access control.
- When that node is published link to both the attached file will be visible and anyone who can view the node can access the link and view and download the files. Now, if you unpublish the node, the attached file becomes inaccessible for viewing and download for everyone except those administrators that are granted permission to Bypass content access control. If someone else tries to use the direct link to the files that worked when the node was published, that user will be denied access.
- If you re-publish the node, but disable the Display check-box for one of the files, you will notice that only one file is listed as an attachment. The one where Display is disabled will not be visible, nor will it be accessible. Even someone that knows the direct URL for the file with its Display check-box disabled you will not be able to view or download this file.
- For finer grained control of who can see/download attached files you may use an additional access control module. For instance, to create access lists to files, you can use the Flexi Access module to set up explicit ACLs for nodes with files attached.
File uploads by threat agents
As noted above, files stored in the public file system will be accessible and can be viewed and downloaded by anyone that knows its URL.
This means that if you allow non-trusted users to upload files to the public file system, you may end up hosting publicly available files on your site that you don't want to be associated with. Uploaders may then link to these files to make them findable by people and search engines.
For example, a threat agent may upload warez (copyright violations) or images of sexual child abuse. If these files are uploaded to the public file system, they will be accessible by anyone on the Internet, bypassing your site's access control. Then, your site may be subject to legal action for hosting these files.
To avoid this, consider the following:
- Do not host publicly accessible files from untrusted sources. Either
- do not allow untrusted users to upload anything; or
- make sure uploads from untrusted users are stored in the private file system.
- Ensure cron is properly running on the site, so that non-complete uploads are purged in a timely fashion.
- Audit file uploads to make sure that files that are uploaded are relevant to your site.
The file field
After you've set up the default download method and configured the Unix file permissions for the upload directory, you're ready to add one or more file field to entities.
The File field may be added to any entity. You may add the File field to one of the existing bundles (e.g. content types), such as Article or Basic page, or you may create a new bundle for some specific purpose and add the File field to it.
To add the file field to a content type navigate to , and click the link for the content type you want to add the File field to. Under , give the field a Label, select the field type File. Then, click-and-drag it to the place you want to have it among your fields, and click the Save button.
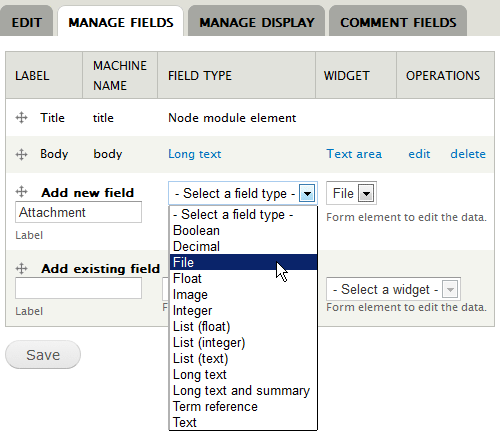
As when adding any new field to an entity, you are first required to set the field specific settings for the field with the given Label. You may add an existing field to an entity, and the settings you specify here will apply in all the entities where you use the field. These settings cannot be changed per entity.
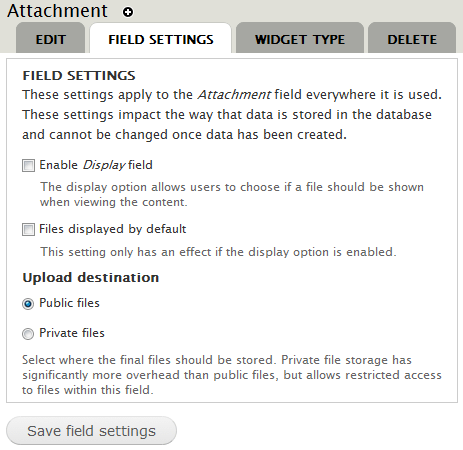
This is the meaning of the options:
- When checked, the Enable Display field option will add a check-box to the content form that will allow the creator to choose if a file attachment should be shown when viewing the content.
- The Files displayed by default option makes the display file option checked by default, when users upload files to this field.
- The Upload destination allows you to override the default download method for the entity. Select Public files for the public download method. Select Private files for the private download method.
Click Save field settings when done.
Note that field settings for upload destination cannot be changed when there is data in the field.
The next dialogue consists of two panels. The first is to set the field settings for this particular bundle only (i.e. Basic page in the example below). This can be changed between different bundles. The second panel is mostly a repeat of the field settings described in the previous paragraph, and is omitted from the facsimile below.
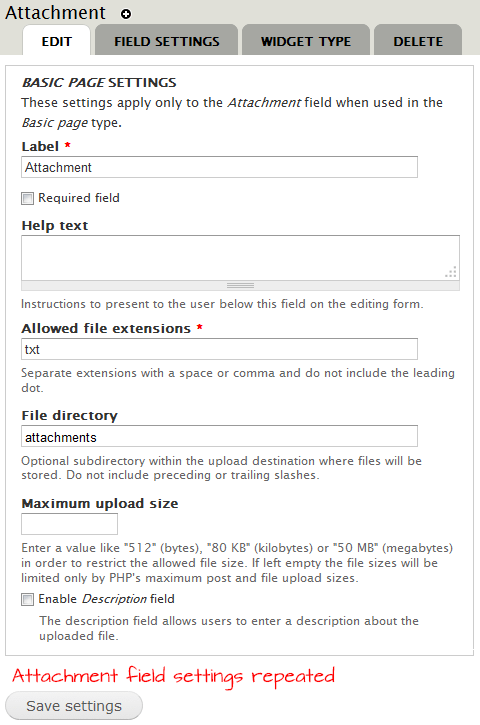
- The Label is the label used when the field appears in a content creation form. The default is to use the label used when the field was first created.
- When checked, the Required field options makes the field mandatory when content of this type is created.
- What you put in the optional Help text text field will be shown the user to guide him or her when using the field.
- The list of Allowed file extensions is used to validate the file upload. See the section Preventing arbitrary code execution and rogue files to see a list of safe file extensions that your users may be allowed to upload. You should never allow untrusted users to upload executable files.
- The optional File directory can be used to specify a sub-directory of the file system path defined for the field. It is strongly recommended to set this. If it is left empty, file attachments will be saved in the root files folder, above all sort of cached image styles, css and javascript. This makes it much harder to backup attachments only.
- You may specify a Maximum upload size for each file uploaded. If left empty the file size will be limited by the value set for PHP (the default is 2 Mbyte). The value cannot be set higher than the value set for PHP.
- When checked, the Enable Description field will add a field to the form where up-loaders may describe the file uploaded. If this is not checked, the file name will be used as file description.
In the second panel contains for the most part a repetition field settings for the named field. Changing them here will change them everywhere they're used. There is, however, and additional option:
- The Number of values field let you specify that a fixed number of values (between 1 and 10) of the field shall be a part of the bundle, or Unlimited. Setting Unlimited will add another empty instance to the content entry form whenever the user fills in the field when creating content.
Click Save settings when done. You've now added a File field to the bundle.
Increasing upload file size
The default upload file size for PHP is only 2 Mbyte. This may be too
little for some applications. You can change it in
the .conf file for the site. For example, to increase it
to 32 Mbyte, use the following two lines:
php_value upload_max_filesize 32M
php_value post_max_size 32M
After changing these values, you need to test the configuration and do a graceful reload of the web server. The commands for Apache on Ubuntu are:
$ sudo apache2ctl configtest
$ sudo apache2ctl graceful
Uploading a file attachment
To upload files to a Drupal site, you create entities that have at least one File field as part of their bundle.
The facsimile below shows how the File field appears as part of a content creation form:
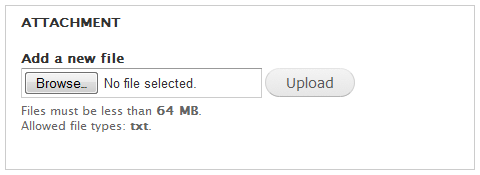
To upload a file attachment, you first press Browse to select the file to upload, then you press Upload to upload it to the server. The file is permanently saved and attached to the content when you press the Save button below the content creation form.
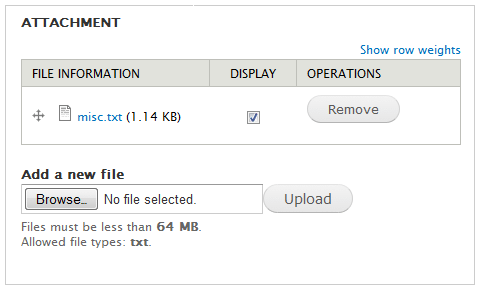
Once a file has been uploaded and attached to content, you can specify whether it will be displayed in the list of attached files or not. Listed files are displayed automatically in a section at the bottom of the content; non-listed files is not shown there, but a the link to an attached file can, for example be embedded in your body of the content.
 Embedding
a file in the content body means in this context that you copy the
relative path of the file and manually embed it where you want it to
appear in your content body – for example to insert a link to
the attachment in a link tag or an image tag. Note, however, that a number
of common text format , including “Filtered HTML” will not
allow any image tags.
Additional options for managing the display of the file list are available in the tab “Manage display” of the content type's administration page.
SELinux
If your web server is set up to use SELinux (Security Enhanced Linux), access to files is controlled by SELinux in addition to the standard file system access control based upon file ownership (user, group, others) and mode bits.
You can check enforcement status for SELinux with the following command:
$ getenforce
Enforcing
If this command produces “disabled”, “not installed” or “command not found”, you're not using SELinux.
In SELinux every process and every object (i.e. files, directories, devices, network ports, etc.) gets a label. Then a large rules database, called “policy”, is loaded into the kernel of the operating system. The kernel, based on the “policy”, ultimately controls what each process can do based on its label, and the label of the object it is trying to access.
This means that on a web server running SELinux, you may
find that the web server is not allowed to access a file, even if the
file's ownership and mode indicates that access should be granted.
For example, the web server is denied access to a file is with
mode 644 or -rw-r--r-- (normally indicating
that read access is granted to everybody).
To see the SELinux labels you need to inspect the file's “security context”. You can do this with the option -Z to the CLI-command ls. Example:
$ ls -Z *.png
-rw-r--r-- ... unconfined_u:object_r:httpd_sys_rw_content_t:s0 image1.png
-rw-r--r-- ... unconfined_u:object_r:user_home_t:s0 image2.png
Here, the file image1.png is accessible by the web server
process, because the third field in “security context” shown
for image1.png is httpd_sys_rw_content_t. This
label indicates that the web server process (httpd) may read
and write this file. Notice that the third field in “security
context” shown for image2.png is
user_home_t. This labels it as user's home content.
The web server process will be denied all access to
this file, as SELinux will block Apache processes from
reading data labeled as user's home content.
The command to set the security context to grant access to the web server process is typically one of:
$  sudo chcon -t httpd_sys_content_t image2.png
$  sudo chcon -t httpd_sys_rw_content_t image2.png
$  sudo chcon -R -t httpd_sys_rw_content_t translations
The first gives the web server process read (but not write) access to the file. The second gives the web server process read and write access to the file. The third gives the web server process read and write access to the directory and recursively to all files and directories inside the directory.
 You
may also want to read this article by Dan Walsh (Red Hat's SELinux
project leader) in the Drupal Watchdog:
Using Apache and SELinux Together.
It gives a brief introduction to SELinux and teaches you the art of debugging SELinux problems.
Troubleshooting
File permissions
The drush plugin File permissions may help.
Final word
The functionality described in this chapter is provided by the Drupal 7 core File module. In general, it enables users to upload and attach files to content and to manage these uploads.
 The
core File module is described in the
Drupal community documentation.
Last update: 2017-01-08 [gh].