Using the MS Windows 10 GUI
[TBA]
Table of contents
Introduction
[TBA]
The Start-menu
The Start-menu is the main point of access to Windows 10 apps. There are two main ways to open it:
- Use the mouse to click Windows logo in the lower-left corner of the taskbar.
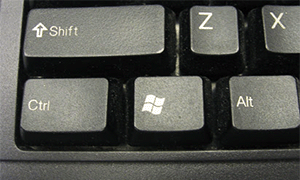
- Press the Win key (the key with the Windows logo) on the keyboard. See photo on the right.
In navigation descriptions, the clicking on the Start-menu will be written as or ).
The Windows 10 Start-menu consists of three parts. The two at the left resemble the traditional Start-menu from Windows 7 and earlier, while the righ part features the live tiles that were introduced in Windows 8. All are shown in the screenshot below.
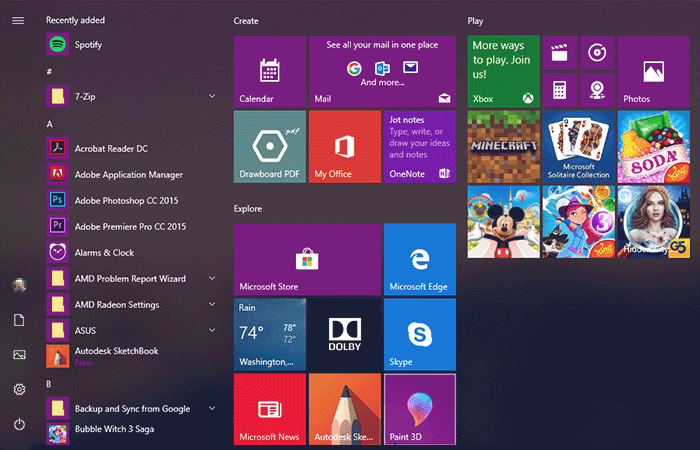
The Start-menu can be customized, however, by default, the following six items appear in the first part:
- Click the hamburger menu at the top to expand this part to show text in addition to icons.
- Click the avatar/username to change account settings, log in with another user or sign out.
- Documents: Access your documemts.
- Pictures: Access your pictures.
- Settings: Access settings.
- Power: Sleep, shutdown or restart.
The second part shows a list of most of the apps and app folders that are installed. These are sorted alphabetically. Clicking on the top bar (next to “Recently added”) provides quick navigation to a specific letter. Clicking on the small down-arrow next to an app folder will open a sub-menu to show the content of that folder.
 Not
all executable programs appear in this list (for instance: emacs does not).
I think this depends on the program's installer. The worksarounds are: create a desktop shortcut,
pin to taskbar, or pin to start. The latter will put a tile in the Start-menu, not add it to the
alphabetized list. I've haven't tried the suggestions from
SuperUser.com.
The tiles in in the third part can be customized to speed up access the apps you use frequently. Right-clicking an app and selecting “Pin to Start” will create a tile for the app. You may position the tile with the mouse.
Windows 10 Keyboard shortcuts
Using keyboard shortcuts for some tasks may be more efficient than using the mouse to navigate through menus. The list below contains those I find most helpful:
- Win
- Open or close Start Menu.
- Win+E
- Activate file explorer.
- Win+L
- Activate lock screen.
- Win+M
- Minimize all windows.
- Win+R
- Run command.
- Win+X
- Poweruser menu
 For
a longer list, see
WindowsCentral.com
Note that this list is not complete. For instance,
 Win+F
is not listed, but trying it reveals that it will open the
Feedback hub
app.
Settings and control panel
There are two different tools for configuring Windows 10. The old Control Panel and a new menu (introduced in Windows 8) called Settings.
They are not overlapping. The Settings menu is used to configure the common Windows personalization options, while the Control Panel is generally reserved for more complex things. If you need to adjust the way your computer looks, feels, or behaves from a user standpoint, head to the Settings menu. On the other hand, if you need to tweak any network, security, or hardware options, Control Panel is the place to be.
To navigate to one of them:
- Settings: .
- Control panel: .
This is what the Settings menu look like:
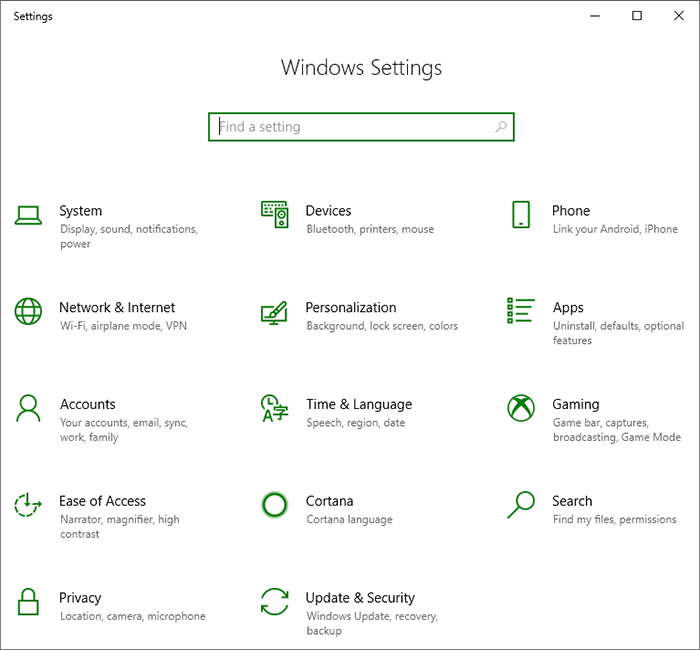
There are currently 14 sub-settings:
- System: Display, notifications, apps, and power options.
- Devices: Bluetooth, printers, and mouse/keyboard.
- Phone: Link other devices for sharing.
- Network & Internet: Manage Wi-Fi, Airplane Mode, and VPN.
- Personalization: Change background images and colors.
- Apps: Manage apps.
- Accounts: Settings for user accounts on this PC.
- Time & Language: Region, speech, and time options.
- Gaming: To manage game settings, include to turn game mode off.
- Ease of Access: Tools for the vision or hearing impaired.
- Cortana: Configure languge for digital assistant (only varaiants of English exists).
- Search: Settings for Internet and device search.
- Privacy: Control what your computer knows about you.
- Update & Security: Backup, restore, or update.
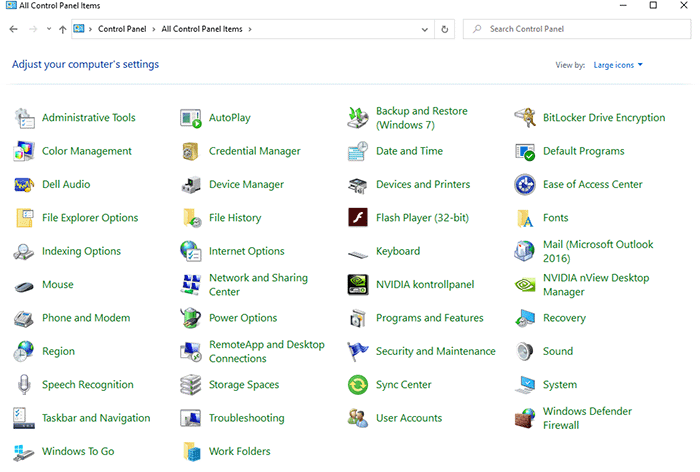
This is what the default Control panel menu look like:
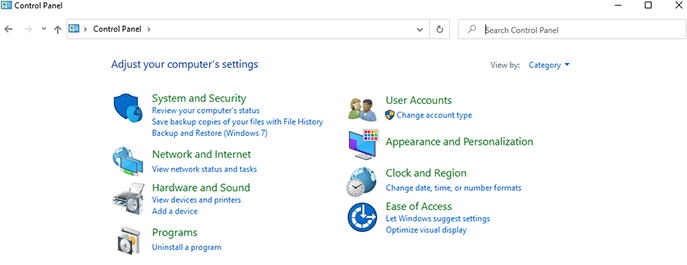
To change this into a version that show more items, change the “View by” from “Category” to “Large icons”.
Environment variables for the GUI
The environment variables you set in
the PowerShell profile does
not have any effect in the GUI. To change a environment variable (e.g. Path),
do the following:
- Visit .
- Use the search box on top left (“Find a setting”) and search for the environment variable you want to change (e.g. “Path”).
- Click on “Edit the system environment variables”.
- In the panel “System variables”, select “Path” and click “Edit”.
- Click “New”.
- Type in the new path (here “C:\Program Files\GIMP 2\32\bin”).
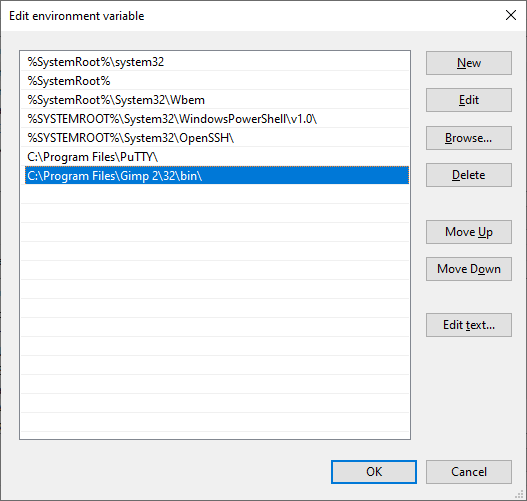
- The screenshot above shows how it should look like.
- Click “OK” until all panels that have been opened are closed.
Connecting to UiO
If connecting from outside UiO, you need to use a VPN. Use Cisco AnyConnect Secure Mobility Client to connect to “vpn.uio.no” first.
Source: VPN-tjenesten vpn.uio.no.
MS Remote Desktop
The Microsoft Remote Desktop lets you connect to a remote
PC or virtual apps and desktops made available by administrators. It
can be used to gain access to the M:\-drive on Ifi from
anywhere. It may ne used as an alternative to WinSCP to copy
files between a remote computer and your local PC.
To connect to Ifi, type Win+R and then “mstsc”
or use the start menu:
.
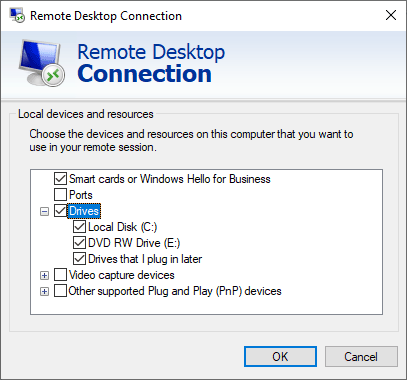
To be able to save to local drives, you need to configure local resources. When setting up a connection, click on and tick local drives as shown in the screenshot to the right.
You need to click past two certificate warnings to connect, as the server is named “windows.ifi.uio.no”, but the certificate is issued for “win.ifi.uio.no”.
 Adobe Framemaker
7.1 used to be available on a machine called
windold.ifi.uio.no, but in 2020, it is gone.
Program kiosk
The UiO application kiosk gives you access to your home area and a large amount of programs without having to install the programs on the machine you are using.
If you have not installed the VMWare Horizon Client, you may use the webversion of program kiosk.
After starting "UiO Windows desktop".
Source: UiO Program kiosk.
Specific apps
Below are usage notes for specific apps.
IrfanView
To initiate screen capture, press the key: c. This
launch the capture setup. Change any setting that needs
changing. Press “Start” to make ready for capture.
Final word
[TBA]
Last update: 2020-03-28 [gh].