Using a terminal emulator
This note is about using a terminal emulator from a Microsoft Wondows 10 personal computer to access the CLI on a eb server running Ubuntu or some other flavour of Unix or Gnu/Linux..
Table of contents
Introduction
To access the web server using the command-line interface (CLI) from a personal computer you use a terminal emulator.
You may use the MS WIndows 10 built-in ssh, Starnet's X-Win32 (commercial) or Simon Tatham's PuTTY (free software).
Logging in with a username and password
To log in on the remote with a username and password, use one of the following methods:
To use ssh, open up a Powershell window and just type the ssh-command.
For example, if your username is “bob” and the server you want to access is named “example.com”, do this from the PowerShell:
PS C:\> ssh bob@example.com
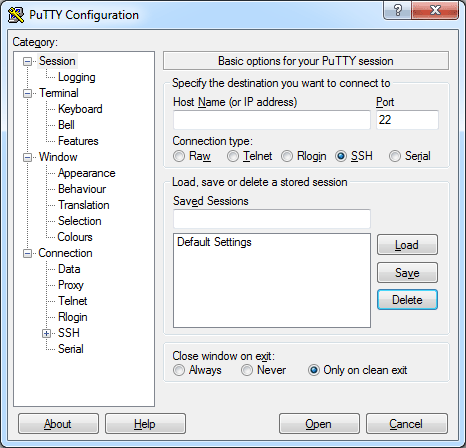
To use PuTTY you need to configure a session. The screen shot below is the PuTTY configuration screen. Make sure you set the connection type to “SSH”- The only other thing you need to fill in is the host name or IP-address to connect to.

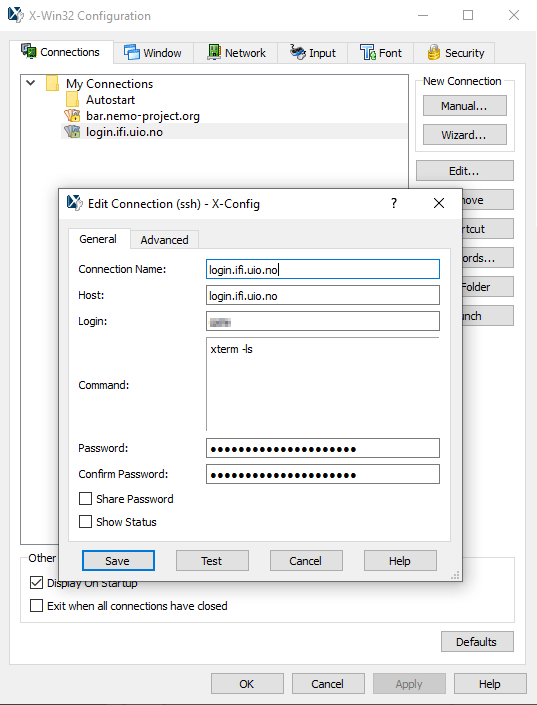
X-Win32 If your computer is in a secure location (e.g. at home), you may store your login credentials in X-Win32 by means of X-Config:

Key based authentication
However, logging in on the remote with a password sent over the net is not recmmended. Best practice is to use key based authentication with various ssh clients.
Obtaining and installing keys
If you already have a working key pair, you should be able to reuse that.
If you don't, here sre links to how to generate a key pair on MS Windows and Unix:
- On MS Windows: Use PuTTYgen - see Ionos: Use SSH Keys with PuTTY on Windows, section “Create New Public and Private Keys”.
- On Unix: Use ssh-keygen -see “Unix: The shell” and the section “Key-based authentication”.
After generating the pair, make sure the pair of key files are stored in a subdirectory named .ssh in your home directory. Check this before proceeding.
Copy the public key to the server and store it in the
file ~/.ssh/authorized_keys. If you don't have access to
the server, ask the server's administrator to do this for you.
To test that you have a working key pair, test it with the ssh client that is built into MS Windows 10.
For example, if your username is “bob” and the server you want to access is named “example.com”, do this from the PowerShell:
PS C:\> ssh bob@example.com

No mail.
Last login: Mon Apr  5 15:14:56 2021 from 192.0.2.0
$
This the dialogue shows a successful login using key based authentication.
However, you may want to use a more
PuTTY
If your key pair was generated by ssh-keygen, first convert private key file “id_rsa” to a PuTTY compatible file named “id_rsa.ppk”, using the following procedure:
- Open PuTTYgen (part of the PuTTY package).
- Navigate to .
- Locate the file “
id_rsa” on you computer (should be in~/.ssh). - Click on “Save Private Key” and “Yes” to save without a passphrase.
- Save it in the same directory, and name for new key file “
id_rsa.ppk”. - Close PuTTYgen.
Now open to PuTTY and add a path to key for the connection. Provided the username on the MS Windows PC and the remote server is the same, you can configure PuTTY to use the system username.
- Enter the remote server Host Name or IP address under Session.
- Navigate to .
- Right of the “Private key file for authentication” field, click “Browse…”.
- Locate the private key
id_rsa.ppkon your computer and and click “Open”. - Navigate to .
- Select the radio button “Use system username (…)”
- Return to “Sessions” to save session configuration so you can reuse it later.
- Finally, click “Open” to log into the remote server with key pair authentication.
X-Win-32
Now go to X-Win-32 and add a path to key for the connection:
- Open X-Config
- Locate the connection to configure, and navigate to .
- Click on the … on the right of the “Key File” field.
- Locate the newly created “
id_rsa.ppk” file and add it to the field. - Click “Save” to save your yout connection with the private key.
Source: StarNet.com.
In some cases, PuTTY and pscp (the PuTTY
version of scp is unable to locate id_rsa.ppk.
You will typically get this fatal error:
FATAL ERROR: No supported authentication methods available (server sent: publickey)
A fix for this is to specify the full path
to id_rsa.ppk on the command line:
pscp -scp -i C:\users\u\.ssh\id_rsa.ppk $file u@example.net:/home/u/sink
In PuTTY, create a session and add the full path by adding the full path to in the field “Private key file for authenticton”, and the save the session.
Troubleshooting
- “Permission denied (publickey).” The public key on the server is missing or invalid.
- “Server refused our key” / “No supported authentication methods available (server sent: publickey).” The ssh client did not provide a private key.
Final word
[TBA]
Last update: 2021-07-06 [gh].