TLS
This chapter is about TLS.
Table of contents
- Introduction
- Check that ssl_module is enabled
- Certificate providers
- Creating certificates manually
- Fix Drupal for TLS
- Restart the web server
- Troubleshooting
- Final word
Introduction
Transport Layer Security (TLS) and its predecessor, Secure Sockets Layer (SSL) are cryptographic protocols that provide communications security over a computer network. The initials “SSL” usually refers to both.
When secured by TLS/SSL, the connection between a browser (client) and a web server has the following properties:
- Confidentiality: The connection is secure because symmetric cryptography is used to encrypt the data transmitted.
- Data integrity: The connection is protected against undetected loss or alteration of the data during transmission.
- Identity authentication: The identity of the entity owning the server can be authenticated using public-key cryptography.
There are four kinds of TLS certificates: Self-signed (SS), Domain Validation (DV), Organization Validation (OV) and Extended Validation (EV).
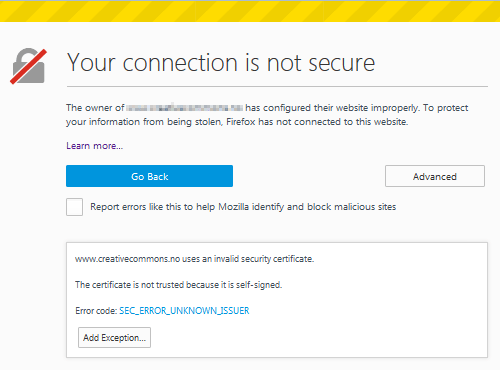
A Self-signed (SS) certificate is a certificate which is signed with the private key corresponding to the public key which is in the certificate itself. This means that the certificate was issued by the certificate owner itself. It is trivial and free to create a self-signed certificate using tools such as OpenSSL. It provides confidentiality and data integrity protection, but no proof of identity. When browsing a site with a self-signed certificate, the browser will say "Your connection is not private" (Chrome) "Your connection is not secure" (Firefox), or "There is a problem with this website’s security certificate." (MSIE) and require a security exception to be added before providing access to the site. This means that SS certificates should not be used on public-facing websites. They can only be used for testing.

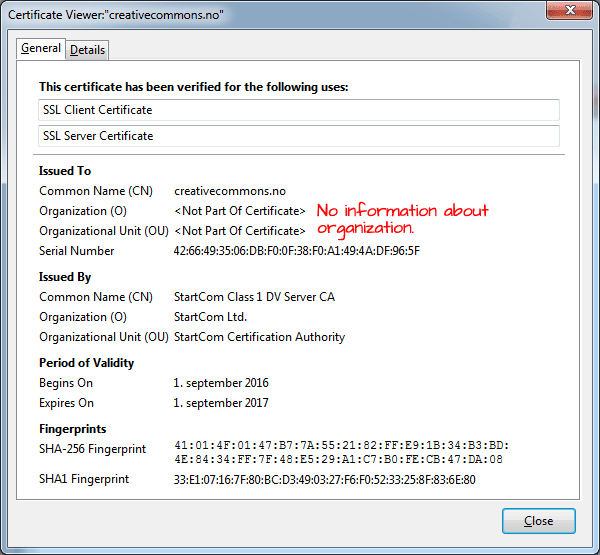
A Domain Validation (DV) certificate provides the lowest level of validation available from commercial and public service certificate authorities. It is a certificate that validates that the domain is registered and someone with admin rights is aware of, and approves, the certificate request. The DV certificate is the most common TLS certificate type. Free DV certificates exist, and validation is automated, and usually takes seconds. On a technical level, a DV certificate asserts that a public key belongs to a domain it says it belongs to. Nothing else about a site’s content or who runs it is verified. DV certificates do not include any information about a website’s reputation, real-world identity, or safety. This means that sites trafficking in phising, malware and scams can easily obtain DV certificates. If a DV certificate is issued by a trusted authority, a browser will indicate a trusted HTTPS connection (i.e. data confidentality and integrity can be trusted). But this does not necessarely mean that the site itself is trustworthy. So a DV certificate may not be good enough for an e-commerce site if you have security minded clients.

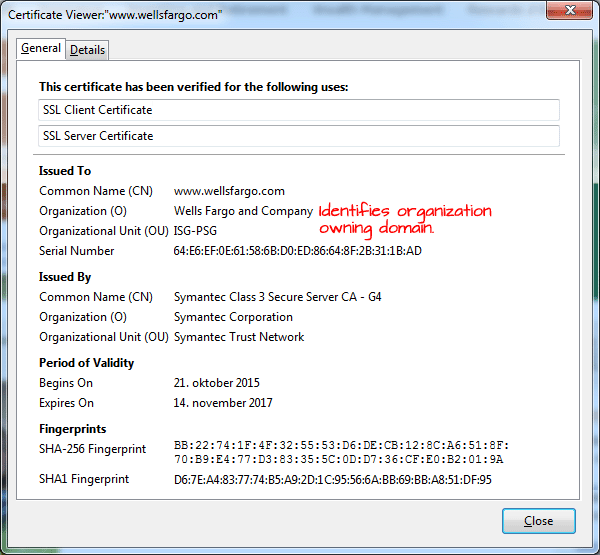
A Organization Validation (OV) certificate is a certificate that validates the domain ownership, plus organization information included in the certificate such as name, city, state and country. The validation process is similar to the domain validated certificate, but it requires additional documentation to certify the company identity. With an OV certificate, the organization’s name is also listed in the certificate, giving added trust that both the website and the company are reputable.

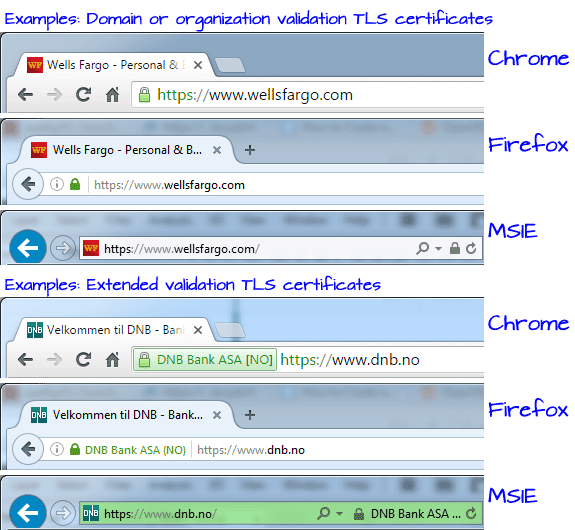
An Extended Validation (EV) certificate is a certificate that verifies both the domain and the company. It's the highest level of TLS certification for a website. When a site has an EV certificate, the URL will be displayed in the browser with the company identity along with the padlock. Chrome and MSIE will even show the company name on a green background. EV validation certificates are expensive, costing from USD 145/year an up.
The illustration below shows a trusted DV/OV certificate and a trusted EV certificate is visualized for the end user in three different browsers.

Browsers do not use different visual clues in the URL field to distinguish between DV and OV. To tell DV and OV certificates apart, you may try inspect the numeric policy identifier (appears under the certificate's "Details"-tab if present). Please note that this identifier is not adopted by all CAs. Values used for the policy identifier are show below:
DV 2.23.140.1.2.1
OV 2.23.140.1.2.2
EV custom
Read more:
- Simone's blog: SSL/TLS certificate types
- Globalsign: Telling DV and OV certificates apart.
Check that ssl_module is enabled
Before installing a certificate on a website, first check if the ssl_module is enabled:
$ sudo apache2ctl -M # Debian
$ sudo httpd -M      # Fedora
Then proceed to install a cerificate.
Certificate providers
Below are links to websites that monitor the market for certificate providers. Some of these are also involved in affiliate marketing (look for ids in their URLs).
- LifeWire: The 15 cheapest SSL Certificates.
- LifeWire.com: The Cheapest SSL EV Certificates.
- Moz.com: Pros and Cons of HTTPS Services.
- SSLShopper.com: Cheap SSL Certificates.
The only free certificate available that is trusted by major browsers I am aware of is the DV certicate provided by LetsEncrypt.org. There exists other free certificates, but they are not not trusted by major browsers, so, like self-signed certificates, they can only be used for testing.
LetsEncrypt.org
LetsEncrypt is a service provided by the Internet Security Research Group (ISRG) using technology developed by EFF and others. It provides free DV certificates. The certificates only last for 90 days, but renewals are automated on Ubuntu.
See also: DO.
To obtain a certificate for one or more websites, go to the the Certbot site to get customized instructions for your operating system and web server.
For Apache on Ubuntu 14.04, 16.04 and 18.04, the Certbot team maintains a PPA. If you add it to your list of repositories as described in the instructions (see below), you shall be able to use the Ubuntu standard package manager apt for installing and upgrading.
Below is an outline of the process for Apache runing on Ubuntu 16.04:
First, check if Certbot is already installed on the web server.
$ certbot --version
certbot: command not found
To install Certbot for Ubuntu 18.04 or 20.04, use the following pair of commands:
$ sudo apt install certbot
$ sudo apt install python-certbot-apache  # 18.04
$ sudo apt install python3-certbot-apache # 20.04
After it has been installed, you can print out a list of subcommands and options for Certbot with the following shell command:
$ certbot --help
…
To set up one or more sites running the Apache2 web server to use TLS, do:
$ sudo certbot --apache
The first time you do this on a specific server, it will ask for your email address, and go through some other inital setup steps.
But after that, Certbot will create a numbered list of all the domains enabled for your Apache web server. You may pick more than one domain, but all the domains you pick will share a single certificate with the same common name (CN). Yout typically will pick just the domainname and “www.” followed by the domain name.
Certbot will then get a certificate for you and also edit your Apache configuration automatically to serve it and to redirect to the secure site..
 Cerbot does not grok IDNs.
To obtain certificates for these, use punycode in the Apache configuration file.
You may use a punycode converter to find the correct strings.
Your account credentials is saved in the local certbot
configuration directory /etc/letsencrypt.
The keys and certificates for a domain named example.com is saved
in the directory /etc/letsencrypt/live/example.com/
and the apache configuration file for the domain is amended to refer to
the certificate and private key created by Certbot.
As the final step of the process, certbot will ask about how you want to configure redirects from http-requests to https. Unless you have a specific reason not to, you should always do this.
The secure vhost will become available after the web server is restarted. To complete the process restart the web server.
To delete cerificates you no longer need, the following command will let you choose the certificate to delete from the list. It removes files from live, archive and renewal directories.
$ sudo certbot delete
 If
the site is enabled, disable it first, before deleting the
certificate. Otherwise, Apache will become confused by the cerificate
missing.
If the site previously sent a Strict-Transport-Security header, it will be valid for a long time to come. Its purpose is to do force all http requests to go to https. To stop this from happining, locate the icon looking like four books (library) in the Firefox top bar, and navigate to . Right-click on the site that no longer has a certificate, and select “Forget About This Site”.
The first of the following commands will simulate renewal of all active certificates. The second will renew those that are about to expire (i.e. those who are within 30 days of expiring), and do nothing to those that are not:
$ sudo certbot renew --dry-run
$ sudo certbot renew
$ sudo certbot renew --force-renewal
To get a more verbose report about renewal status, use:
$ sudo certbot renew -v
To see when a certificate is due for renewal, view the certificate. The “Period of validity” section will tell you when it was last renewed, and when it will be renewed.
If certbot package includes a cron job
(/etc/cron.d/certbot). For Ubuntu 16.04, there was also
a systemd timer (check: systemctl
list-timers). Both run twice a day and automate renewals.
The cron job disables itself when
the systemd timer is present.
Notice:
- Congratulations! Your certificate and chain have been saved at
  /etc/letsencrypt/live/[CN]/fullchain.pem. Your cert will
  expire [in 90 days]. To obtain a new or tweaked version of
  this certificate in the future, simply run certbot again with the
  "certonly" option. To non-interactively renew *all* of your
  certificates, run "certbot renew"

 - Your account credentials have been saved in your Certbot
   configuration directory at /etc/letsencrypt. You should make a
   secure backup of this folder now. This configuration directory will
   also contain certificates and private keys obtained by Certbot so
   making regular backups of this folder is ideal.
Upgrading Certbot
If the installation comes from the PPA, the Ubuntu standard package manager (apt) will automatically upgrade if the package is upgradable:
$ sudo apt update
$ sudo apt list --upgradable | fgrep certbot
To actually upgrade certbot (and other pending packages), use the following pair of commands.
$ sudo apt upgrade
$ sudo shutdown -r now
Resources
Creating certificates manually
Certificate providers offer tools (such as certbot described above) that automate the process, but are tied to their specific services. Below the process of creating and installing cerificates by hand.
To work with certificates, you need openssl 1.0.1 or newer:
$ openssl version
OpenSSL 1.1.0f 25 May 2017
You will also need a working directory to store configuration, certificates and keys. Create a subdirectory for the local CA in own home directory if it does not already exist.
Background:
- Ubuntu OpenSSL.
Generate self-signed certificate
When generating a certificate, you will be asked to provide additional information, such as your two-letter country code, organizational information and a common name. [Check if having a config file as described in Ubuntu OpenSSL will take away this dialogue.]
The common name should be the fully qualified domain name for the
site you are securing (www.example.com). You can leave
the email address, challenge password, and optional company name
blank.
Create a self-signed certificate, example.com:
- Create a certificate signed by myself using openssl.
openssl req -x509 -nodes -days 365 -newkey rsa:2048 \

        -keyout example.key -out example.crt
You will be prompted for additional information. When the command is finished running, it will create two files: aexample.keyfile and aexample.crtself signed certificate file valid for 365 days. - Copy the key file and the self-signed certificate to
/etc/apache2/ssl.
Background:
Stripping key
By default, the private key will be protected by a passphrase and you be prompted for the passphrase whenever Apache is started. While this additional protection is nice, it is a PITA to enter the passphrase for every restart. If you want to strip the passphrase before installing the private key, you can do this with the following:
# openssl rsa -in private.key -out stripped.key
# openssl rsa -in stripped.key -out private.key
Create secured virtual host
After installing the key and certificatein the
directory /etc/apache2/ssl/, you need to edit the vhost
file, and add a VirtualHost container for port *:443,
based upon the following pattern:
<VirtualHost *:443>
        …
        SSLEngine on
        SSLCertificateFile /etc/apache2/ssl/example_com.crt
        SSLCertificateKeyFile /etc/apache2/ssl/private.key
        SSLCertificateChainFile /etc/apache2/ssl/1_root_bundle.crt
        <Directory "/www/ecample.com/htdocs">
                …
                AllowOverride All
        <Directory>
</VirtualHost>
Fix Drupal for TLS
If the secured site is a Drupal site you need to set up Drupal to handle TLS correctly:
- Correct the
$base_urlassignment in thesettings.php-file. - Redirect all incoming requests to secure pages.
To correct the $base_url assignment to use "https" in
stead of "http", edit the settings.php file.
Below are instructions for adding rewrite commands to redirect all incoming requests to secure pages.
 If
you use certbot to automate the process, you only need to
check the Apache configuration. By default, certbot adds the
necessary rewrite commands directly to the site's Apache configuration
file.
LetsEncrypt.org's certbot will automatically add the
correct redirects to the host's Apache configuration file when
installing the certificates if you request so. If you don't use certbot, you
may need to add the statements below to the host's Apache
configuration file (best option), or to the
site's .htaccess file just below RewriteEngine
on (if you are on shared web hosting and do not have access to
the host's Apache configuration file. If you opt for the latter, make
sure that the directive AllowOverride All is present in
the Directory (a child under the VirtualHost
container). This means that the Drupal .htaccess takes
precedence.
RewriteCond %{HTTPS} off [OR]
RewriteCond %{HTTP_HOST} ^www.domainname\.com*
RewriteRule ^(.*)$ https://domainname.com/$1 [L,R=301]
For a sub-domain:
RewriteCond %{HTTPS} off [OR]
RewriteCond %{HTTP_HOST} ^www.sub.domain\.com*
RewriteRule ^(.*)$ https://sub.domain.com/$1 [L,R=301]
(Source Drupal.org.)
 A
minor upgrade of the Drupal core will replace
the
 .htaccess-file with the latest version from the
Drupal distribution, removing any re-write rules you've added. You
need to keep a copy of your changes to .htaccess, and
re-install them after upgrading.
Restart the web server
The secure vhost will become available after the web server is restarted. It is good practice test the syntax of the configuration files before restarting.
Ubuntu running Apache:
$ sudo apache2ctl configtest
Syntax OK
$ sudo systemctl reload apache2
On Red hat running Apache:
$ sudo service httpd configtest
Syntax OK
$ sudo apachectl graceful
After your site is secure, you may need to flush the image cache to replace insecure cached images with secure ones. Navigate to the webroot and use the following command:
$ drush image-flush
Troubleshooting
HSTS
HSTS stands for HTTP Strict Transport Security. It is a web security policy mechanism that forces web browsers to interact with websites only via secure HTTPS connections (and never HTTP). This helps to prevent protocol downgrade attacks and cookie hijacking. However, if the site is not secure, it will produce false warnings. It may also cause redirects to a previously linked domain remmebered by the browser. To fix it, make the browser forget all about the site.
Here is how to make your browser forget about a site.
- The SSL Store: Clear HSTS settings.
Weird redirects
If server redirects to another domain, or emails sent from the site (e.g. email about available updates) refers to another domain, you my have a misconfigured certificate. For instance, you visit “mydomain.com”, but is redirected to “somedomain.com”. If this happens, try visiting “https://somedomain.com” with Firefox. It will typically display an invalid certificate. If you click “Advanced” you will see something like this:
Web sites prove their identity via certificates. Firefox does not trust this site because it uses a certificate that is not valid for somedomain.com. The certificate is only valid for the following names: mydomain.com, cpanel.mydomain.com, mail.mydomain.com, webmail.mydomain.com, www.mydomain.com.
This may be caused by an attacker intercepting your connection, but if you experience this just after setting up TLS for a site, the most likely cause is a TSL misconfiguration.
To fix it, check your configuration and if necessary delete the certificate and replace it with a new one.
Partly secure pages
Tools to sniff out insecure embedded elements on a otherwise secure page: Cheap$$Lsecurity.com, WhyNoPadLock.com.
Final word
USIT.
Dette stemmer ikke at kokeboken gir deg selvsignerte
sertifikater. Kokeboken beskriver hvordan du lager en nøkkel og en
CSR, altså et Certificate Request med en tilhørende nøkkel. CSRen er
ikke et selvsignert sertifikat. Ta godt vare på nøkkelen og pass på at
den ikke kommer på avveie.

Når dere har CSRen finnes det en lenke på kokeboksiden til

    http://www.uio.no/tjenester/it/sikkerhet/sertifikater/bestilling.html

som igjen henviser deg til

    https://nettskjema.uio.no/answer/74868.html

der dere legger inn innholdet i CSRen. Automatikken vil så sende dette
inn til DigiCert og godkjennerene hos oss (meg og et par til) vil få
en epost om at det har kommet inn en sertifikat-bestilling. Vi logger
oss så på DigiCert sin portal og sjekker om sertifikatet ser fornuftig
ut. Om det gjør det godkjenner vi. DigiCert sender så ut sertifikatet
til bestiller per epost.

Siden dere har nøkkelen er det kun dere som kan bruke
sertifikatet. Håper dette var oppklarende. Lukker saken.
[TBA]
Last update: 2018-04-08 [gh].