Drupal administration
This chapter discusses some of the interfaces and tools you may use in the day to day administration of a Drupal-based website.
Table of contents
- Administration menu
- Site information
- Managing users
- URL aliases
- Database administration
- Cron
- Updating Drupal
- Final word
Drupal extensions mentioned in this chapter: Backup and migrate, Pathauto, Token, User restrictions.
Administration menu
When you are logged in as the administrator of a Drupal 7 website, a menu with links to the various components of the administrator's interface will appear at the top of the screen.
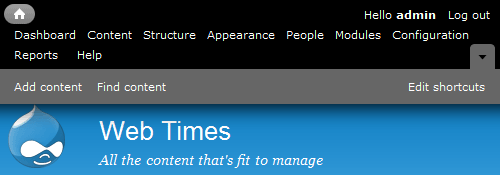
The screenshot above shows the the administrator's interface (black) and shortcut toolbar (grey) and the page header (blue) as displayed by the default theme (Bartik). Inside the page header is the site name (“Web Times”) and slogan (“All the content that's fit to manage”).
Site information
To change site information, navigate to . Many of the settings on this page (e.g. site name and the site's email address) are already filled in with information prompted for by Drupal's installation script.
The site name is used in a number of places on the website, including the page header at the top of each page (if the theme is set up to display it), and in the registration and cancellation emails.
The slogan is usually displayed in the page header, just below the title. Like the title, its placement is really controlled by the theme.
The site's email address is used as the From address in
all the emails that are sent automatically. I usually set up an
non-personal email account such as admin@sitename.com or
webmaster@sitename.com for this field (where
“sitename.com” is the site's domain name).
Managing users
General user account settings
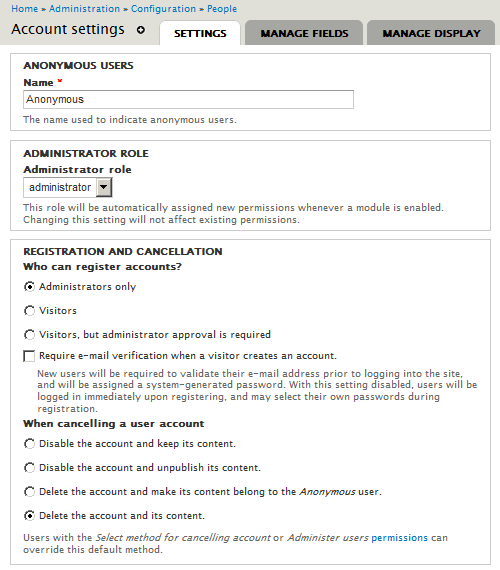
The interface for configuring settings that apply to all users are . This interface lets you configure default behaviour of users, including registration requirements, emails, fields, and user pictures.
 In
Drupal 6, the core allowed the administrator to enforce access rules
to control whether a given user name, email address and/or host should
be allowed to create an account or to log in.
This could be used to require or disallow spaces in a user name, to
enforce that only users with email-addresses in certain domains should
be allowed to create an account, etc.
Access rules was removed from the core of Drupal 7. If you need this
functionality, you need to install the
User restrictions
package.
The screen shot below shows the top of this form. The two first items lets you set the display name for the predefined anonymous user roles (default “Anonymous”), and to pick the role that shall be granted the rights of the site administrator (default “administrator”). The third item shown below sets site policies for registration and cancellation og accounts.
The next item in the account settings for sets policies for signatures (text added automatically below any content created by the user) and user pictures (avatars). If you enable user pictures, there are some additional settings available.
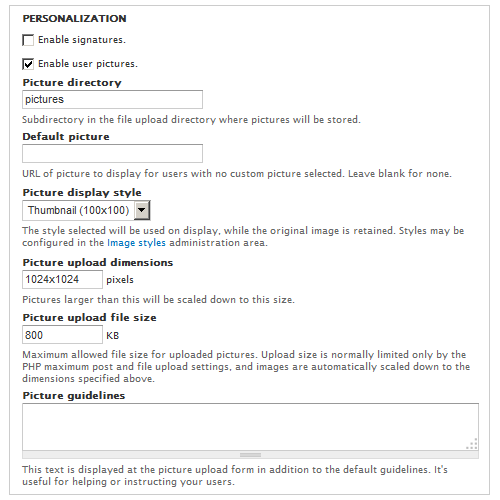
If you choose to , you should also specify the URL of a default picture to display if the user does not upload a picture.
The final item lets you customize the text of the emails that is sent by the systems as an response to miscellanenous account events, such as the adminsitrator creating a new user, the registers an account, etc.
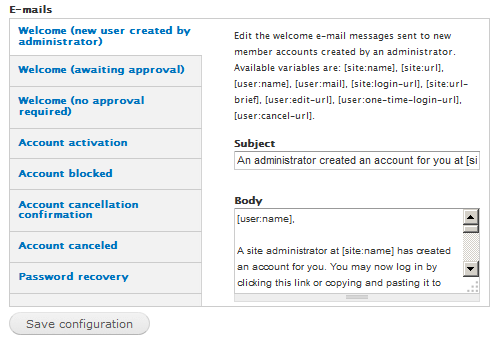
When done comfiguring the account settings, press to save the settings.
Adding fields to the user entity
The basic user entity only contains a few basic fields (e.g. uid, name, pass, mail, theme, signature, picture and a few more). To add more fields to an user entity in Drupal 7, you go to and add the new fields you want (e.g. real name, phone, number, address, favourite colour, etc.). To define a new field, you must assign the field a label, an internal machine name, a field type, and a widget to handle the form entry processing.
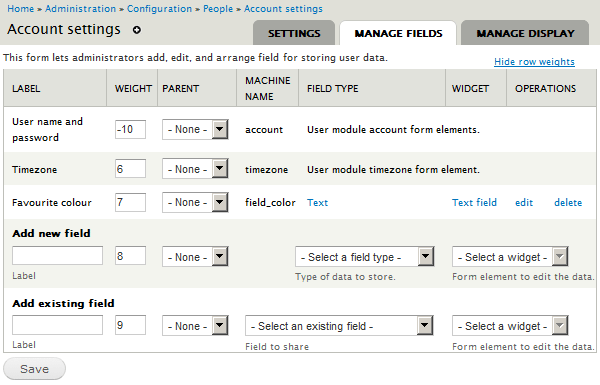
The value Weight determines the position of the field in the user rehistration form. Larger values (heavier weights) “sink” to the bottom. To determine the postion and appearance of the field when the user profile is displayed, click on the tab .
Cancelling users
Currently, the only means of finding out whether a user is still active is to list the users () and sort the user list according to .
It is safe to cancel an inactive user. If you do, you will be asked what to do with the account and its content. There are four alternatives:
- Disable (block) the account and keep its content.
- Disable (block) the account and unpublish its content.
- Delete the account and make its content belong to the “Anonymous” user.
- Delete the account and its content.
Undesirable users may be blocked. As long as they are blocked, they cannot log on and they cannot re-register with the same email address.
 The
error messages shown to blocked users are less than obvious. They are
told the account do not exist if they try to log on or to get a
password reminder. If they try to re-register, they are informed the
account already exists.
With comments, there is a provision for placing content created by certain user types (e.g. anonymous users) in a moderation queue, while other user types can create pre-approved content. For other content types, the work-flow settings may be used to force certain content types to be moderated.
URL aliases
By default, Drupal labels nodes with a number. To create URLs that is more meaningful (for instance to hand out to third parties), the Path module that is part of the Drupal core provides a way to create meaningful URL aliases.
To turn on this, first navigate to and tick . Next, navigate to , and set the following permissions: and for the roles you want to give this capability. You would normally only let administrators do this.
Now, for those allowed to administer url aliases, there will be a page to list existing URL aliases and to add new URL aliases.
URL aliases can also be added when a node is posted or edited (provided the user has sufficient permissions). You do this by editing the field under .
 By
installing and enabling the
Pathauto and
Token modules,
URL aliases will be created automatically, without requiring the author
of a node to manually specify the path alias.
The aliases are generated by a pattern-based system that
uses tokens set by the administrator.
Database administration
The recommended tool for adminstrating a MySQL or MariaDB database is phpMyAdmin.
 See
also this page with
useful queries.
Troubleshooting database
If the following error appears in the GUI, it indicates that Drupal is unable to truncate caches for some reason.
PDOException: SQLSTATE[HY000]: General error: 1030 Got error 168 from storage engine:
  TRUNCATE {cache_admin_menu} ; Array ( ) in cache_clear_all()
  (line 173 of …/includes/cache.inc).
The remedy is to manually truncate all cache tables in the database. If you are lucky, the following CLI-command will fix it.
$ drush cc all
Cron
Drupal 7 comes with a built-in function (sometimes referred to as “poor man's cron”) that is used by the system to perform periodic tasks. The built-in cron can be set up to run at specified intervals by navigating to (default is every three hours). Setting a longer interval helps reduce server load, but can also cause unwanted effects, such as search lagging behind content.
Drupal will automatically run the built-in cron whenever a page is requested if has not been run within the requested interval.
Clicking the button runs cron immediately.
Unfortunately, Drupal's built-in cron significantly impacts page
load performance when it runs. That is OK for a development site, but
should be avoided in a production site. Instead, you can set up
a Unix or Gnu/Linux to use crontab to trigger a cron
run on a Drupal site. This will provide more predictable and reliable
behaviour, and has less of an effect on delays that may impact
users. You can do this by having a crontab-entry that pokes cron.php.
For example, each of the following crontab entries will run the cron task at 03:04 every night:
4 3 * * * /usr/bin/curl --silent --compressed http://example.com/cron.php?cron_key…
4 3 * * * /usr/bin/wget -O - -q -t 1 http://example.org/cron.php?cron_key=A0p8k5z2…
4 3 * * * /usr/bin/lynx -source http://example.net/cron.php?cron_key=A0p8k5zAb0p5w…
(Provided, of course, that curl, wget or lynx are available on the machine that runs the cron job. I provide three different command examples so that you can pick one that is available. Only one of these is of course required.)
Notice the secret cron_key passed as an argument with the URL.
This is to prevent others using cron as a vector for a denial
of service attack. Navigate to to view the URL for your site. Without
the right cron_key, nothing will happen.
When you set up an external cron trigger, you should disable Drupal's built-in cron by setting its frequency to “Never”.
 In
addition to the above: If your site receives very little traffic, and
you depend on cron for critical maintenance tasks, you cannot rely on
page loads to trigger cron. Instead, set up cron to be run from the
outside.
In an environment with a cluster of hosts, where your initial login-shell may be on a random host, it may be a good idea to include something like the following entry in the crontab. It will append a line each day to the named log-file recording the name of the host where there is an active crontab. Normally, you don't want more than a single active crontab in a cluster.
4 3 * * * echo `date` `hostname` >> /hom/gisle/crontab.host
There are several ways to maintain the crontab.
I prefer to create a text file with all the entries I want in
my crontab in a file named crontab.txt.
I then can create an active crontab or replace the current
crontab with the contents of that file with the following
shell command:
$ crontab crontab.txt
To list the content of your current active crontab, you log on to the host where your crontab is active, and type the following shell command:
$ crontab -l
For a stable personal site, you might set up this cron job to run once a day. For a more active site you might want to run that job more often – perhaps every few hours or every hour.
 Drupal 7
uses cron for a number of recurring tasks such as:
indexing the site's content for search,
retrieving feeds for the news aggregator,
checking for updates,
sending out notification,
and various maintenance tasks (e.g. truncating log files).
To learn more about cron jobs in Drupal, see the
Drupal.org website.
Troubleshooting cron
Cron may fail due to tasks set up my activated modules is exhausting memory allocted for PHP. The error message will look like this:
Fatal error: Allowed memory size of 134217728 bytes exhausted (tried to allocate
8192 bytes) in …/includes/database/database.inc on line 2227
To see the maximum allowed memory size, check Drupal's status
report the by clicking the PHP-link for “more information”, and search
for the value memory_limit. A typical PHP configuration
will be set up with a value for 128 Mbytes (134217728 bytes).
If you run out of memory during cron runs, ensure that your
PHP memory_limit is set high enough. You can find out
how much is required by setting it very hight and enabling
Memory profiler.
You'll find the memory consumed in the watchdog log.
To increase the memory limit for a vhost, change the setting in its
configuraton file and restart the web server. For instance, to set it
to 4096 Mbyte, use:
php_value memory_limit 512M
See also: Changing PHP memory limits.
To get email alerts about this error, enable Notify Cron Failed (not yet tested).
If cron fails, a workaround to get stuff cleaned up is to use drush to clear all caches and the to run cron from drush:
$ drush cc all
$ drush cron
For more cron troubleshooting tips, read Troubleshooting cron at Drupal.org.
Updating Drupal
 If
you are unable to update because drush is unable to unpack
the tarball, check for full root file system. If it is full, you need
to free up some
space.
Doing a minor update of the core
A “minor update” in Drupal-speak is any update within a major version. Updating the core from version 7.79 to 7.80 is a minor update, updating from version 7.80 to 8.9.13 is a major update.
Minor updates are issued frequently for the Drupal core. A minor update may add requested features, fix bugs and/or deal with security issues. You want to install a minor update as soon as possible after it is released to maintain the integrity and security for your Drupal installation.
Doing minor updates is usually quick and painless, provided
you've observed Drupal's prime directive, which is: Do not
hack the core. This essentially means that you should avoid
touching
anything outside the sites subdirectory.
 Doing
a major update of the Drupal core to version 8 is not quick and far from
painless. Describing how to do it is beyond the scope of this
ebook. Basically, you rebuild the site as a Drupal 8 site and then migrate the content.
If your installation is clean (i.e. you haven't hacked core), and your file system permissions are set correctly, you can do bring the core up to the latest version by using the CLI.
If you use drush to maintain your Drupal 7 website, navigate to the webroot (or below) and use one following commands:
$ drush pm-update drupal -y
$ drush up drupal -y
This will move all files that make up the core to a backup location, download the new core, install it, and then do all required database updates.
 Using
drush to update the core will replace everything below the
webroot with the latest defaults. For instance: If you have
changed
 .htaccess and/or robots.txt those
changes will go away. Make a rule of comparing those two files to
those backed up to determine whether you need to retrofit any
changes.
The default drush backup location
is drush-backups in your home directory. To change it,
put the following in your drushrc.php:
$options['backup-dir'] = 'path/to/your/backup-dir';
 The
“Status” report and drush gets the version number from
 modules/system/system.info.
If drush says: “Project drupal was updated successfully.”,
but drush ups shows the previous version, make
sure drush has permission to overwrite all files that need
updating.
If you use composer to maintain your Drupal 7 website, navigate to the directory containing composer.json and use the following sequence of commands:
Using compsoser to maintain a Drupal 7 website is still experimental.
$ composer update 'drupal/*' --with-dependencies
$ drush updb
$ drush cc all
Updating extensions
Maintainers in the Drupal community maintain their contributed extensions on a regular basis. An update may be due to a security problem being discovered and fixed, a bug being fixed, or just to add new features.
To check the update-status of your site, you can use the following pair of commands in the CLI:
$ drush pm-refresh; drush pm-updatestatus
If you want to type less, the equivalent shortform aliases are:
$ drush rf; drush ups
You can update any extension to the latest stable version with the following CLI command:
$ drush up machinename -y
Or to update everything that is out of date:
$ drush up -y
This command will also apply any database updates required.
As always, for drush to work when interacting with a site,
you need to be in or below the webroot when typing the command.
On a multisite, you should be in the same directory as
the settings.php for the specific sub-site.
 When
you use drush to update or download an extension, drush will move the old
extension directory to a backup location, then download and install a fresh copy of the
extension. This means that this drush will overwrite any files you've altered, and erase any extra
files that you have placed in that directory. Some extensions
(e.g. CKEditor, Colorbox, Radioactivity)
requires you to do this. Drush will automatically
back up everything before overwriting, but you may also want to
handle this yourself. For an example on how to
do this with CKEditor
see Updating CKEditor.
Updating manually involves downloading the tarball, removing the
old version and then unpacking the new. You should then visit the
site's status report page to see if in is necessary to apply any
database updates. If there is, you must run update.php
immediately.
Because a manual update may take minutes, you should place the site in maintenance mode before you start, and not put the site back online until you're done.
When you're using drush to update it will also automatically do any required database updates. If you've updated manually, you may use one of the following drush commands to apply any pending database updates to a single site:
$ drush updatedb
$ drush updb
If there are no pending updates, it will do nothing. This command is also quick way of making sure all pending updates have been run.
 When
updating a multisite, drush may save you a lot of work since
you can just add
 @sites to the drush database
update command (i.e. drush @sites updb) to run the
datebase update script for all the sites.
For more about this, see
Carl Vuorinen's post on
Updating a Drupal multisite using drush.
However, I have mixed
experienced with this. Using this methods sometimes results in crashes due to unsufficient memory.
An alternative is simply to screate a bash-script that decends into each individual
site, sleeping between iterations to allow memory to be released.
Using a patched version of an extension
A patch is typically applied to a tagged release or to the HEAD of
a dev branch. To get alerts about available updates, make sure that
the information added by the Drupal.org packaging script to the
extension's .info with version and datestamp are
retained.
To protect an extenstion from being updated when you use drush to update your project.
- Navigate to the folder that contains the contributed extension to which you want to add a lock (typically
sites/all/modules/machinename) below the webroot. - Create a file called
.drush-lock-updatethat contains text describing the need for the module lock.
Example:
$ echo "Held back due to proxy-patch" > .drush-lock-update
The message wil only be displayed as a response to drush ups if there are pending updates.
To enable updates by drush again, delete this file.
You may also use the following command pair to lock and unlock:
$ drush up --lock=someextension
$ drush up --unlock=someextension
More about updating with drush
Note that drush actually relies on Drupal for most of the tasks it can be used for. It just provides a CLI instead of a GUI for performing those tasks. If you try to run and get an error message like the one below, the most likely cause of the problem is that the update module that is part of Drupal core is not enabled.
$ drush pm-update
Command pm-update needs the following modules installed/enabled to run: update
The drush command 'pm-update' could not be executed.
To be able to run , you need to enable it first. Here is how you do this with drush:
$ drush en update -y
After enabling the core update module (see above), you should be able to update the entire Drupal configuration with this single drush command:
$ drush up -y
Note that this command will do a lot of things automatically. If you've altered any of the extensions (and as noted above, some extensions require you to do that), those changes will be gone after the update.
If you want more control over the process, you can download the latest update of a specific extensio with the following command:
$ drush dl machinename
The above will pause and ask you if you want to proceed before
carrying out certain steps. If you add the option -y to
the command line means saying «yes to all». Using it will prevent
drush from pausing and asking if you want to proceed at some
steps in the process.
The command will download the recommended release for the current branch, unless you specify a release. If there are no recommended releases for the extension, it will list available releases and ask which one you want. To download the latest dev-release, use:
$ drush dl machinename --dev
$ drush updb
To download the latest dev-release of an earlier version use (in this example the version is 2):
$ drush dl machinename-7.x-2.x-dev
$ drush updb
After downloading, to enable one or more if an extension (module or theme) including dependants, you may use the following command:
$ drush en extensions
You can use the wildcard (*) at the end of an
extention name to enable all matches.
Final word
[mumble]
Last update: 2018-07-07.