Scald
The Scald project is a Drupal media management project designed to replace Drupal's image/file for representing media assets. It is a file uploader, file browser and media asset manager. It allows you to curate and reuse media as entities across your whole site, both as an atom reference field and inline.
Table of contents
- Introduction
- Setting up Scald
- Creating atom fields
- Media library
- Contexts
- Adding atoms to content
- Using atoms
- Permissions
- Image gallery
- Final word
Drupal projects discussed in this chapter: Juicebox HTML5 Responsive Image Galleries, Scald, Scald: Gallery.
Introduction
“Scald” is a recursive acronym (Scald is Content, Attribution, Licensing, Distribution). It comes along with some new terminology. It introduces media "atoms" as the universal media entity. In addition to still images, "atoms" may be videos, audio and Flash files. It also has an API that will allow you to add your own media types and capabilities.
The main features of Scald are:
- powerful library for asset management;
- fieldable media “atoms”
- insert or drag and drop media into rich text areas and/or media reference fields;
- extendable: can handle images, files, video, galleries;
- enterprise level: used by several large publishing houses.
Media assets may be tagged to improve the searchability of the library. Use instances have standard captions (generated from the media item's title) with the option to override the caption on each media instance use. You manage the library independent of the use of the assets.
Setting up Scald
Alternative guides: OS Training, Annetech.
First make sure Views and CKEditor are installed.
Download Scald from Drupal.org, and install it as you would normally install a contributed Drupal project. See: Installing modules for further information.
Navigate to the modules page and scroll down to the "Scald" section. You'll see a list of the Scald core and five sub-modules;
- Scald core. This is the core of the framework.
- Atom reference. Defines an field type: Atom reference. This allows to directly reference Scald atoms from a node field.
- DnD library. Enable a drag and drop media interface.
- Scald DnD Library. Bridge between Scald and DnD (requires Views).
- Multimedia editorial element. Inserts a widget that gives access to atoms when editing a field. Allows users to define metadata on atoms that are embedded in text fields.
Enable all of these.
Just below, there is a section named "Scald providers". Out of the box, four providers are listed. If you want more providers, you can locate projects that support them on the page listing Scald related modules on Drupal.org.
For now, just enable the provider Scald image. In this tutorial, Scald will only be used for for images.
By default Scald images are in all contexts rendered by the trancoder named “Passthrough”. This transcoder does nothing, so images, for instance, are not scaled to fit the context. Before you start using Scald, you should adjust the “Full page” context for images: Navigate to and click on the “contexts” link for “Image”. Expand the “Full page” and change the trancoder from the default (“Passthrough”) to “Medium (220x220)(Image style)”.
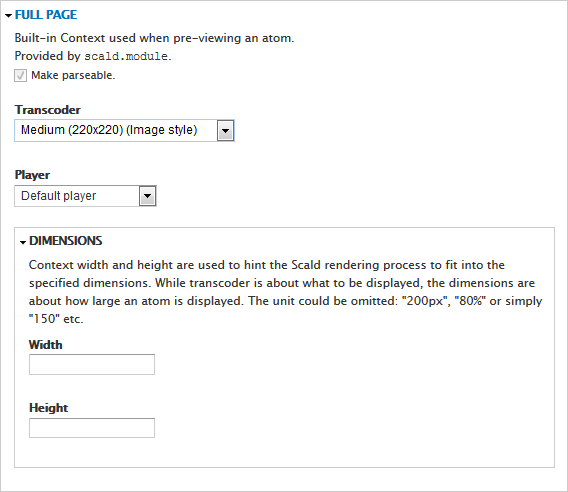
Don't worry about not understanding contexts yet. Scald contexts will be explained later.
Scald is now ready to be used to create a media library and to browse the media library.
Media library
The Scald media library is located under the tab that accessible from the shortcut in the administrative GUI (
Use the link to add new atoms (media assets) to the library. You may want to add a few images to have some images available for testing.
After uploading an image, it may look like this:

Note that by default, the “Title” field is prepopulated with the file name. You may want to replace it with something more meaningful. The metadata fields for “Authors” (Artists) and “Tags” ("Taxonomy terms") are already attached to the atom. They need to be filled in when you add a new image (atom) to the library.
Scald atoms comes with a few pre-defined fields (Title, Image, Authors and Tags). To manage fields, navigate to and click on the "manage fields" link for "Image".
You will see a table listing all fields currently associated with a Scald image, and controls to reorder, delete and add fields.
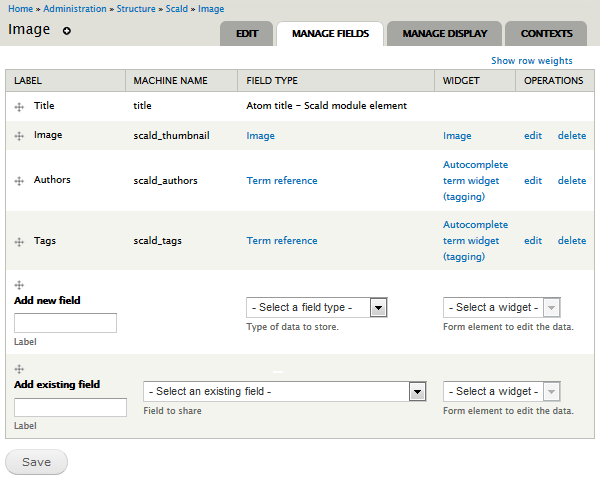
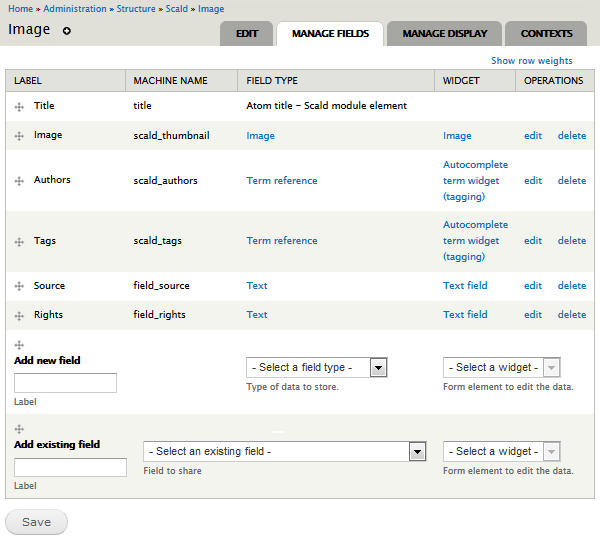
I usually add at least Source (URL to place of origin) and Rights (Usage rights, which may be plain text, or some license or rights abbreviation (PD, CC0, CCBY, CCBYSA, CCBYND, CCBYNC, CCBYNCSA, CCBYNCND. ARR).
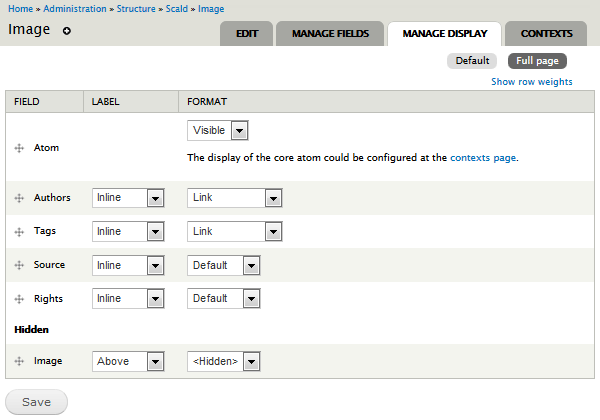
By default, all fields are visible. We usually don't want this, as Scald images are rendered in contexts where we control what metadata to display directly. To remedy this, click on "manage display" for "Image" and change the default setting for all the newly created contexts to hide everything except the atom.
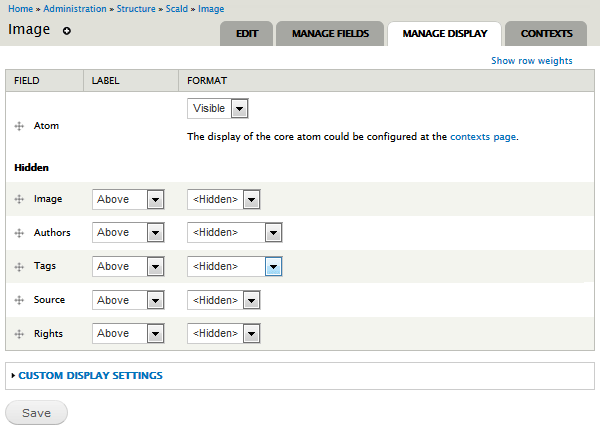
However, hiding all metadata fields also hides them in the view used in the media library. To bring them back, set up custom display settings for the media library view (“Full page”), and show metadata.
Contexts
The key to understanding how to make use of Scald is to understand Scald contexts.
 There
is a writeup about Scald contexts in the community
documentation wiki at Drupal.org, with the title:
Working with contexts.
If you have not done so already, you should read that as an
introduction to contexts before looking at the text below.
A Scald context (more precise: a Scald Rendering Context) is something like an entity view mode (i.e. "default" and "teaser" for a vanilla Drupal installation). Any atom can be rendered in any supported context and the context determines what that rendering looks like, which player it uses, and what language (XHTML etc.) it is in.
To inspect contexts, navigate to . Notice that each type of media (e.g. Image, Video) can have it's own context settings.
Click on the link next to the Image atom type. This takes you to Scald Rendering Contexts.
You'll now see a series of different contexts and display formats. Below is the list of the five contexts that ships with Scald. The default transcoder is “Passthrough” (i.e. do not apply an image style). In the list below, I've suggested a transcoder (in brackets) , as well as my observations about the default use of each context:
- Title: Passthrough. Only shows the title field of the atom (no other graphic).
- Full Page: Medium (W220). Atom browser View.
- Preview Representation: Medium (W220). Atom browser Edit.
- Editor Representation: Medium (W220). When inserted in editor.
- Library Item: Library (W48). Thumbs under Representation on the library index page.
Only image styles that exists by default in Drupal are suggested at this point.
If a context is parseable, that means that its output is wrapped in HTML comments (currently this feature only works reliably for contexts which have a render language of XHTML) which make it possible for Scald to uniquely identify the atom based on the rendering. For instance, if a WYSIWYG editor is being used in some text areas and Scald atoms should be included in the WYSIWYG preview of the text, a context can be chosen and specified as parseable. That ensures that when the textarea is submitted, Scald will be able to determine which atoms are present in the textarea, convert the rendered versions to Scald Atom Shorthand (SAS).
To make a context unavailable in WYSIWYG, remove the tickmark to the left of .
 Be
careful about disabling the Make parseable
setting. If you do this, and the context is already in
use, the “Edit atom properties” dialog will no longer
work. If you open this dialog and find the “Context” menu is empty (see screenshot below), this is probably the cause.
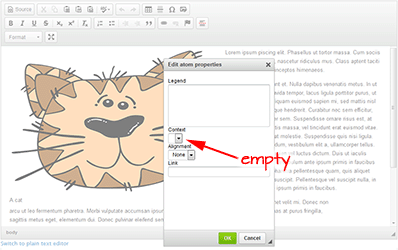 The only fix I am aware of is to delete the atom and reinsert it with a valid context.
A context defines a set of standard transformations Scald should perform on media before it is presented, based one where it is being rendered (displayed or played). It uses a transcoder to transform the media, and a player to play the media (e.g., for a video file, this may be HTML5 or Flash):
- Transcoder:
- For images, the transcoder might just be Drupal's image styles. For audio, maybe there is a transcoder that clips out a 30 second sample of a song as a preview before a purchase.
- Player:
- The last step of presenting the media. As mentioned above this might be a choice between HTML5 markup vs a Flash player.
This allows you to control how the atoms is shown across different areas of your site.
Adding image styles
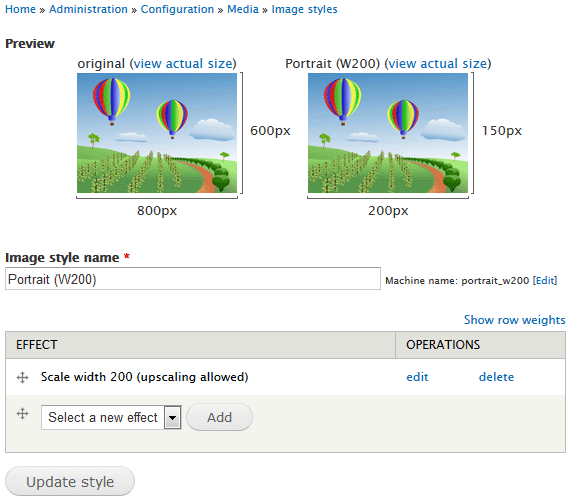
The five contexts that ships with Scald is not what we want. You should create your own image styles and assign them to Scald contexts. To create and edit image styles, navigate to . These are those I always create (image style machine names in monospaced font):
- Small:
- Portrait (W200)
portrait_w200 - Landscape (W300)
landscape_w300
- Portrait (W200)
- Large:
- Portrait (W320)
portrait_w320 - Landscape (W480)
landscape_w480
- Portrait (W320)
For each of the styles, set the effect "Scale width X (upscaling allowed)", where "X" is the width in pixels.
Adding contexts
In Scald, a context is defined by a module (the "context provider") and that module takes the whole responsibility for rendering the atom in that context. Contexts may be tied to entity view modes, inline rendering of entities or nothing at all.
By default, there is a few system contexts pre-defined by Scald core (e.g. "Title", "Full page") and three pre-contexts defined by Scald Dnd Library module ("Editor representation", "Preview representation" and "Library item"). The “Full page” context is an entity view mode, the others are not. The use of contexts that are entity view modes can be configured via Field UI's field display settings.
However, Scald provide a GUI that lets the site builder contruct new contexts. To create a new context named “Passthrough”, navigate to , and click on the link, and give it the title “Passthrough” and a description. Then press . Then click on the link to the right of “Image”, expand the vertical tab and set the “Transcoder” for this to “Passthrough”, and press .
You may also link contexts to image styles. As an example, here is how to create a context for the “Teaser” entity view mode: First, navigate to , and click on the link, and give it the title “Teaser” and a description. Then press .
The “Teaser” context is going to be used for displaying a teaser on the aggregate front page.
If the Atom field is set to Visible, the tab let you specify context. Here is how you may set up the Teaser context to show a small thumbnail (220 px wide) in the teaser view mode.
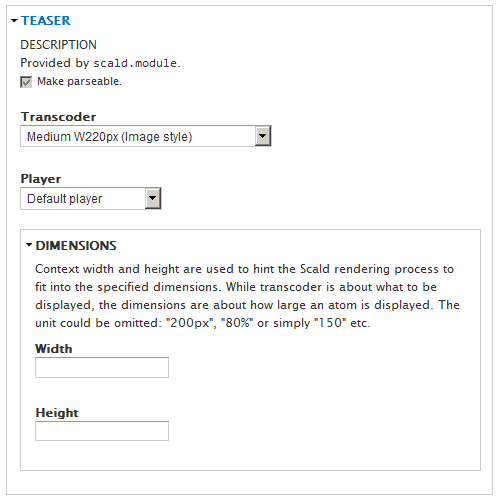
If you leave the dimensions blank (as in the example), the output dimensions will be determined by the transcoder.
You also want to make contexts that make the image styles created in the previous section available when Scald image atoms are rendered inline by creating a parseable context for each style you've defined. For instance, for the image style named "Portrait (W200)", create contexts named "Portrait W200". Navigate to and click "Add context".
After adding the context, click on the "contexts" link for "Image", and set the transcoder to the matching image style. Repeat for all image styles you want to make available.
Now, create CSS for the contexts you've created.
First, add a context for passthrough. Make sure
that display: inline-block;
Then, to make sure the caption does not overflow when atoms are
rendered inline, add css classes that set the max-width
for each context that you expect to use inline.
Below is a snippet of a .less-file that cater for the
contexts that has been created so far (note that using //
for comments is valid less, but invalid css):
// Passtrough
.context-passthrough {
  display: inline-block;
}
// Editor representation
.context-sdl_editor_representation {
  max-width:220px;
}
// Small
.context-portrait_w200 {
  max-width:200px;
}
.context-landscape_w300 {
  max-width:300px;
}
// Big
.context-portrait_w320 {
  max-width:320px;
}
.context-landscape_w480 {
  max-width:480px;
}
Make sure there is some air around atoms:
.atom-align-left {
  margin-right: 15px;
}
.atom-align-right {
  margin-left: 15px;
}
.atom-align-center {
  margin: 15px;
}
For borders around images, set classes dnd-widget-wrapper and
dnd-caption-wrapper to appropriate values.
Adding atoms to content
Scald provides two different ways to insert an atom into content:
- As an atom reference field.
- Inline (i.e. inside another field such as body).
The prerequisites for both methods are described below:
Adding atom fields
To have an atom reference field in an entity, navigate to , and click on the link for the Article content type.
To have an “atom reference field” in the entity bundle, add a new field named Scald atom ref and select Atom reference as its field type.
The default Article content type already has a field with the type Image. Unless you have legacy data in this field, you may want to delete it, since the Scald atom ref field is going to be used as the image field by Scald.
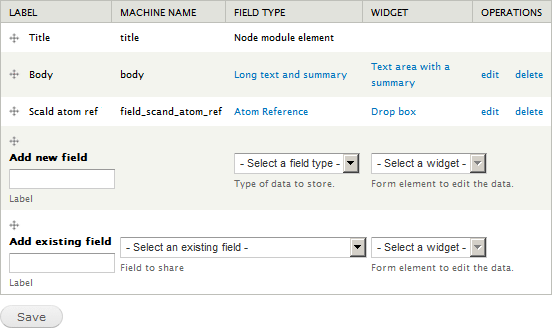
The screen shot above shows Article after the addition of Scald atom ref and deletion of Image and Tags. You may want to keep Tags.
For an atom reference field, you can specify different contexts for different view modes by navigating to , then click on for the content type you're interested in.
You set a context in the Format column. You may use custom display settings allow you to use different contexts for different view modes. You may, for instance select a large image for the Default image mode, and a smaller image size for the Teaser image mode.

When done, click on Save.
Enabling inline atoms
For inline atoms, Scald depends on a WYSIWYG editor (CKeditor) for inserting markup for atoms into a textarea field. Before enabling inline atoms, you need to install and enable CKeditor.
To be able to embed atoms in the body field of a node entity, we need to edit the body textarea field. Click on the link “edit” for the body field (in the columns “operations”). In the settings for the body field you'll see four Scald setting (shown below). Check "Drag'n'Drop Enabled" and "MEE Enabled", set "Scald default context" to "Editor Representation" and "Scald fallback context to" "Title").
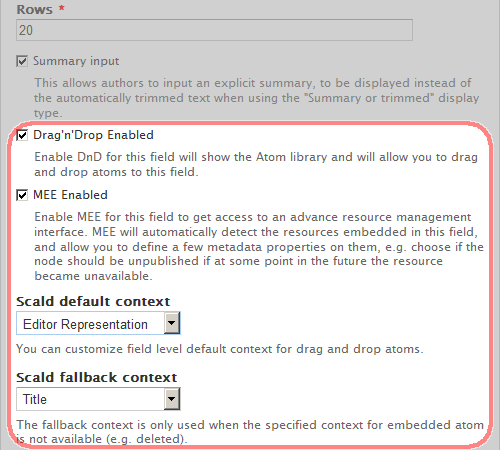
Save the settings for the body field.
Navigate to and review the settings. You may want to use the admin theme for drag and drop, as there may be a theme conflict with more complex themes such as Bootstrap.
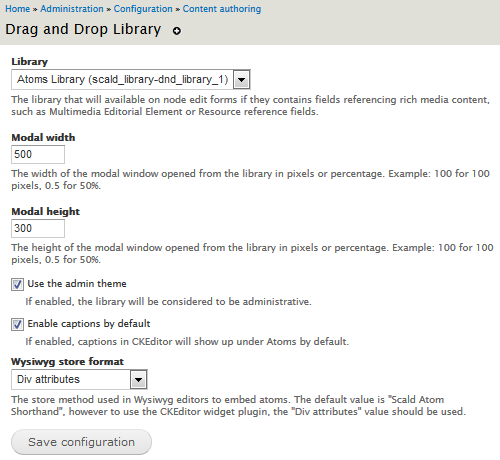
Finally, make sture that the WYSIWYG editor has the “Embedded atoms”-filter enabled. Navigate to and review the settings for the text format set up for the WYSIWIG editor.
The context for an inline atom is set in a modal box provided in the WYSIWYG editor. Unlike field atom references, there is no way to use different contexts in different display modes without resorting to writing custom code that pre-process the entity.
Using atoms
To actually insert atoms into content, Scald provides a drag & drop (DnD) widget. This widget (see illustration below) exposes the media library to the user and allows the user to drag & drop an atom directly into a field or into the body of a node.
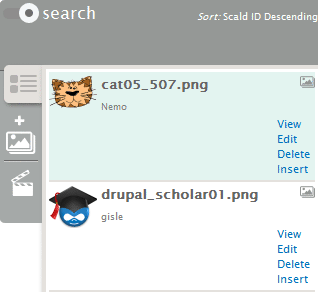
The above shows inserting from the library. The two other icons let you upload an image or link to a video. Clicking on the next to the text "search" opens up the DnD widget to search the library.
Field atoms
Adding a field of type Atom reference creates a field
with a drop box. Using the DnD widget to drop an atom into this field
adds it to the content instance.
The context for the atom is provided by the display settings for the field, allowing different contexts for different view modes.
Inline atoms
Clicking on the link in the DnD widget, inserts a Scald Atom Shorthand (SAS) inside the body field, as shown below:
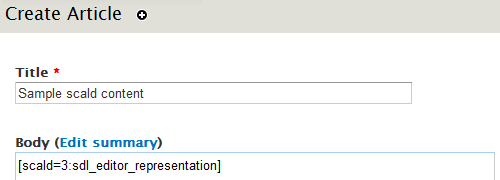
When the node is saved, the SAS gets converted into HTML.

The default context used when an atom is included into a textarea
is sdl_editor_representation. It can be globally
overriden with the variable
dnd_context_default.
When the atom is dropped into rich text, it is rendered with the full HTML markup. When it is dropped into a plain text target, it is rendered in the SAS format.
 There
is no way to change context non-WYSIWYG DnD, so using WYSIWYG is the recommended way for working with inline atoms.
Also note that there is no built-in way to use different contexts in different view modes with inline atoms, but you can create pre-process functions that do this.
The WYSIWYG editor (CKeditor) will pop-up the following dialogue if you select the embedded image and click on the Scald include/edit properties icon:

It lets you cange the image instance's context and alignment.
The caption for the image will be by default taken from the atom's Title field. You can override it per instance simply by editing the text.
Unlike atoms used in an atom reference field, there is no simple way to specify a different context to different ciew modes when an atom is inserted inline.
Permissions
Atom permissions
By default, atoms are only fetchable and viewable. A user granted the "edit any atom marked as Editable" will not be allowed to edit an atom because by default, they are not editable. Scald is designed with shared media in mind and when an atom is created it can be used in many places. This means that no one should modify after it has been added to the library.
To make newly created atoms editable and/or deletable by default, navigate to and click for the atom type you want to change.
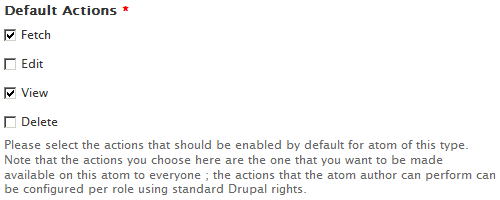
This setting only affects new atoms. To change permissions for an existing atom, edit its permissions.
With Scald access control system, the following workflow is supported out of the box:
- Without permission, nobody (except the super admin) can do anything on any atom. Only with permission, people can do (take action) on "unblocked" (as explained below) atoms.
- To view an atom, people needs permissions. It is possible to prevent any role from viewing atoms.
- To edit or delete any/own atom, people needs seperate permissions.
- It is possible for administrators to block any atom from any action. It is also possible to block all atoms and unblock only a few.
- It is possible for contributors to block their own atoms from any actions if they have the permission "restrict atom access".
With custom code, new action can also be added and is supported in the same way with the four core actions: Fetch/Edit/View/Delete.
User permissions
By default, Scald is configured so that no one (except the super admin) is allowed to do anything. To allow visitors to fetch and view atoms, navigate to and scroll down to the “Scald Core”-section. Grant the following permissions to the anonymous and authenticated user:
- Fetch any atom marked as Fetchable
- View any atom marked as Viewable
To allow editors to populate and administer the Atom Library, grant the role assigned to editors and contributors the following permissions:
- Administer Scald Atoms
- Create atom …
- Delete own atom
To allow trusted editors to access images in the Atom Library, scroll further down to the “Scald DnD Library”-section and grant the role assigned to editors and contributors the permission:
- Access Scald DnD Library
- Administer Scald Atoms
Editors and contributors should of course also have create content permissions.
Click on Save permissions.
Image gallery
Juicebox
The Drupal Juicebox HTML5 Responsive Image Galleries bridge project provides integration between the Juicebox HTML5 responsive gallery library and Drupal.
Out of the box, it does not work for Scald atoms, but I've created a a patch. It need some work to be accepted, but it works fine.
Scald: Gallery
The Scald: Gallery bridge project provides a Galleria player for Scald. I've only tested 7.x-2.5 from May 2015. This version is a bit rough and is not responsive out of the box, but below are some notes for those who want to try it out.
For installation instructions, see README.txt.
To add a gallery navigate to the Scald media library. It is located under the tab that accessible from the shortcut in the administrative GUI (
First, give the gallery a title, and then click on .
To add images to the gallery, you use the standard Scald drag and drop. To add more items, click . You may reorder items in the gallery with the standard Drupal arrowcross drag and drop.
Click when you've finished organizing the gallery.
The gallery is just another Scald content type. To edit, navigate to where you can edit the presentation, manage fields, mange display and work with comtexts.
You may want to hide the following fields from the display: “Gallery items”, “Tag”, “Thumbnail”. The “Author” field appears when you expand the info when viewing a gallery.
The Galleria style sheet is located in
the Galleria library. I have so far not managed to replace
the “classic” style sheet with a custom one, and has resorted to
hacking the original (so far to reduce the width of the
class galleria-info-authors from 50% from 25%).
The gallery contexts seems to be hard-wired to the “full page” context (changing any of the others seems to have no effect). The “Trancoder” settings seems to be ignored. The “Player” has to be “Galleria”. I have so far left “Dimensons” blank. There is a link to configure player settings with the following fields:
- Galleria theme - So far I've only managed to get the default (“classic”) to work.
- Galleria width - the full width of the black gallery canvas.
- Galleria height - the full height of the black gallery canvas.
- Enable fullscreen link - check to enable link to fullscreen.
- Thumbnail style - image style used for thumbnails (below gallery). Client side scaled to 40 px height.
- Normal style - image style used for gallery. Client side scaled to galleria height minus around 70 px.
- Big style - fullscreen style
- Galeria options - see galleria.io (options not tested yet).
Click when you've finished editing player settings.
Final word
How to change the render of an atom.
[TBA]
Last update: 2019-01-03 [gh].