Access control
This chapter explains to a site builder how to configure the access to, and visibility of, different entities and fields in Drupal. It also introduces such concepts as delegation and moderation, where some privileges is granted to a non-administrator user such as an editor or a moderator.
Table of contents
- Introduction
- User roles
- Content visibility
- Non-node core permissions
- Overview of some core permissions
- Managing access to file attachments
- Managing users
- Final word
Projects mentioned in this chapter: ACL, Content Access, Customerror, Flexi Access, Front Page, Node View Permissions.
Introduction
This chapter is about visibility and access control in Drupal.
First, it should be pointed out that visibility and access control management is different things. Hiding elements (as described below in the recipe for hiding a menu) may be fine if you just want to stop users from stumbling some parts of your site that are not useful to strangers or casual visitors. But if the user knows (or is able to guess or search for) the content's URL, any content that is not managed by some access control mechanism will be shown when a user types in the correct URL.
The most common form for access control management in Drupal is node access control. It entails adding access control attributes directly to nodes. Node access control is the main topic of this chapter.
Node access control is not simple to use when one want to create a locus of collaboration for parallel work-groups. For this type of access you may want to explore the following contributed module:
- Organic Groups is a family of modules that facilitate organising users in groups. Access control is managed through these groups.
This module will not be discussed in this chapter. If you need this type of access control, you need to read the community documentation (linked to from the project's home page).
 This
chapter covers all recommended versions of Drupal (currently D7, D8 and D9). Text suspected
of covering just a single version is marked with a version tag in square brackets (e.g. [D7]).
User roles
Drupal by default provides a role-based mechanism for granting permissions to collections of users. Setting roles up incorrectly can compromise your site's security.
 Users,
roles and permissions are key components of website security. Users are the people,
roles are their functions, and permissions define what those functions have access to. Read more at acquia.com:
The importance of user roles and permissions for site security.
The Drupal core do not let you grant permissions to a user directly, but a single user account can be granted as many or as few permissions as you like by means of roles. In a nutshell, a user belongs to a set of roles, and permissions are granted to (or revoked from) a role, not the individual user.
 You may
implement more fine-grained access control in Drupal by using
additional access control modules. To learn more about advanced
access control, including per node and per user access control, see
the section below about
premium content.
When checking whether a user has access to a resource, Drupal (without any additional access control modules) loads a user entity instance, finds the user's roles, and then finds the roles' permissions.
Drupal comes with three predefined roles: anonymous user, authenticated user and administrator. The role anonymous user is assigned to anyone that is using the site, but is not logged in. The role of authenticated user is assigned to anyone that has successfully logged in on the site. The role of administrator is automatically assigned to the first user (created as part of the installation process), but can later be assigned other users.
To set up a content creator role, assign content creator permissions.
To create a new role, or edit an existing a role, navigate to the panel. To create a new role, type in the name of the role and click .
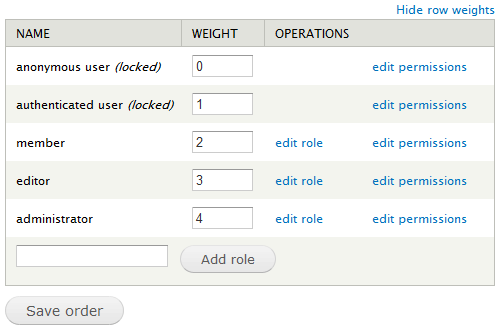
The screen shot above shows the panel after we've added two additional roles, member and editor. In the panel, roles are sorted according to weight. It is recommended to order the roles from the least permissive (anonymous user) to the most permissive (administrator). After rearranging the order of roles, click .
After creating the new roles, we need to set up the permissions for these roles. Clicking let you edit the permissions for a particular role. However, I prefer to navigate to the panel to see the permissions for all roles side by side. The column “Permission” lists the human readable name of all the permissions that exists on the site.
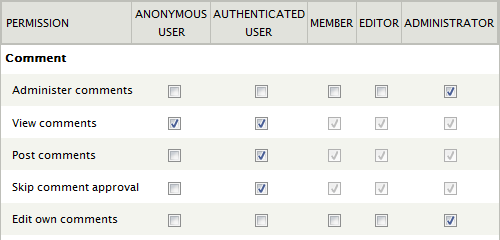
Ticking a box to the right of a permission in a role column grants that permission for the role. Also, granting a permission for the authenticated user automatically grants that permission for all roles except the anonymous user.
By default, Drupal does not grant many permissions to non-admin users. When you first set up a Drupal site, authenticated users are allowed to post comments and view published content and comments, but that is about it. The default configuration also let users register, but the the administrator must approve the account before the user is allowed to log in.
 Letting
users register is an open invitation to so-called spam-bots
to create bogus account on your site. If your development site
is not behind a firewall, you should disable visitor
registration until you've decided on your registration policy and what
anti-spam measure to use. If you've followed the
instructions in this ebook
for setting up a Drupal website, you've already done this.
For example, if you want authenticated users to be able to contribute, search and engage with other users on your website, you should grant the following permissions for authenticated users:
- Create new content (for specific content type)
- Use search
- View user profiles
After setting the permissions, remember to click to save your settings.
Content visibility
Content on a Drupal site may appear on the front page and on sub-pages. What appears in the Content region on the main or front page is usually controlled by the publishing options set for content type.
Sub-pages is usually reached through primary or secondary navigation menus (e.g. blogs, press release archive, users, etc.) or search. Some modules (e.g. Blog, Biblio) have a built-in view with an associated path that produces lists of content that may be used directly in navigation. Other content types need to have such lists explicitly generated by other means, for instance the Views module.
Some special sub-pages are usually not reachable through menus or the other means of navigation described above. These (e.g. about us, contact, privacy policy, etc.) may instead be linked to explicitly. A common place to put these links is in the Footer region of each page.
The Drupal front page is the page that will be the page shown whenever the site is accessed at its base URL (unless you decide to override this).
When no content is promoted to Content region on the front page (e.g. when Drupal is freshly installed and no content has been created yet), it will just contain a message about no content beig available yet.
This message will no longer appear when at least one published node of content has been promoted to the front page, and the user viewing the front page has the permission to see it. It will reappear if there are no nodes that is eligible for display in the Content region of the front page.
The Drupal core content types have built-in rules about whether newly created content is automatically promoted to the front page or not. This setting can be overridden by users with permission to Administer content.
 The
permissions assigned to roles is stored in the database in the table
{role_permission} [D7?]. The strings denoting permissions that
are stored in this table are sometimes different from the strings that
appear in the front-end administration panel. For instance, the
permission that is called
“Administer content” in the front-end administration panel is stored in this table as the string
administer nodes.
Content administrators can override the following settings for a node:
- Authoring information (byline and date).
- Whether a node should be published or unpublished.
- What content goes to the front page.
- What content to display first (sticky at top of lists)
The Sticky at top of lists-option is useful for the following situations (though this is not an exhaustive list):
- a special notice (e.g. announcing an upcoming special event) that you want to give special attention;
- featured content (e.g. an article by a prominent guest writer).
Unpublished content
Content that exists on a Drupal site in the unpublished state is not visible to non-admin users. However, there exists two permissions that overrides this: View own unpublished content lets the user view own unpublished content on site, and Bypass content access control lets the user view all unpublished content on site regardless of ownership and permissions.
The latter permission should never be granted ordinary users – only trusted users such as administrators and moderators.
Because, unpublished content is not visible, if you just want to restrict access to a node without actually deleting it from the site, unpublishing it will do the trick.
 Users
of WordPress may be familiar with “Trash”. This is a special
folder where WordPress keeps content that has been
unpublished but not yet deleted. In Drupal you can see
content in that stage by going to the “Content” tab and selecting
content whose “Published status” is “Unpublished”.
WordPress will delete “Trash” 30 days after it
was unpublished. In Drupal you have to delete unpublished
contents manually. There is, however a contributed
Trash extension for Drupal 9/10,
but there is still not a stable release.
Published content
Blocks and views have their own access control. Please see the section Blocks and Views below to learn how to use this.
Most of the contents on a Drupal website is stored in nodes. Drupal's default access control mechanism for viewing node content is controlled by the permission View published content. It can be set under .
 Users,
roles and permissions are key components of website security. Users are the people,
roles are their functions, and permissions define what those functions have access to. Read more at acquia.com:
The importance of user roles and permissions for site security.
This means that by default, it is not possible to restrict only a part of the site from public view – it is all or nothing. So if we are creating a public-facing website, we grant both the anonymous and authenticated user roles the right to View published content. If we are creating an intranet, we only grant the authenticated user role this right.

 For
some suggestions about how to allow the anonymous role to only view the front page, see
DO: Restrict entire Drupal 10 site except front page. and
Reddit: Drupal 10, how do you restrict entire site except front page.
This setting apply to all node-based content types. This means that if the right to view published content is not granted for a user role, users that only belong to that role can't see any node based content. For instance, the settings for a site where you have to become a member and authenticate before getting access to content, would typically deny the anonymous user role the right to View published content. With this setting site's front page will by default look like this to anyone visiting the site:
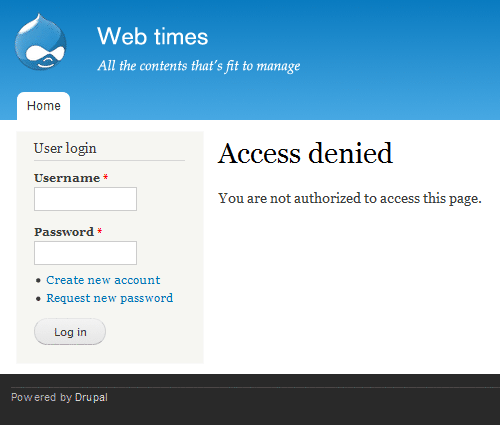
This may be fine if you're setting up a private site or an intranet, but may appear as unfriendly if you want to encourage visitors to create an account and engage with your site. Later in this chapter, adding various types of fine grained access control to the site will be discussed. But first, let us get rid of that message and show a more friendly front page to visitors.
One way to do that is to set up a custom “Access denied” (403) page [or front page] and replace the page content with a static HTML block with a more friendly message.
Drupal 7
First copy the default page template to a template for the front page:
$ cp page.tpl.php page--front.tpl.php
 See How to theme 403 and 404 error pages? to learn how to use
 page--403.tpl.php works with D7.
In the copy replace the part that renders the title and content pulled from the database, i.e.:
  <?php print render($title_prefix); ?>
  <?php if (!empty($title)): ?>
    <h1 class="page-header"><?php print $title; ?></h1>
  <?php endif; ?>
  …
  <?php print render($page['content']); ?>
</section>
… with some friendly welcome message. The text below is just a suggestion:
  <?php print render($title_prefix); ?>
  <h1 class="page-header">Welcome, Visitor!</h1>
  <p>You're invited to register on this site</br>
  To do so, click on the link to <a href="user/register">create a new account</a>.</p>
</section>
The Front Page contributed extension will also let you do this. There is no stable release for Drupal 9/10.
Drupal 9/10
First copy the default page template to a template for “Access denied” (403) page:
$ cp page.html.twig page--403.html.twig
In the copy replace the part that renders the title and content pulled from the database, i.e.:
<section class="section">
  <a id="main-content" tabindex="-1"></a>
  {{ page.content }}
</section>
… with some friendly welcome message. The text below is just a suggestion:
<section class="section">
  <a id="main-content" tabindex="-1"></a>
  <h1 class="title">Welcome, Visitor!</h1>
  <p>You're invited to register on this site</br>
  To do so, click on the link to <a href="user/register">create a new account</a>.</p>
</section>
The result
After this custom access denied page has been created, visitors will see something like the following:
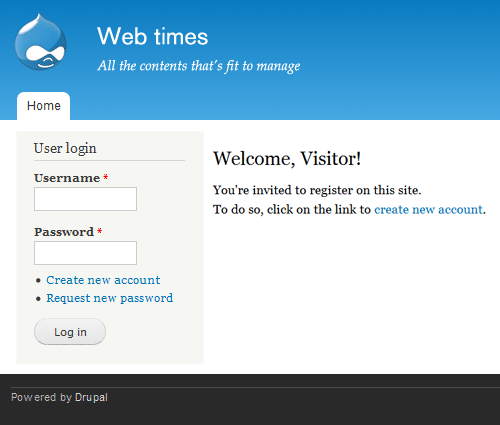
 Drupal.SE:
How to show static text in the template to the Anonymous User?, Drupal.SE:
How to redirect an anonymous user to the login form after a 403 error?, Axelrant.com:
Customizing HTTP Error Pages In Drupal 8.
Premium content
A more complex use case is where only part of the site visible to visitors (i.e. those users who belong to the the anonymous user role). To see other parts, the user must authenticate (log in on the site). Typical use cases are a site that charges for access to certain content, or a site for an organisation where certain pages shall only be accessible for members, while other pages are public-facing.
This type of restricted content is sometimes called “premium content”, and there is no access control mechanism in the Drupal core that give you more control over who can view what than the all or nothing View published content. To have more fine-grained control, you need to add an access control module to your configuration.
Node View Permissions
Installing and enabling the Node View Permissions project is probably the simplest way to offer premium content on a website. It can be enabled per content type. If it is enabled, it adds the permissions “View own content” and “View any content” for each content type it is enabled for. Not granting those for the anonymous user role makes the content type premium.
The granularity of this project is limited to content type and user role.
Content Access
The Content Access project extends the granularity of view access beyond content types to individual nodes. Some content may be viewable by everybody, including users belonging to the anonymous user role, while other content may only be viewable by logged in users, by only granting view access to the authenticated user role. This module lets you set role-based access rules for specific content types, or for individual nodes, as shown in the screen dump below.
 At
the time of writing (June 2023), Content Access do
not have a stable release for Drupal 9/10. This means that it should not
be used on a production website. It is mentioned in this tutorial
just as an example of how to extend the Drupal core's access control
capabilities, not as an endorsement.
After enabling the Content Access module (requires rebuilding permissions), it will be possible to administer role-based access control for miscellaneous content types.
To set up content access control for a content type, navigate to . Then click on the edit link for the type you want to manage, and then on the tab. This takes you to the control panel for role based access control settings.
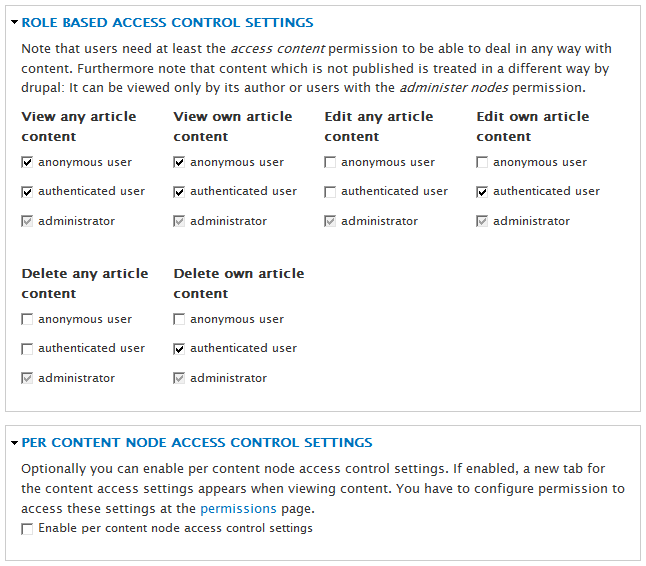
The settings in the top panel apply to all content of a specific type (here article). If you enable per content node access control settings for the content type (bottom panel), you can override the content type specific setting for each node of content.
 An
often useful application of role-based access control is to show
different content to anonymous and authenticated users. There
is no point telling users that are already logged in
(authenticated users) how to register on the site or how to
log in, but this type of information are useful to users that are not
logged in (anonymous users). To restrict showing of such
text to the latter group, create a node with the required information
and only grant the anonymous user role view access to this node.
Flexi Access
If role-based access control is not fine-grained enough, the ACL module provides access control lists (ACLs) that allow per user access control. However, ACL is without a user interface. To get a user interface, you can install the Flexi Access module.
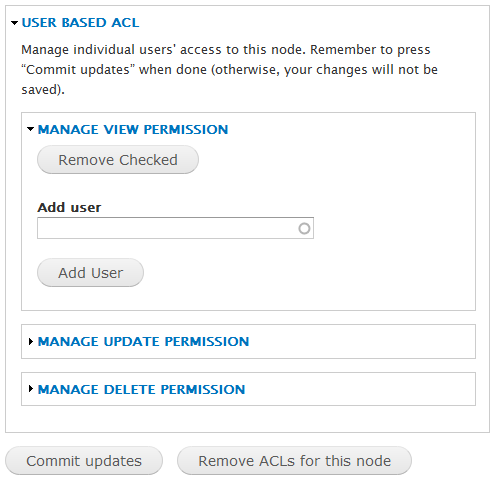
The panel let you add and remove users to an ACL that is associated with the node.
 You
may install more than one node access control module on a
Drupal site, but doing so is probably not a good idea. Unless
the modules are specifically designed to be used together (e.g.
ACL and its client modules), they may be in conflict
or interfere with each other. This may result in difficult to predict
access rules, making the site prone to “data-leaks”.
More about node access
To learn about node access in Drupal, the best place to start
reading is probably the
Drupal API.
And if you know how to read code, looking up the function
node_access()
will be useful. In brief: Four separate rights (create, view, update, delete)
to manipulate a node is managed by the system, and function
node_access() will return a boolean value to indicate whether
the user has been granted the specific right.
 The
four basic operations on persistent storage is sometimes abbreviated
“crud” (the inital letters of create, read, update, delete).
The rights granted by the Drupal API are for these operations, with
the word “view” replacing the word “read” in the acronym. In some
contexts, the word “edit” is used as a synonym for
“update”.
The
four basic operations on persistent storage is sometimes abbreviated
“crud” (the inital letters of create, read, update, delete).
The rights granted by the Drupal API are for these operations, with
the word “view” replacing the word “read” in the acronym. In some
contexts, the word “edit” is used as a synonym for
“update”.
For the the grants create, edit and delete there are by default separate permissions that can be set per content type under . This allows the site builder to create different contributor roles that have the right to create and edit different types of content, depending on their role.
Finally, to understand how node access works in Drupal when multiple permissions are in use, it may be helpful to know the following rules of thumb:
Users granted permission to Bypass content access control are never restricted by node access control. Users who do not have permission to View published content can never be granted access to published content by a node access module. Only users who have View published content and not Bypass content access control are eligible for the wild world of node access module control.
Node access control in Drupal is additive. This means that any module doing access control in accordance with the “the Drupal philosophy” should only allow access, not deny it. An administrator who wants to fine tune access to a node must first make sure nobody has access, and then add access grants to anyone that shall have access.
For example, if view access is granted to all users having the role staff (role based access), and view access to the same node also granted to a user named bob (user based access), then the node can be viewed by any user that is member of the staff and bob, whether bob is a staff member or not.
Let say you're using Drupal to manage a corpus of nodes for a group of authenticated users. The general rule is that an authenticated user (and nobody else) shall be granted access to a node. This is simple to set up in Drupal using the Content Access module. We use role based access control setting to grant access to the role authenticated user (and not the role anonymous user). However, if the authenticated user alice shall be disqualified from having access to a node in the corpus, things become more complex. Creating an ACL for the node granting every staff member except alice access will not work as intended – unless the role based access control for that node (granting access for authenticated users) is removed entirely.
Non-node core permissions
Besides nodes, a Drupal site may contain other content, such as comments, blocks, menus, views, fields and file attachments. In this section we shall describe the recommended practises for managing visibility and access to those.
Comments
In the Drupal framework, comment is a type of entity that is different from nodes. While node moderation requires is quite tricky without adding contributed projects to help with the task, straightforward comment moderation is provided by the Drupal core.
Comment access control is done through the five permission grants shown below. To configure them navigate to and scroll down to the Comment section (you need to have the permissions Administer permissions and Administer users to have access to this).
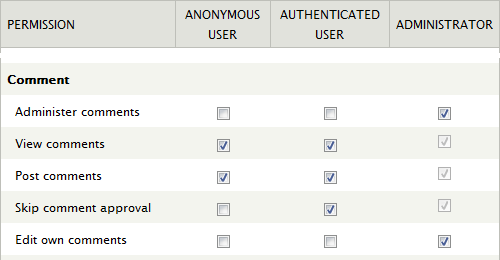
For instance to set up a site where anonymous (i.e. not logged in) users are allowed to post comments, but where they do not show up on the site before they have been approved by an administrator, grant anonymous users the right to Post comments, but not the right to Skip comment approval. In the screen dump shown above ordinary (i.e. authenticated) users are also allowed to Post comments, and their comments will appear on the site immediately, without being queued for administrator approval.
To manage the comment moderation queue, you should (while logged in as administrator), click
Blocks
Users granted the permission Administer blocks have access to the and to the block's Visibility settings. The following will show up when you configure a block:
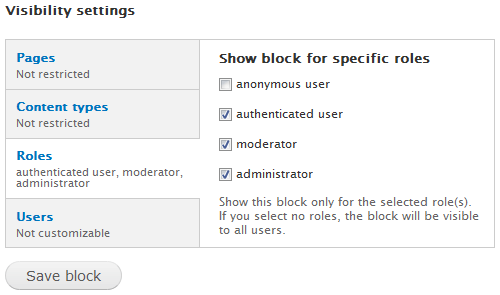
This allow role based access permissions for blocks.
Menus
The permission Administer menus and menu items grants access to . This setting controls the permission to create and edit menus and menu items, but does not provide direct access control to menus.
Access control to menu elements (links) are derived from access control of whatever the menu elements is linked to. If the user does not have access to the item linked to, the link should not appear in the menu when the menu is rendered for the user. However, for this to work, the item must be placed in the menu using the item's menu settings, not by editing the menu links.
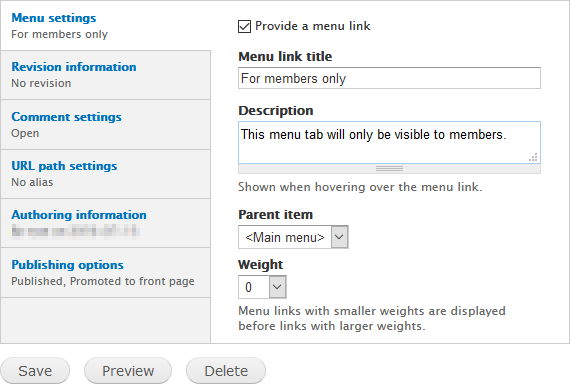
However, the menu itself will show up, even if the user is denied access to every element in the menu.
To control the visibility and access to the menu itself, take advantage of the fact that in Drupal, menu normally is displayed in a block, and blocks can have role based access (see above).
For instance, to hide the navigation menu for the anonymous user role, tick all other roles (as shown in the screen dump in the previous section).
 Hiding
a menu does not affect the non-privileged user's access to
the links listed in the menu. If the paged linked to are
unprotected, they remain accessible to all users that know their URL.
To protect those pages from unathorized access, you need to manage
access to each individual page.
Text formats
While text formats have uses beyond access control, they're fundamental for making sure that untrusted users can create content on the website without compromising its security.
Drupal text fields are always associated with a text format. What defines a text format is a sequence of text filters that any user input must pass though. One or more of these filter can be set up to strip out any markup that may compromise security.
To configure a text format, navigate the following path: , followed by the text format you want to configure.
The defaulttext format for untrusted users is called Filtered HTML (D7) Basic HTML (D8/D9). Out of the box, Filtered HTML just recognises the following subset of HTML markup:
<a> <em> <strong> <cite> <blockquote> <code> <ul> <ol> <li> <dl> <dt> <dd>
Basic HTML is a bit more sophisticated. It allows more header types and <img> in order to allow images to be inserted.
Note that Drupal does not prevent the user from entering markup beyond this list. But markup that is not on the permitted list will be filtered from the content when the markup is rendered.
While the default selection of permitted tags for the built-in
Filtered HTML text format is somewhat arbitrary (why
<cite>, but no <h2> or
<h3>?) However, there are some common tags that are left out
for a good reason. These are tags that allow content (including
scripts) hosted elsewhere (i.e. beyond your control) from being
inserted in-line into the web page), and includes:
<iframe> <frameset> <script> <object> <embed> <applet> <style>
Note that the above list of tags may not be an exhaustive deny-list. There are too many obscure tags in the HTML-universe that may compromise security when interpreted by some browser. The security model for markup should always use a allow-list of permitted tags, rather than a deny-list.
In Drupal, there is a text filter called Limit allowed HTML tags and allows the administrator to set up a list of allowed (allow-listed) tags. Any tag that is not on the list will be ignored.
 Most
filtering systems disallow
 <iframe>,
<script> and other tags where it is obvious that an
attacker could insert arbitrary code into a page, but some browsers
also allow Javascript to be run by means of some less obvious tags,
such as <style>, which
is why these should not be allowed without some form of
protection. See the chapter on Security
for more information about why these tags are insecure.
The administrator can set up access rules to text formats by role. It may be OK to give trusted users such as the administrator, editors and regular contributors access to a format (e.g. Full HTML) that allows them to post content with insecure HTML constructs, while restricting untrusted users to Filtered HTML (D7) or Basic HTML (D9+) only.
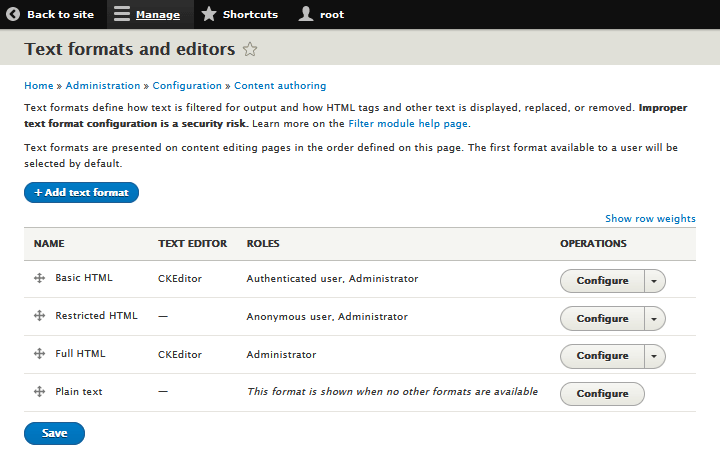
 If
a user is granted edit access to a field, but that field is in a
text format the user is not granted access to, the field will
appear greyed out and the user will no be able to edit it.
If you want to allow untrusted users to embed videos, it is not a
good idea to just allow-list an insecure tag such as
<iframe> (used to embed video from YouTube
and Vimeo).
Instead, you need to sanitise user input that embed material in the
page. You may do this by using a text filter that inspect embedding
tags and remove attributes containing scripts, use separate fields for
media content this is santised before they are rendered, or make the
user use a data entry tool that santises user input. See the
chapter about setting CKEditor
to learn how to do this.
| Name | Role | CKEditor |
|---|---|---|
| Full HTML | Administrator | ✔ |
| Filtered/Basic HTML | Authenticated | ✔ |
| Restricted HTML | Anonymous | ✘ |
| Plain text | Fallback | ✘ |
You should only appoint users you trust to the "Content editor" role. You may consider giving them access to the "Full HTML" text format.
Views
You may also use Views to resolve this. Restrict the anonymous role from viewing published content. For example, the frontpage is a view, so you can enable unrestricted access for the anonymous role to this view. To do this click on "Permission" in the second column, and select "Role".
To restrict access to anu other content for the anonymous user role, remove the permission "view published content" from the role.
Overview of some core permissions [D7]
Each Drupal module can define its own permissions. In addition to the human readable name a permission also has a machine name (shown in monospace font in the table below). You use the human readable name when you manipulate permissions using the Drupal administrative GUI, and the machine name when you do it my means of a PHP program.
Below is an overview of the most commonly used permissions from core modules. The module name is listed in bold before each group of permissions. Permissions marked with a ⚠ in the column “S” has security implications, and should only be granted trusted users.
Name (human/machine) |
Notes | S |
|---|---|---|
| Block | ||
Administer blocksadminister blocks |
Grants access to . | |
| Comment | ||
Administer comments and comment settingsadminister comments |
Grants permission to edit, unpublish, and delete comments. | ⚠ |
View commentsaccess comments |
Allows the user to view comments. | |
Post commentspost comments |
Grants permission to create a comment. It will be unpublished unless next permission is also granted. | |
Skip comment approvalskip comment approval |
Grants permission to create a published comment. | |
Edit own commentsedit own comments |
Allows the user to edit own comments. | |
| Filter | ||
Administer text formats and filtersadminster filter |
Grants access to configure text formats. Users with this permission can use all text formats. | ⚠ |
Use the format text formatuse text format format |
Grants the right to use the specific text format. | Menu |
Administer menus and menu itemsadminster menu |
Grants access to . | |
| Node | ||
Bypass content access controlbypass node access |
View edit and delete all content regardless of ownership and permissions. | ⚠ |
Administer content typesadminister content types |
Grants access to . | ⚠ |
Administer contentadminister nodes |
Grants permission to create, edit and delete all content. Also exposes the Publishing options section when editing nodes. | ⚠ |
Access the content overview pageaccess content overview |
Grants access to . | |
View published contentaccess content |
Allows the user to view content. This should be enabled for all roles, unless you want to set up a private site or an intranet. | |
View own unpublished contentview own unpublished content |
View own unpublished content on site. | |
Contenttype: Create new contentcreate contenttype content |
Create new content of type indicated. | |
Contenttype: X new contentx contenttype content |
Do x with content of type indicated (x = edit own/any, delete own/any. | |
| Search | ||
Use searchsearch content |
Use basic search. | |
| System | ||
Administer site configurationadminister site configuration |
Grants access to menu, including (clear all caches). However, this permission is very broad and usually implies that user can change the configuration. | ⚠ |
Use the administration pages and helpaccess administration pages |
Required to get site building entries (i.e. and ) show up in the admin toolbar. However, this permission only implies right to view, not change. | |
View the administration themeview the administration theme |
Have admin pages rendered using the administration theme. | Toolbar |
Use the administration toolbaraccess toolbar |
Show the toolbar (administrative dashboard). | |
| User | ||
Administer permissionsadminister permissions |
Grant and withdraw permissions from users, including self. Requires Administer users to work. | ⚠ |
Administer usersadminister users |
Grants access to the menu. Edit all fields in any user's profile. | ⚠ |
| View user profiles [D7] View user information [D9] access user profiles |
View other user's profiles. | |
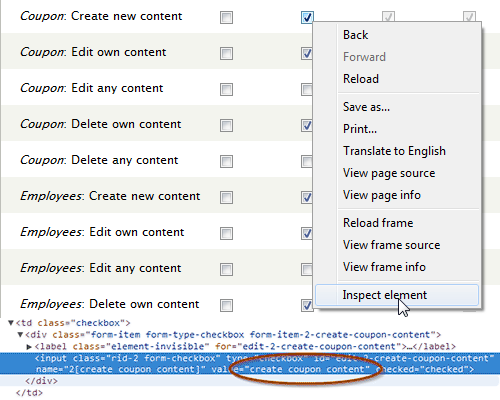
Every module can define their own permissions. You can get an
overview of the permissions that exists on a website by navigating
to and see the human
readable names. By right clicking on the control and using “inspect
element” (available in Chrome, Firefox and some
other browsers), to look up the value of the checkbox
item, you can find the machine name of the permission.
For human readable permissions, you can find a list of that exists on a particular side by navigating to . For machine names, there is an outdated permissions reference on Drupal.org. It is still useful as many of permissions for Drupal 7 also exists for Drupal8 and Drupal 9..
Managing access to file attachments
There are no role based settings for files as such. However in Drupal. files are normally attached to nodes, and as long as files are stored in the public file system, you can hide (but not restrict access to) a file by hiding or restricting access to the node the file is attached to.
If your needs go beyond hiding the file, please refer to the section about file access control.
Managing users
On a large site or a site with a diverse staff, the site builder may want to create a role-based workflow for authoring, reviewing, copy-editing and publishing, or simply delegate some tasks, such as managing users (e.g. creating users, vetting users for various roles, and blocking spammers) to some others users (moderators) that shall not be trusted full administrator rights.
 Do
not delegate the permission to manage users by granting the moderator
the Administer users permission. While this
grant will give the moderator all the privileges he or she will need,
it also has security implications. For instance, it grants the
moderator the right to change the password of any user,
including users with full administrator rights, making it trivial for
a tainted moderator to elevate her or his own privileges.
To manage users, you need to install a module. This blog post gives mini-reviews of the modules available.
Final word
Access control is one of the greatest stumbling blocks in Drupal. The system is far from intuitive, and there are a number of different things that can go wrong. Below is a short list of things to try when you or one of your users get mysterious “Access denied” errors.
- Clear your browser's cache and the Drupal cache on the server. and Views' cache . (This one is the first thing to try with almost any problem with a Drupal installation.)
- If you've just installed a new module, make sure that you've executed a database Update. You may also try to uninstall the module, to see if it is the cause of the problem.
- If the administrator role has access, but no ordinary users, make sure that you have granted the necessary permissions. Note that you need to add access grants whenever you create a new content type, or you add fields to an existing content type (until you do, only the administrator role has access). Also note that granting a specific permission to the Anonymous user role does not mean that the Authorized user role (or any other role) inherits that grant. You have to grant each role the permission explicitly.
- Use Devel's DNA to debug node access problems.
- Check (and if possible repair) the SQL database. A bad database
can cause access or log in problems even for the administrator
role. Bearing in mind that you should always back up your database before
doing anything to it, you can try the following:
- Rebuild permissions: Navigate to and click the link in the row. If you have a lot of nodes, this operation can take some time.
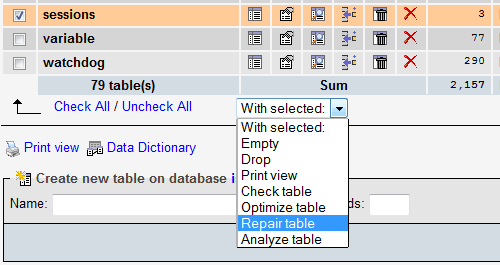
- Repair the the sessions table with the help from phpMyAdmin. In phpMyAdmin, choose your Drupal database, check the box left of the sessions table, find the drop-down menu near the bottom of the page, and choose .
- Check input filter roles. If you're using input filters, note that if a user does not have permission to use an input filter, then the user cannot edit content that can only be edited with that input filter.
Please use the comment field to let me know if there are other ways of hunting down and fixing access control issues that you know about.
Last update: 2023-06-16 [gh].