Installing Drupal
This note explains how to download, unpack, install and configure Drupal 10 in order to set up a development server for Drupal from scratch on a web server that provides Linux, Apache, MySQL/MariaDB and PHP.
Table of contents
- Introduction
- Decide on a host
- Make sure that LAMP is set up and operational
- Set up a database for Drupal
- Download the core
- Install the new site
- Check the new installation
- Post-installation
- Reverting to a null installation
- Troubleshooting
- Final word
Introduction
Before you can start using Drupal, you will of course need to install it and set it up to be ready for use. To do so, you need to complete the following six steps:
- Decide on a host.
- Make sure that LAMP is set up and operational.
- Create an SQL database and a database user for Drupal.
- Download the latest version of Drupal and place it in your webroot directory.
- Install a new Drupal website.
- Check the new installation.
Decide on a host
The note named Introduction to the Drupal WCMS stated that the platform best suited for Drupal is referred to as “LAMP”, so we shall only consider using a host where we will have access to LAMP.
LAMP comes pre-installed on some shared web-hosting services, on others you need to install it yourself before you can install Drupal.
Many hosting options do not come with pre-installed LAMP. If you want to use Drupal on a host where LAMP is not already installed, you will need set up the host with LAMP before you can install Drupal. To set up a test server on a local computer, you may use a pre-packaged LAMP, for example XAMPP or MAMP. I recommend using XAMPP. For more information, see the documentation on Drupal.org: Install Drupal with XAMPP. In our guide for webmasters, there are notes about setting up LAMP and other useful tools for a Drupal webmaster on Ubuntu.
 Some
hosting providers include pre-packaged Drupal websites
(see Drupal.org:
Marketplace) with a administrative GUI to manage Drupal and LAMP. I do not
recommend using these providers unless the site is very simple and
only uses the Drupal core. To manage a Drupal site that uses
extensions (these are also called “modules” in Drupal-speak) it is
paramount that you are able to interact with the website by means if
the CLI using tools such as git, composer and drush.
In this ebook, I am going to assume that you are using a web host where the LAMP stack is already set up and ready to use.
Make sure that LAMP is set up and operational
As already noted, you should have access to the command line interface (CLI) of the web server, and at you should also be able to run the following programs from the CLI: git and composer. It is a good idea to check that these exists in your website development environment by using the CLI to output the version number. (If you do not know how to gain access to the web server CLI, read about how to use The terminal emulator.)
$ mysql --version
mysql  Ver 8.0.20-0ubuntu0.20.04.1 for Linux on x86_64 ((Ubuntu))
$ git --version
git version 2.25.1
$ composer --version
Composer 1.10.1 2020-03-13 20:34:27
The version number and other text in the output may differ, but if any of these are missing from your development environment, install them (or arrange with your hosting provider to have them installed). Do not proceed with installation until you have access to these tools.
In this ebook, I am going to assume that these CLI tools are installed as part of your development environment.
The final prerequisite is that you have access to sudo. If you're not sure whether you have this, try to print today's date by means of sudo. If the dialogue goes like this, you have access to sudo (replace “username” with your own login username).
$ sudo date
[sudo] password for username:
Mon Sep 12 07:47:37 CEST 2016
If the dialogue do not produce the date, and instead goes like this, you don't:
$ sudo date
[sudo] password for username:
username is not in the sudoers file. This incident will be reported.
It is possible to build and maintain a Drupal site without having access to sudo, but I do not recommend it. To follow the instructions in this note, you need access to sudo.
Finally, you need to make sure that the database can be configured with “InnoDB” as the database engine. To check, use the “SHOW ENGINES” custom query.
$ sudo mysql
Enter password:
…
mysql> SHOW ENGINES;
+--------------------+---------+------------------+--------------+------+------------+
| Engine             | Support | Comment          | Transactions | XA   | Savepoints |
+--------------------+---------+------------------+--------------+------+------------+
| PERFORMANCE_SCHEMA | YES     | Performance …    | NO           | NO   | NO         |
| MRG_MYISAM         | YES     | Collection of …  | NO           | NO   | NO         |
| MyISAM             | YES     | MyISAM SE        | NO           | NO   | NO         |
| BLACKHOLE          | YES     | /dev/null SE …   | NO           | NO   | NO         |
| MEMORY             | YES     | Hash based, …    | NO           | NO   | NO         |
| InnoDB             | DEFAULT | Supports …       | YES          | YES  | YES        |
| ARCHIVE            | YES     | Archive SE       | NO           | NO   | NO         |
| CSV                | YES     | CSV SE           | NO           | NO   | NO         |
| FEDERATED          | NO      | Federated … SE   | NULL         | NULL | NULL       |
+--------------------+---------+------------------+--------------+------+------------+
9 rows in set (0,00 sec)
In the query above, “InnoDB” is supported and the default. This is ideal. Drupal 10 is transactional, so the database engine must support transactions. Because of this, the “MyISAM” storage engine is no longer an option.
 If
you don't already have access to a host with the properties described
above, there exists commercial hosting providers that will provide you
with a virtual webhost for a small amount of money, such as
DigitalOcean.
I recommend selecting “Ubuntu 20.04 LTS” as the operating system for the droplet.
You may also want to read
DigitalOcean's Drupal tutorials.
Set up a database for Drupal
With some hosting options, a single database is included in the hosting plan. If this is case, the database is already set up for you, and you only need to know its credentials before proceeding to downloading the core.
But usually, you need to create the database yourself. The recommended method for setting up a database for Drupal on a production site is to create a Drupal database and a specific Drupal database user manually. Provided you have root access to a MySQL or MariaDB database, this is done with the sequence of commands below:
$ sudo mysql
Password:
mysql> CREATE DATABASE drupal8;
mysql> GRANT USAGE ON *.* TO drupal@localhost IDENTIFIED BY 'password';
mysql> GRANT SELECT, INSERT, UPDATE, DELETE, CREATE, DROP, INDEX, ALTER,
    -> LOCK TABLES, CREATE TEMPORARY TABLES ON drupal8.* TO drupal@localhost
    -> IDENTIFIED BY 'password';
mysql> quit
Bye
$
This sequence of commands creates a database named “drupal8”, and a database user named “drupal”, with password set to “password”. (You should of course pick a more obscure password than “password” when you do this.)
 The
web servers operated by HNM AS has a script
named
 mysql_createdb.sh that does this. Use that instead
of typing in the commands manually.
Create a swap file
The memory requirements of composer is on the heavy side so you should make sure that there is at least 4 GB of RAM available. If you're using a traditional hard disk you may resolve this by creating swap file to accomodate this. If your VM uses SSD, a swap file may case hardware degradation over time, and you may need to go with a plan with 4 GB of physical RAM.
Prepare the configuration
Make sure your webroot is writeable by your ordinary user and the web server group.
Make sure your web server is capable of interpreting index.php in your webroot.
/etc/httpd/conf/http.conf
/etc/httpd/conf.d/titan2.conf
Make sure that the web server is capable of reading the .htaccess file that shall be created in the webroot.
This usually boils down to:
- Apache
mod_rewritemust be enabled. - The vhost configuration file most have
Allowoverride All. - The web server must be able to locate the site's
.htaccess.
To quickly check whether .htaccess is not read, put
garbage in .htaccess, if the site does not break
with a 500-error, it is being ignored. Most common causes are that
one of the three items above is not present. If the web server is
unable to locate the site's .htaccess, first check the
Apcahe .conf-file, and verify that “DocumentRoot” and
“Directory” identify the correct directory.
Downloading the core
For an overview of the latest versions of the core, vistit releases on Drupal.org
The canonical procedure for installing the currently recommended
version of Drupal is to use composer and the
command create-project to create a new project in the
directory above what will become the webroot (i.e. the
directory set up as DocumentRoot in Apache). The
template for this project is “recommended-project”.
Below you can see the generic command to specify the name of Drupal root directory., and two specific examples. Unless you plan to use the site for core development, you should remove the VCS.
The generic commmand need to specify the name of composer project directory (siteroot):
$ composer create-project drupal/recommended-project directory
…
Do you want to remove the existing VCS (.git, .svn..) history? [Y,n]? Y

  Congratulations, you've installed the Drupal codebase
  from the drupal/recommended-project template!
The directory given on the command line will be created. If it exists and is not empty, there will be an error.
The webroot directory will always have the name “web”, and be in the siteroot.
Single site
The first example is for a web server serving a single site.
This pair of commands will create a directory where the webroot will be “/var/www/html/web”.
$ cd /var/www
$ composer create-project drupal/recommended-project html
Vhost
The second example is for a typical vhost configuration.
This pair of commands will create a directory where the webroot will be “/var/www/example.com/web”.
$ cd /var/www
$ composer create-project drupal/recommended-project example.com
Specify version
If no version is specified, “create-project” command will always download the latest recommended version (currently Drupal 10.0). Specifying “9.x” will download the latest version of Drupal 9.
$ composer create-project drupal/recommended-project:9.x html
About the siteroot
The create-project-command will place an inital root
(global) composer.json in the composer project
directory,. It will also create a subdirectory for Drupal named “web”.
If you look inside composer.json, you will that it
will have a “repositories” key like this, telling composer to
also search the
"repositories": [
    {
        "type": "composer",
        "url": "https://packages.drupal.org/8"
    }
],
Composer will, by default, search the Packagist repository. There is no “repositories” key for the Packagist repository.
As already mentioned, in the project directory, there will be a subdirectory named “web”. This will become the webroot and if the you used the exact same create-project command as the one in the example above. The recommended version of Drupal and all its dependencies will then be downloaded and installed in the webroot.
The create-project command will also create a file
named composer.lock in the composer project
directory above the webroot. This file will lock in your
configuration so it can be recreated in its present state just by
rerunning the composer install command.
The composer project directory will contain some files and directories. The most important are:
composer.json: The rootcomposer.jsonused to manage the project.composer.lock: The configuration file that locks the project.vendor: A directory that contains most of the libraries managed by composer.web: The webroot. This is where Drupal is installed.
Install drush
Up to and including Drupal 7, the same version was used for every
project. However, with symfonic Drupal (e.g. Drupal 10), different
projects may require different versions of drush. So today,
each project should have a version of drush installed locally
in the project's vendor directory. However, I also recommend
installing drush version 8 globally (the
"global"
command will by default composer will put it in the
directory .config/composer/vendor/bin/ below your home
directory). It has a built in routine to find the correct version
of drush for a particular project. Here is how to
install drush version 8 globally. It assumes that the
direcory /usr/local/bin/ is in
your $PATH.
$ composer global require 'drush/drush:8.*'
$ ln -s ~/.config/composer/vendor/bin/drush /usr/local/bin/drush
$ drush version
Drush Version   :  8.4.12
These instructions are expanded from the official Drush documentation about global installation.
 The
official documentation suggests
Drush Launcher as an optional install. IMHO, this is not superior to the built-in drush finder in version 8.
I do not recommend using it.
To use drush with projects based on Drupal 7, you can use the globally installed drush version 8.
For symfonic Drupal, after you have created the Drupal project,
you should always install a local drush for the project. To do it,
navigate to the project's siteroot (the directory that
contain composer.json) and use the following command:
$ composer require drush/drush
To check the project-specific drush version in use, make sure you're in or below the root directory of a Drupal project.
$ drush version
 Drush Version : 12.4.3.0
$ drush --version
Drush Commandline Tool 12.4.3.0
This is the version number of the latest version at the time of writing. You may get a more recent result.
If drush is out of sync with the version of PHP installed, you may see warnings and errors, such as this one:
$ drush version
count(): Parameter must be an array or an object that implements Countable Table.php
 Drush Version   :  7.4.2
or:
PHP Parse error: syntax error, unexpected '[' in phar://…/output.inc …
PHP Parse error: syntax error, unexpected 'class' T_CLASS, expecting …
To fix this, you need to bring them in sync.
First, try to update drush using composer.
$ composer update
If that does not fix the problem, you should use composer to remove, and then reinstall drush. The follow pair of commands does that:
$ composer remove drush/drush
$ composer require drush/drush
If your PHP is outdated, you need to upgrade PHP to be compatible with the version of drush you've installed.
After downloading
You may want to do the following to be sure your site is ready for installation of Drupal:
Change into the default directory for the site, and copy the settings file:
$ cd web/sites/default
$ pwd
/var/www/example.com/web/sites/default
$ cp default.settings.php settings.php
Change into the project directory and make sure it, and all
directories below it, is writable by the web server group. If the
directory where the composer project is located
is /var/www/example.com and the web server group is named
“www-data”, the following CLI-commands will do this and display the
result. The commands shown below are for Gnu/Linux. If you're using
a different platform, use the equivalent commands for that system.
$ cd ../../..
$ pwd
/var/www/example.com
$ sudo chmod -R 775 .
$ sudo chgrp -R www-data .
$ ls -ald .
drwxrwxr-x 7 root www-data 4096 aug. 11 12:42
You may want to check the update status after doing this. You probably will not get exact the same list as the reproduced below, it is just to give you an idea of what it looks like:
$ composer outdated
dflydev/dot-access-data   v1.1.0  v2.0.0  Given a deep data structure, access data …
grasmash/yaml-expander    1.4.0   2.0.0   Expands internal property references in …
league/container          2.4.1   3.3.0   A fast and intuitive dependency injection …
symfony-cmf/routing       1.4.1   2.0.3   Extends the Symfony2 routing component …
twig/twig                 v1.42.3 v2.11.3 Twig, the flexible, fast, and secure …
typo3/phar-stream-wrapper v2.1.2  v3.1.2  Interceptors for PHP's native phar:// …
vlucas/phpdotenv          v2.6.1  v3.5.0  Loads environment variables from `.env` …
As you can see from the semantic versioning, these are all major version updates. They are held back because their most recent APIs are not compatible with the current version of Drupal.
You may add the option --no-install to the
create-project command. This will let you edit
composer.json before installing. For instance, the
“installer-paths” section will by default use paths starting with
“web”. To use “html”, change the section to this:
"installer-paths": {
    "html/core": ["type:drupal-core"],
    "html/libraries/{$name}": ["type:drupal-library"],
    "html/modules/contrib/{$name}": ["type:drupal-module"],
    "html/profiles/contrib/{$name}": ["type:drupal-profile"],
    "html/themes/contrib/{$name}": ["type:drupal-theme"],
    "drush/Commands/{$name}": ["type:drupal-drush"]
},
 Changing
the “installer-paths” section produces a broken site if you install the “Demo” profile.
Go with the default unless you want to debug this. [Tested 2019-08-13.]
Install the new site
When the database and the Drupal core is in place, you can go ahead and install the site, using the Drupal GUI.
When there is an
unconfigured settings.php present, and you point your
browser to the base URL of your website-to-be, you should see a screen
that looks like the screen dump below. This is the start of a wizard
that will guide you through the steps required to connect the site to
its database, create tables, add the first user account (the
administrator) and prompt you do some basic website settings.
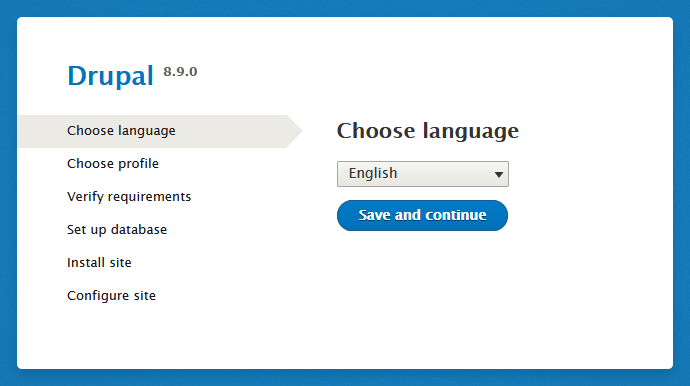
Here is a summary of the steps:
- You will first have the option to pick a language. This will be the default language for the website. You may add more languages later, but you can't change the default language, so make sure you pick the correct if you shall not use the built-in default (“English”). Then click “Save and continue”.
- In step two, you will have the option to select an installation profile (“Standard”, “Minimal” or “Demo”). Pick “Standard” unless you're very familiar with Drupal and want to customise your installation right away.
- At this stage, some sanity checks will be run to verify that the requirements for installing Drupal is fulfilled. You must fix all errors before you will be allowed to proceed.
- The next screen lets you set up the database. For “Database name”, “Database username” and “Database password”, you must enter the credentials for the database you've previously set up for Drupal. If you're database is running on a server different from localhost, a non-standard database port, or you want to use a table prefix to allow for multiple instances sharing the database, you need to expand “Advanced options” to set up these as well. When done, click “Save and continue”.
- The next screen will install Drupal. This takes a long time.
- The last screen lets you configure the site. It is important that the email address you enter in the field: “Site email address” is a real, working email address. Note that this will also become the email address of the site maintenance account. You can pick whatever username you want for the site maintenance account. It may be a good idea to not use names like “admin” “administrator”, as these are the usernames most attack scripts will try to brute-force. When done, click “Save and continue”.
The screen dump below shows an example of how to fill in the site information form.:
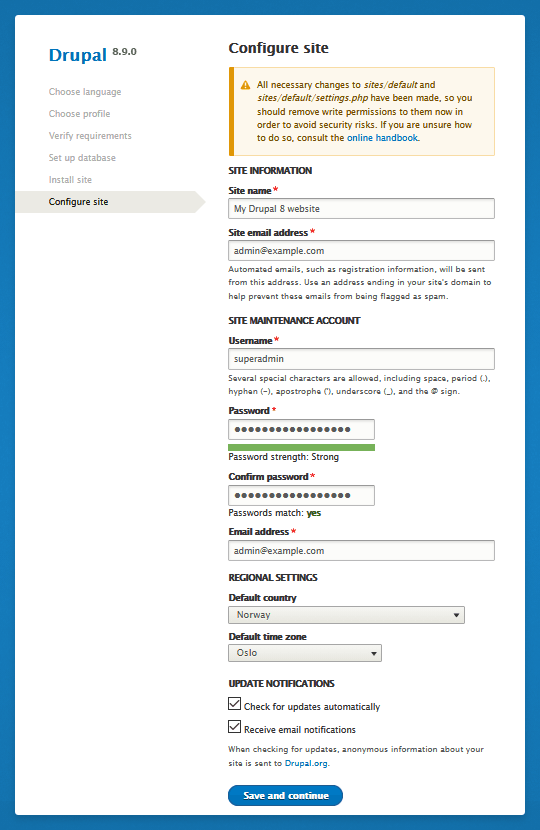
After completing the steps above, the site should be ready and you shall get a screen telling you: “Congratulations, you installed Drupal!” You can now proceed to the site front page.
 A
table prefix may be set up in step 4 above. It is prepended to the
front of each table name in the Drupal database to prevent one
installation from overwriting the tables in another. If you are using
bargain bin shared hosting for your web server, multiple databases come
at a premium. Using a table prefix lets you use a single
database for a number of different applications without having them
interfere with each other.
After installation, you need to secure the permissions of default settings directory and the settings file. Also allow the web server group to write to the public file directory. The commands shown below are for Gnu/Linux. If you're using a different platform, use the equivalent commands for that system.
$ pwd
/var/www/web/sites/default
$ sudo chmod 755 .
$ sudo chmod 644 settings.php
$ sudo chgrp -R www-data files/
Drupal can use the Symfony trusted host mechanism to prevent HTTP
Host header spoofing. To set up this, edit settings.php
and locate the section headed “Trusted host configuration”, and edit
and uncomment the setting for “trusted_host_patterns”. For example,
to allow the site to run off of all variants of “example.com” with all
subdomains included, use the folowing setting.
$settings['trusted_host_patterns'] = [
   '^example\.com$',
   '^.+\.example\.com$',
];
 One
of the installation profile available is “Demo”. It demonstrates key features of the symfonic Drupal core
and requires no additional modules. It is well worth checking out. It demonstrates Drupal's multilanguage
capabilities, roles, taxonomies, a custom content type (“recipe”), etc.
The motivation behind it is described
on Drupal.org.
Drupal will automatically set up a configuration sync directory in
public://files. It will have a file name starting with
"config_ followed by a long, random string to make it
hard to guess the filename and containing a sundirectory named
"sync". Ideally, this file should be located outsite the
webroot.
You can do this by creating it manually elsewhere. For
example under "/var/private. Then record the absolute
path in "settings.php":
$settings['config_sync_directory'] = '/var/private/config/sync';
Make sure it is writable by the web server.
Background on DO: Managing your site's configuration.
Check the new installation
If you point your browser to the base URL of your website, you should see something like the screenshot below:
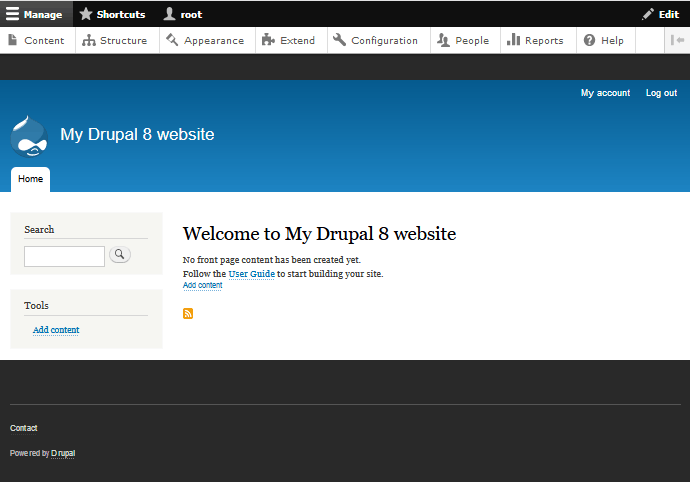
You can now start using the site.
However, before you wrap up, check to make sure
sites/default/settings.php and sites/default
are secure.
As a final check that the the installation was successful, navigate to . The screen dump below shows how the top of this report is supposed to look like.
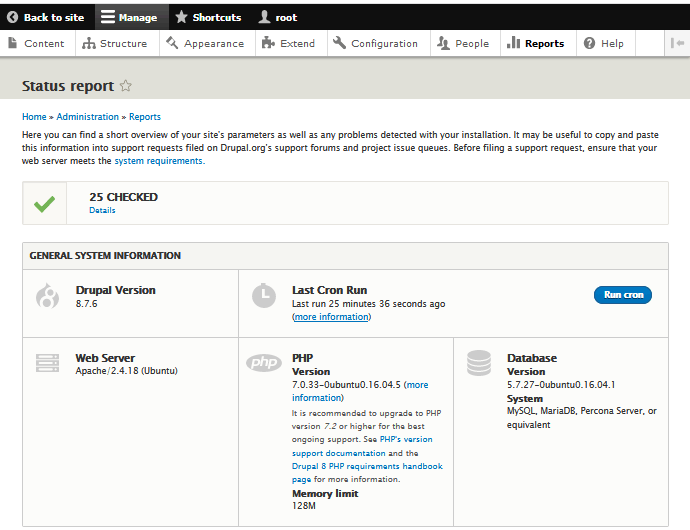
If there is any problems with the installtion, this will also be indicated at the top of the status report.

Clicking “Details” will take you to the status report to inspect check that failed. You may also scroll down to locate the heading “Checked”. Below that heading is the status report with is a list of checks performed, and their current status.
Common installation problems is that some files and directories has their ownership and/or file permissions wrong.
You should also make sure that the email address belonging to the Drupal admin user is a valid adress that you actually monitor in order to receive system messages about updates, etc. Click on the user-name that appears in the black administration menu at the top of the screen, and then on “Edit profile”. If necessary, change the email address field into a valid and monitored address.
After creating a new Drupal site, you should always check that the site information is how you want it to be. Navigate to and check that at least the following site information fields have been filled in with sensible values:
- Site name
- Email address
In particular, make sure the field Email address contains a valid and verified address. All email sent by the system will use this address as the sender address. Make sure there exists an SPF-record to tell milters that this address is verified. This email address is by default the same address as the email address of the admin user, but it is not required to be identical.
The “Slogan” is a string displayed below the site name is some themes. Leave blank for no slogan.
This page also let you specify a relative URL to display as the front page. Leave blank this field or use “/node” to display the default content feed. The default content feed places newly created posts on the front page when it is created, and removes old posts when the number of posts exceeds the maximum number.
The site information page also let you set up custom error pages for HTTP status codes 403 (access denied) and 404 (not found). If you leave these fields blank, generic error pages will be shown.
After completing all the steps above, you should also test that your site is capable of sending email. The simplest way to do this is to create a non-admin test user that is associated with your own email address. Navigate to in the administration menu, and click on “Add user” fill in all the fields including the email address field, and make sure the box labelled “Notify user of new account” is checked. Then click in the button “Create new account”.
Almost immediately, you should receive an email with the subject “An administrator created an account for you at …”. If you do not receive this email, you need to review the email configuration of your server. Drupal needs to be able to send email to work.
Post-installation
Below are some notes on things you may want to do post-installation. This is not things that are required to configure a Drupal WCMS, but things I consider useful.
Turn off visitor registrations
Allowing visitor registrations when a site is still under
development is not recommended. Instead set the value of
the user_register variable by navigating to
,
and set the radio button for this setting to “Adminstrators
only”.
Contact forms
If you want people to be able to contact you, and/or users to contact each others, by means of a contact form, you need to use the core Contact module and grant permissions to use contact forms.
The module should be installed by default. If it is not, navigate to and locate the Contact module. Place that a tick-mark in the box to the left of the module name, and scroll down to the bottom of the page and click on the button labelled .
To give people access to the contact form, navigate to and examine the section. Usually, you only want to let the site administrator administer contact forms and contact form settings, but you may want everyone, including people that are not logged in on the site (i.e. the anonymous user) to be able to contact the site administrator through the site-wide contact form. You may also want to permit people logged in on the site (i.e. an authenticated user) to be able to contact each others by means of a personal contact form.
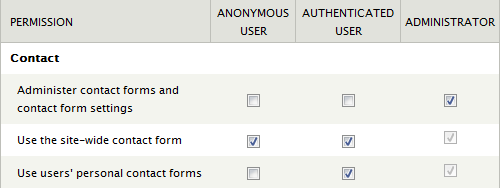
When done, scroll down to the bottom of the screen and press “Save permissions”.
 Allowing
people that are not logged in on the site to use the contact form may
lead to spammers using it to send you spam. If this becomes a
problem, you could either disable it for the anonymous user by
removing the tickmark in that column and then pressing “Save
permissions” to save the change.
After ticking off the contact permissions you want to grant, scroll down to the bottom of the page and click on the button labelled .
By default, the link to the global contact form is placed in the
navigation menu. It is initially disabled. Rather than showing it in
the navigation menu, you may but the link to /contact in
a custom block placed in the footer region.
 If
you want to add some leading text above it, to guide those using the form, you do this by adding a block to the page with the form.
For precise instructions, read the answer to
How to add predefined text to contact form?@DrupalSE.
As for block visibility, using a wildcard (
If
you want to add some leading text above it, to guide those using the form, you do this by adding a block to the page with the form.
For precise instructions, read the answer to
How to add predefined text to contact form?@DrupalSE.
As for block visibility, using a wildcard (contact/* will
show the block on every contact form page. A good region for
placing this block is “Highlighted”.
Mission and footer
Most sites want to display some sort of mission statement in a block on the front page, and a footer block that contains such things as a copyright notice a links to basic pages that contain the site's privacy policy and terms of use.
You add a block in Drupal by navigating to . Then you fill in the block description and the body. Then press “Save”. Go back to the “Block” layout tab, and determine what region you want to place the blook in. Press “Place block” and locate the block in the list and press “Place block” gain. You may also restrict the visibility of the block to certain content types, pages and roles. When done, press “Save block”.
For example:
- Mission. Add custom block. Place in Highlight region. Only show on <front> page.
- Footer message. Add custom block. Place in Footer region.
After you've created an positioned the blocks, you create suitable content for them.
Set up a private file system
To protect files managed by Drupal from unauthorised access, you need to set up a private file system download method. This cannot be done automatically because the path to the private file system depends on how you've set up your file system.
The procedure for doing this is in another note, titled Working with files in Drupal.
Provided you set the permissions correctly, the Backup and Migrate module will be able to create the required subdirectories.
Sanitize filenames
If users are allowed to upload file to your site, you need to enable transliteration. To do so navigate to and locate the "Sanitize filenames"-section.
Use the default replacement character ('-'). Then, tick the following:
- Transliterate.
- Replace whitespace with replacement character.
- Replace non-alphanumeric characters with the replacement character.
- Replace sequences of dots, underscores and/or dashes with the replacement character.
- Convert to lowercase.
Click "Save configuration".
User #1
The first user created in a brand new Drupal installation gets user ID number 1 and is special. For instance, this user bypasses all access callbacks – meaning it has all permissions by default. Do not make this a regular user. Give it a special name (but not admin or administrator) and only log in to this user to perform administrator tasks. To stop outsiders from learning the name you've picked for the administrator role, do not grant anonymous users the right to see user profiles.
 Failing
to secure the administrator account could result in potential security
risks. Treat this account as you would with root on a GNU/Linux
systems. There are several options for recourse to secure this account. See
Securing user #1
for some suggestions.
You may later assign the administrator role to other accounts. However, you can tweak the permissions granted the administrator role, but not the permissions granted user #1.
Adding another language
The strings embedded in the core and in modules are all in English. English is the default Drupal language.
However, Drupal is well prepared to handle other languages. Here is what is needed to make “Norwegian Bokmål” the default language for the Drupal user interface.
- Enable the core Interface Translation module (it will automatically enable Language).
- Navigate to the language configuration page: .
- Select the language you want (i.e. “Norwegian Bokmål”). Click “Add language”.
- Be patient when Drupal updates the translations. This will take some time the first time you do it.
- Use the radiobutton to set “Norwegian Bokmål” as the default language. Click “Save configuration”.
After this, the list of languages should look like this:
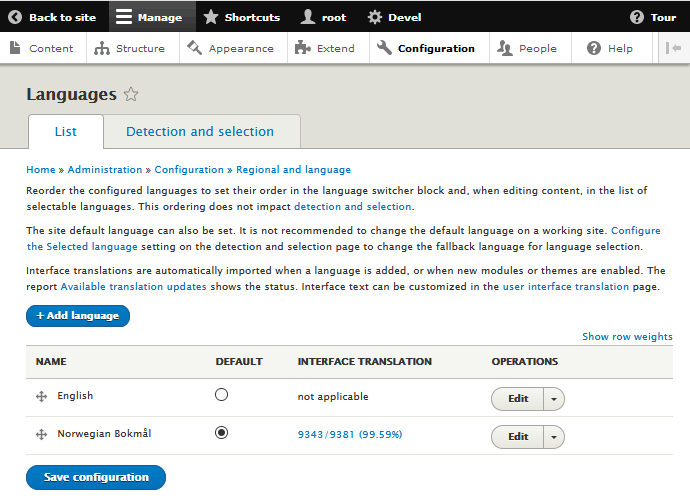
 The
“Tour” button in the upper right corner produces a sequence of
help popups introducing the Drupal language subsystem.
After you've enabled a language, when you download and install a package, Drupal will automatically download the translation files for all additional languages you've enabled along with it. Translations, however, are often lagging behind releases. This means that you need to have the translations on your site updated at regular intervals.
To enable periodic checks for translation updates, do:
- Navigate to
- Use the radio button to indicate the frequency of checking.
- Click “Save configuration”.
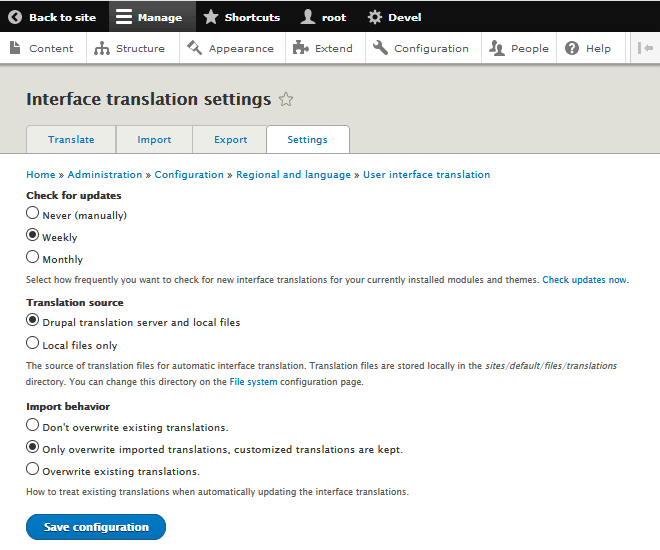
In the screenshot above, weekly checks has been selected. Checks are done during cron runs.
To check for translation updates manually:
- Make sure the core Update Manager module is installed. (It should be installed by default if you used the “Standard” installation profile.)
- Navigate to .
- Click the link "Check manually". This will compile a list of all available translations. This can take a few minutes.
 The
repository of translations of the core and released modules are kept at the Drupal
translation server. If your site is missing
translations, you can speed up the process of making them available by creating
an account as a translator at that site. Initially, you will only be allowed to
suggest translations. You have to wait for someone else to approve them
before they become available for download. However, you may speed this up further
my asking the moderator for the language you're interested in to grant you the right
to approve your own translations.
This section tells you how to set up the site with a single language that is not English. If you want to use more thyan one language, please see our note about Internationalisation
Date and time
Navigate to and make sure the regional settings are correctly.
First select the default country and the first day of the week. For calendars in Europe, the first day of the week should be Monday.
After setting the first day of the week, you should set the default time zone to the city where you are located. If your city isn't listed, choose the time zone that is closest to your location which has the same rules for daylight saving time. In the screenshot below, it is “Oslo”, since that is my location.
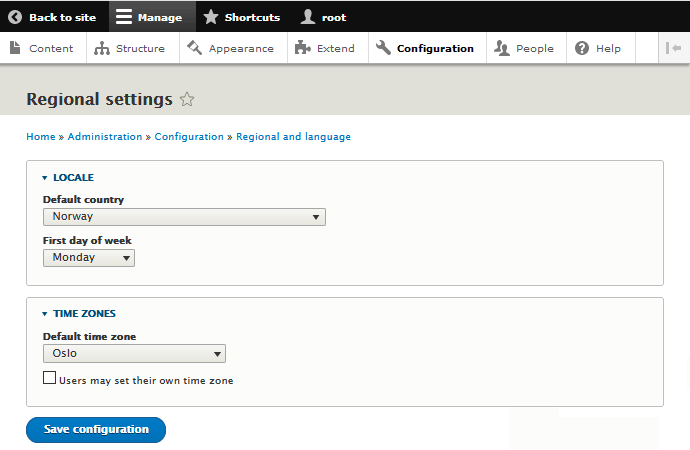
If you tick the box to let users set their own time, more options appear. These are the time zone settings:
- Default time zone. This sets the default time zone for the website. Used for anonymous users.
- Authenenticated users may set their own time zone, but this may be disabled.
- You may also set default time zone for new users.
If the time zone for a user is set, this overrides the site's default time zone.
If you changed anything, remember to click on to save the changed settings.
You should also visit and set up the date formats you want to use for long, medium and short formats. For ISO-8601 style date formats, use:
Long:  l, Y F j - H:i
Med.:  D, Y-m-d - H:i
Short: Y-m-d - H:i
Install essential extensions
You should be able to produce database backups.
Use this extension: Backup and Migrate.
 There
is a major bug for version 5.0.x-dev reported in this issue:
Unable to restore backup from the Saved Backups tab.
It is pretty transient, but if it bites you, fall back on mysqldump.
Install software for GUI-only clients
If the client prefer the GUI over the CLI, you may install these extensions to enable webfont assignment and custom CSS from the GUI:
Use this extension for webfont assignment: @font-your-face.
Use this extension for custom CSS: CSS Editor.
However, in my experience, the CSS Editor don't work well. Recommend to client using the CLI instead.
Reverting to a null installation
Sometimes, your site may be in a state where you want to delete it and start over again.
To do this, while keeping your version of the core and all other code that exists on the site in place, go through the following steps:
- Set up a database for Drupal. If you reuse the old database name, all the data in will be wiped out.
- Copy
default.settings.phptosettings.php. - Make sure the
sites/defaultdirectory andsettings.phpand writable by the web server. - Go through the steps described above in the section Install the new site.
- Rebuild the cache.
- Secure
sites/defaultdirectory andsettings.php.
To replace the code, including the vendor directory
managed by composer with a fresh copy as well, use the following
steps:
- Set up a database for Drupal. If you reuse the old database name, all the data in will be wiped out.
- Change into the siteroot mentioned in the section Downloading the core
- In this directory, use the following commands to wipe out all of your present Drupal site and download a fresh version of the Drupal core. The “directory” referred to in the last step will become your webroot.
$ rm -rf composer.json
$ rm -rf composer.lock
$ rm -rf vendor
$ rm -rf web
$ rm -rf config
$ composer create-project drupal/recommended-project  directory --no-interaction
- Go through the steps described above in the section Install the new site.
Troubleshooting
Private directory not protected
If you experience this after installing, and .htaccess is present in the private directory, clear cache.
No matching package
The CLI-commands used to download the core in the
section Download the core are taken from
the
official documentation on Drupal.org. I have experienced that
using drupal-composer/drupal-project [deprecated] to install Drupal
does not work because of problems like those described in
this issue (on GitHub).
Using the --no-install option and removing the package that causes the problem from the core's composer.json before installing may fix it.
Configuration sync directory not found
You will get this error if the configuration sync directory
specified in "settings.php" does not exist.
Set it up manually as described above.
Final word
Installation is only a job well begun. The task of running a production Drupal site entails keeping the configuration up to date. Many of the updates to the Drupal core and contributed modules that appear over time are security updates. Failing to install them in a timely manner when they become available constitutes a security risk.
A useful tool that will help you with keeping the site up to date with security-patches is the Drupal security newsletter.
In a professional enviroment, you will build a Drupal website on a staging server located behind a firewall and not accessible from outside your organisation. When the site is built, it will be copied to a production server “go live” on web. Developer Aram Boyajyan has a blog post about going live with a Drupal website. The posting includes a helpful of list of settings and other details that should be checked before a Drupal website goes live on the web.
Last update: 2022-12-28 [gh].