Managing media
This chapter discusses some of the media management projects that is available for Drupal 7.
Table of contents
Drupal projects discussed in this chapter: CKEditor, IMCE, Media, Media Library, Media CKEditor, Insert, Scald.
Introduction
Drupal 7 has deservedly had a poor reputation for media management. Using the same media asset in more than one location, being able to curate media assets in a library for reuse, even if it is not attached to any node, and being able to transform the same image depending on the context has been rather clunky compared to other WCMSs such as WordPress.
Drupal 8 has a core Media Entity type to handle media assets. This type does not exist in Drupal 7.
However, a number of projects to manage media assets exist for Drupal 7. These range from very basic tools to upload and embed individual media files, to digital media asset managers.
Below is the list of the tools I am currently aware of:
- Insert
- is a simple tool that allows the casual user to insert an image into the editing area of a WYSIWYG editor with the click of a button.
- IMCE
- is both a file uploader and a file browser. It is badly suited for casual users, but provides the image library management functions an editorial team needs.
- Media
- is by far the widely installed media management tool for Drupal 7.
- Scald
- is a file uploader, file browser and media asset manager. It is newer software, and IMHO it provides a better UX than IMCE.
It is probably not a good idea to install more than one of these. If you want to try them out, only install one at the time. Insert is a light-weight tool for casual uploads. The others are designed for enterprise media asset management, and do roughly the same thing, but with a different user interface.
 The
next three sections describes how to install the alternative
media management projects
Insert, IMCE and Scald.
So far I've only added placeholder sections for Media. Of those I've tested,
Scald is the media management project for Drupal 7 that provides the best overall
UX, and the most complete set of media management festures.
This chapter describes how to set up three different Drupal 7 projects (Insert, IMCE, Scald) for file upload that work with CKEditor. They are all free software and are maintained as contributed modules in the project area on Drupal.org.
Insert
The Insert module is a simple tool that allows the casual user to insert an image into the editing area of a WYSIWYG editor with the click of a button. It may be set up to integrate with the function that comes with Drupal's core ImageField and FileField. It adds a JavaScript-based button to ImageField and (FileField) widgets. Pressing the button inserts the image (or a file link) into the WYSIWYG editing area.
To install Insert you download the project and enable the module.
$ drush en insert -y
To be able to insert images, the content type need to have an ImageField. You can add this field to any content type by using Drupal's core field feature (see the chapter Creating content types using fields for details).
However, since the built-in Article content type already has an image field, we're going to use that.
To add an insert button to the article's Image field, navigate to and click on “edit” for the Image field. Scroll down and expand the “Insert” dialogue. There is a lot of settings here, but the only one that is necessary to change is to check is “Enable insert button”.
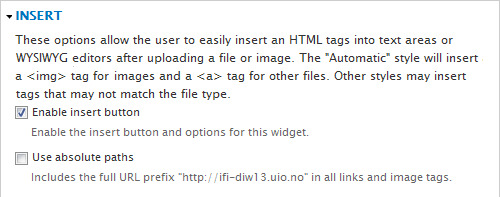
You're now ready to test it. But you should clear all caches before trying to test it. With drush, you can do it with the following command.
$ drush cc all
To test it, go ahead and create a new Article, upload an image, and insert it into the WYSIWYG editor – it should work! The only glitch would be that the article would show two copies of the image: One due to markup in the body generated by the CKEditor, and a second because the ImageField by the default is visible.
To correct this, navigate to , and click on “Manage display” for the Article content type. Make sure that the image field is <Hidden> for the Default and Teaser display settings, and all the other display settings that exist.
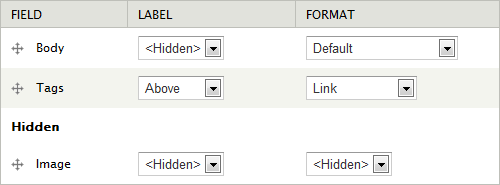
Now, when the user edits a content type with an ImageField, and uploads an image, a button with the legend “Insert” will appear next to the image. To insert the image into the body, press the “Insert” button.
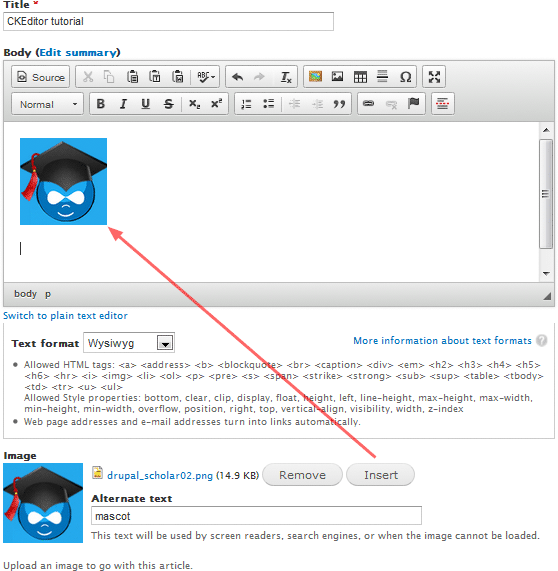
The Insert module only adds the ability to insert images associated with content into the body of that content. It does not, for instance, allow for reuse of already uploaded images by an editorial team. For this type of features, you may install either IMCE, Media Library or Scald.
IMCE
The IMCE module implements a file browser and uploader. It was originally developed to work specifically with the TinyMCE WYSIWYG text editor. TinyMCE expands to «Tiny Moxie Code Editor» and the initials IMCE stands for «Images for Moxie Code Editor». I has since been expanded to integrate with CKEditor as well as TinyMCE.
In contrast to Insert (discussed in the previous segment), IMCE is fully featured file browser that supports management of image libraries and upload quotas. Its user interface, IMHO, is awkward and bone ugly. IMCE is not something to throw at a casual user, but before Scald (first regular release in April 2013) became available, it was probably the best free alternative available for Drupal for use by an editorial team to manage a library of uploaded images that are going to be used and reused.
To install IMCE you start, as always, by downloading the project and enabling the module, e.g.:
$ drush en imce -y
The next step is to set up IMCE profiles for the roles that shall be permitted to upload images.
To do so, navigate to to view and change the configuration profiles. There already exist two profiles, named «User-1» and «Sample profile». The «User-1» profile is tied to the site maintenance account (User #1), but we're going to create a new profile, named «Authenticated», for the authenticated user role.
You do this by clicking “Add new profile”, filling in the profile name, import all settings from «Sample profile», and press “Save configuration”. (Later, you want to come back and tweak some of the settings for this profile, but for now the sample profile settings are fine.)
You then need to assign this profile to the Authenticated user role. When done, press “Save configuration”.
Next you need to configure CKEditor to use IMCE to be its file uploader and browser.
Navigate to . Click on “edit” for the profiles that are going to use WYSIWYG.
First, expand the dialogue “File browser settings” and set the “File browser type” to be “IMCE”.
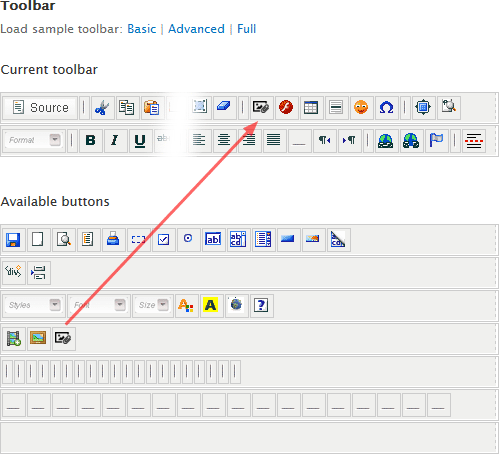
Next, expand the dialogue “Editor appearance” and scroll all the way down to Toolbar. Locate the icon for the IMCE tool on the toolbar containing Available buttons and move it up to the Current toolbar, as suggested by the red arrow in the illustration below.
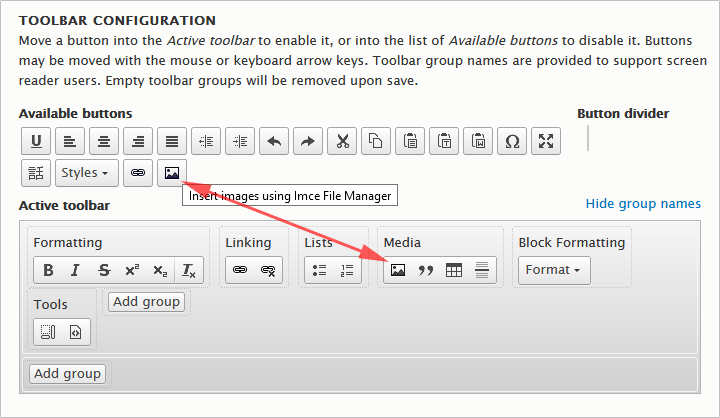
Finally, check the box to enable the “Plugin for inserting files from imce without image dialogue” and click on “Save”.
Media
The Media project, with the two companion projects Media Library and Media CKEditor provide tools for managing media assets compatible with legacy media maangent in Drupal.
[Media was pretty bad in the past, so I abandoned in favour of Scald. Its reputation has improved since then, so in 2019, maybe it should be tested again?]
Scald
Scald (Scald is Content, Attribution, Licensing, Distribution) is a Drupal media management project designed to replace Drupal's default image/file for curating media assets. It is very powerful, but not easy to install and configure. There is a separate chapter about installing and configuring Scald. In this chapter, only Scald integration with CKEditor will be described.
With Scald, it is recommended to use the widget feature of the library to make embedded Atoms more robust in the editor.
First make sure you use a custom build of CKEditor that
contains the Widget plugin. A directory
named widget/ should be present in the
directory ckeditor/ckeditor/plugins/. If it is missing
you should use CKbuilder to
create a custom build that includes theWidget
plugin. (It will automatically include all of its dependencies as
well).
After you've installed the editor, to integrate it with Scald, first set it up as described in Setting up.
Then navigate to . Click on “edit” for the profiles that are going to use WYSIWYG.
Expand the dialogue “Editor appearance” and look under Toolbar. Locate the icon for the Edit Atom Properties tool on the toolbar containing Available buttons and move it up to the Current toolbar, as suggested by the red arrow in the illustration below.
Then, under “Plugins”, check the box to enable “Scald Drag and Drop integration - CKEditor 4 widgets“.
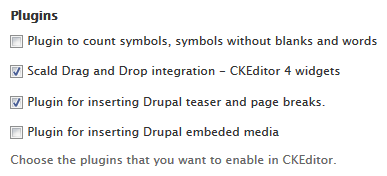
 If
the option “Scald Drag and Drop integration - CKEditor 4
widgets“ does not appear (but you instead just get “Scald
Drag and Drop integration“), then the Widget
plugin to the library is not present. You need to fix this problem
before proceding. Without this plugin active you will not be able to
make drag and drop in CKEditor work. At the time of writing, no sure
method of fixing this is known, but a complete reinstall of both
the CKEditor and Scald may solve it
(provided you can persuade Drupal to forget all about these
two project, which is not always straightforward).
When done configuring the CKEditor profiles, click “Save”.
Finally, you may navigate to
. Then click on
“Configuration” for each text format that are going to use the Scald plugin for CKEditor.
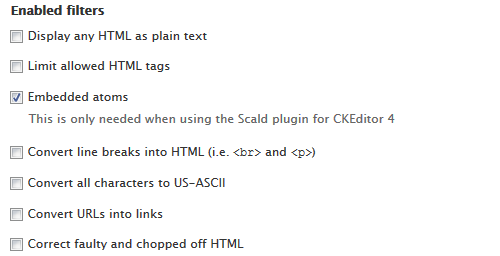
Enable the filter “Embedded atoms” (machine
name: mee_scald_widgets). This is the filter that
inserts the correct markup for inline atoms in CKEditor.
The filter order is decribed below below, in the section “Configuring a WYSIWYG filter”.
When done configuring the text format, press “Save configuration”.
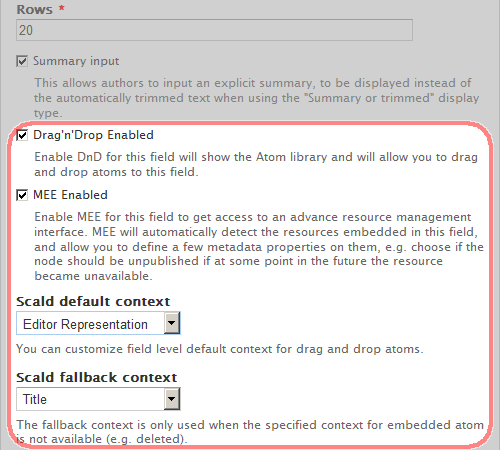
For each content type that have a text area where CKEditor is used, navigate to . Then, click on “edit” for the text areas that is going to use drag and drop for placing atoms in the text, and check that “Drag'n'Drop Enabled” and “MEE enabled” are both checked.
Finally, perform these three sanity checks:
- Visit and make sure “WYSIWYG
store format” is set to “Div attributes” (and not
“Scald Atom Shorthand”). This changes the variable
mee_store_formatvariable toembed_divinstead ofsas. - In the CKEditor profiles, expand the “Editor appearance” section and make sure the "CKEditor 4 widgets" is ticked under "Plugins".
- In the CKEditor profiles, expand the “Advanced content filter” section and make sure the "Advanced content filter" is set up correctly (or disabled).
Final word
For Drupal 7, I recommend using the five projects (one base theme and four module projects) described in this section. When used together and set up correctly, it will do the following:
- Make the website mobile friendly and responsive.
- Provide a WYSIWYG editor for the website's users.
- Create a framework for media handling, including an image library.
- Allow untrusted users to create rich media content.
The five projects are:
- Bootstrap
- The Bootstrap framework by Twitter is widely used for mobile-first responsive web applications. The Drupal Bootstrap brings this framework to Drupal. In 2019, it is the most popular Drupal theme and is strongly recommended as the base theme to make a mobile-first responsive website.
- CKEditor
- The CKEditor project provides a wrapper that intergrates the CKEditor WYSIWYG (What You See Is What You Get) content editor into a Drupal website. The editor itself is implemented in JavaScript and runs in the user's browser. Its user interface will be familiar to users who have used word processing software like LibreOffice Writer or MS Word. The image drag and drop feature of the Scald project integrates nicely with CKEditor.
- Scald
- The name is a recursive acronym that spells out for “Scald is Content, Attribution, Licensing, Distribution”. This project implements a media library that integrates nicely with image styles and WYSIWYG editing. While it supports many different media objects, it is most useful for images.
- WYSIWIG filter
- The WYSIWYG filter is required if you want untrusted users to be able to create rich media input. It works on the principle of whitelisting allowed markup.
- Src whitelist
- The Src whitelist is a adjunct module to WYSIWYG filter, and is required if you want untrusted users use images, and link to videos and Google maps.
 At
present (February 2019), neither WYSIWYG filter nor
Src whitelist have stable releases. This means that
releases for these extensions are not covered by Drupal's
security advisory policy.
In general, such releases should be avoided on production web-sites.
However, currently, there is no good alternative to the latest
releases of these two extensions if you want to make media handling
secure on a Drupal website. I consider it better to use these
modules, than to have no protection at all for rich media content.
To learn more about installing and setting up a responsive theme, a WYSIWYG editor and media handling, please the following chapters in this ebook: Bootstrap theme, Scald and CKEditor.
Last update: 2019-01-14 [gh].