User management
This chapter tell you how to manage your administrator account, how control who is able to register ab account on your site, and introduces how are user permssions are controlled using something called roles.
Table of contents
- Introduction
- Managing your administrator account
- Initial user setup
- Allowing visitors to register
- Sensible registration guidelines
- User email settings
- Assigning user permissions
Introduction
When the business of installing and configuring Drupal is complete, people can visit your site. Now it's time to consider how these visitors to your site will be treated. Part of that involves the decision whether to even allow users to register on your site and, if so, the privileges they get as registered users.
This chapter is about making your own administrator account a bit more secure, managing whether your visitors can register and log in, how that process takes place, and the privileges both unregistered and registered users get on your site.
Managing your administrator account
The administrator account is the username and password you set up when you installed Drupal. This account is your key to the kingdom: The administrator account allows you complete control over everything on your site.
In chapter 2, a administrator account was set up with the username "Janet". In the section about security below, it is explained why you should not use a username like "admin" for the administrator account.
However, from now on, in this ebook, the administrator's username is shown as "admin". This is to make it clear to you that the actions in the examples are carried out by the administrator. However, "admin" is not the real username of the administrator of the Drupal primer website (nor is "Janet").
Editing administrator settings
To change settings for your administrator account, log in and click the "My account" link. You will see basic information about how long your account has existed under the View tab (see figure 4-1).
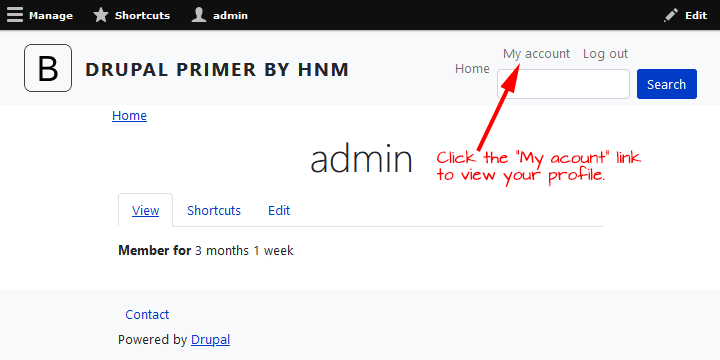
You can't change anything on this page. It only tells you how long you've had an account the website. To change your account configuration, click the "Edit" tab.
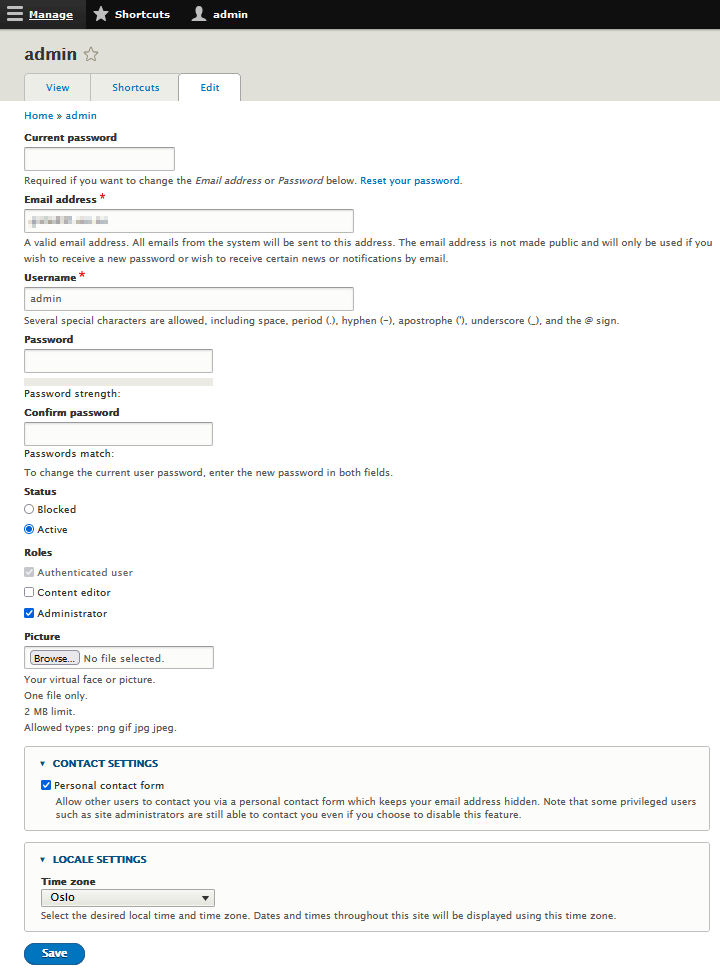
Clicking on the "Edit" tab opens up a much longer page with options for you to change your email address, username, password, status, roles, upload a picture, contact settings and locale settings (see figure 4-2).
 The
"View" and "Edit" tabs show up for all registered users on your
site. But users that are not administrators cannot change their
username, status and role. As an administrator, you can control what
your users can change when they visit the Edit tab, but changing the
users's permissions. How you do this is described later in
this chapter, when I discuss
user roles.
- Username: You can change your administrator username here, as suggested below.
- Email address: This is the address associated with your administrator account.
- Password and Confirm Password: If you want to change the password you set when you set up the Drupal site, here's where you can change it, as suggested below.
- Status: This setting controls whether this user, in this case, you the administrator, can log in. It must be set to "Active".
- Roles: This setting confingures the roles the user belongs to. Three roles exists by default:
- Authenticated user: This is Drupal's term for a user that have registered an account. The box is grayed out because the role cannot be removed.
- Content editor: This is a role that shall be given for users that have permission to create content. By default, users are only allowed to read published content on the website, but users with this role are allowed to create and edit content. The administrator does not get this role because the administrator already has permission to everthing this role has permission to.
- Administrator: A user with this role has permission to to everything, that can be done on the website, including some operations that may compromise security. When you create your own Drupal website, you get this role by default. Only gives role to people you absolutely trust to not abuse the role.
- Picture: This lets the user upload a portrait or an avatar that may be used in contexts should as the byline for user created content.
 Don't
change the Status to "Blocked" when you are looking at your own
account. If you change it to "Blocked", you will lock yourself out of
your own site! It is possible to recover from this, but how
to do it is tricky – and beyond the scope of this ebook.
The two remaining sections of the the "Edit" tab on the account profile page are:
- The "Contact settings" tickbox let other users of the website to contact you via a personal contact form that is part of your user profile. The purpose of having a contact form is to be contactable while keeping your email address hidden from robots that harvest exposed email-addresses for spamming purposes. Note that if the contact form is accessible by visitors of the website, it too will be used for spamming, so you may want to restrict access to it.
- The "Locale settings" override the time zone you set when you configured the site. The overide is a per user setting, and will result that users in different time zones will see time stamps used in bylines and other places will be in their local time.
 Drupal
uses a design component that can hide page sections. Clicking on the
title "Contact settings", for example, hides the content in the area
just underneath the title, and changes the triangle pointing down on
the text inside the are. You can click on the title again to display
it. This is used in lots of places, so if you don't see a section of
the page displayed that you think you should see, make sure it is not
hidden under the title.
Maintaining security
Your administrator account controls everything, and I mean everything, to do with your Drupal site. Keep your administrator account safe at all times by following the practices described below.
If you are using something predictable like “admin” or “admininstrator” as the user name of your administrator account, consider changing it to something less guessable.
To change your username on the "Edit" tab of user account page, just fill in the name you want in the field "Username" and press "Save" at the bottom of the screen.
If you started with a simple password, consider changing it to something stronger. Please see the section about password strength in chapter 2 to learn how to pick a strong password.
Changing your password is easy. Go to the "Edit" tab and type in your new, stronger password in the field "Password", type it again in the field "Confirm password", type your current password in the field "Current password", and press the "Save" button at the bottom of the screen.
 The
reason you have to type in your current password is to safeguard
against somebody else changes your password if your terminal is
unattended while you're logged in. If you've forgotten your password
and need to reset it, see chapter 18.
Initial user setup
Drupal allows two types of users by default when you first install it:
- Unregistered users are visitors to your site who don't log in. By default, unregistered users can view all the published content on your site, but they can't create any content themselves. If they try to comment, they will be told they must log in to do so.
- Registered users have registered an account with a username and password on the website. By default, registered users can view all the published ontent and are also allowed to add comments.
However, these are the default settings for unregistered and registered users, but you can change these settings to your liking.
Allowing visitors to register
As Drupal is set when you first install it, anyone can register for an account on tour website without having to be approved by you. You can set up your own user account and see how user registration currently works:
- If you are currently logged in, click the "Log out" link first.
- You will see a that the "Log out" link is replaced by a new link that says "Log in". Click on that.
- You will now see a page with three tabs: "Log in", "Create new account" and "Reset your password". Click the "Create new account" tab.
- You will see the "Create new account page" with a form to create a new account form (see figure 4-3).
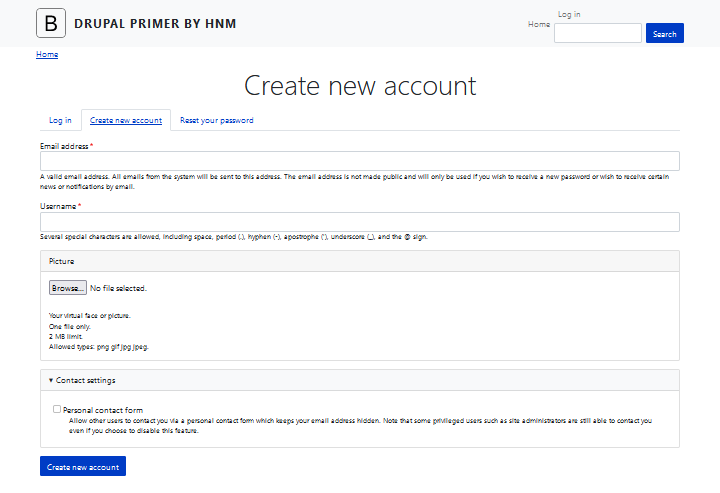
You've already encountered a version of this form when you created your administrator account. But this is how it works when somebody visists your site and register a new ccount.
- The user need to enter at least a username and a valid email address, and then click Create new account.
- The use will receive an email at that email address in a few minutes. For an example, please see the welcome email reproduced in chapter 2.
 Use
a different email address for your test user account than the
address you used with your administrator account. Drupal identifies
users on the site by email address; only one user to an email
address is allowed.
The text of the welcome email is up to you. I shall show you where you can change it in the “User email settings section, later in this chapter.
The new user account has now been set up. The user can click the link in the email they receive and see how the rest of the registration process works.
 Now
you have a registered user account in addition to your administrator
account. Take advantage of this new user account to see how the site
looks to your registered users who are not administrators. You should
also preview your site completely logged out as you work through the
chapters of this ebook.
Sensible registration guidelines
Users can create their own accounts (as I explained previously in this chapter). As things stand now, the site administrator (you) won't necessarily know when a new user registers. However, there are a couple of settings that can help you control new registrations:
- You can control whether new users who register have to be approved by you before their account is activated.
- You can control whether you are notified by email when a new user registers an account.
To control user registrations and a few other settings involved with new user creation, you can visit the "Account settings" page. To get to the user settings section, log in with your administrator username and password. Navigate to , and locate the section "Registration and cancellation" (see figure 4-4).
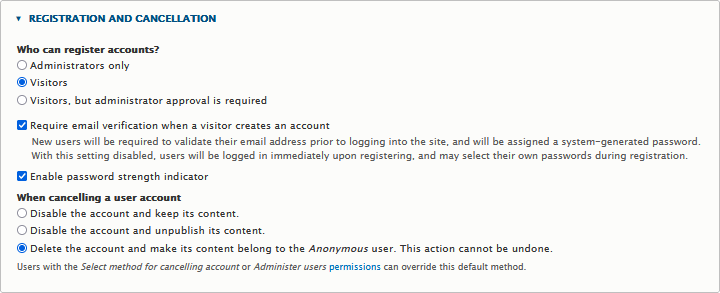
The Public registration set of radio buttons controls how users can register. The options are:
- Administrators only: If
you select this option, visitors will no beallowed to register. The
link that invites visitors to create a new account will not appear.
To create new accounts, you must logged in as the administrator and will need to use the add user form that I
shall describe in the section “Adding, editing, and cancelling users”.
I recommend that tou use this setting when creating a new Drupal website, and only conside changing it when you've finish designing your site. - Visitors:
This is the default setting when you install Drupal.
You've already seen how this works for users:
- Provide the system with a username and email.
- Receive an email from the system with a temporary password and a link to log in.
- Visitors, but administrator approval is required: If this setting is used , Drupal will send an email to the administrator asking them to approve the new user registration. If you follow the link in the email and approve the user, they will be able to log in. If not, then Drupal throws away their information.
The next option on the page is a checkbox that asks you if you want to require email verification when a visitor creates an account. It's checked by default. This option causes the new registering user to get a welcome email like the one shown in chapter 2.
 If
you don't install any protection to prevent spambots from registering an account,
it is recommended to leave
this option checked. It prevents users from registering with a fake
email address. They have to use the link provided in the welcome email
they receive, which proves that they have access to a real email
account and aren't a spambot who only register an account to fill your
site up with junk content.
The checkbox labeled "Enable password strength indicator" pust puts a JavaScript password strength indicator on the registration page, to encourage new users to pick a strong passphrase. Leave it checked.
The last radio button in this section is the default action to take when a user account is cancelled. Leave it at the default, you shall be able to override it whenever you cancel an account.
When done configuring this section, scroll down to the bottom of the page and press "Save confuration".
User email settings
The "Account settings" form has a section that lets the administrator customise the emails that get sent out to users by Drupal when certain things happen. For example, figure 4-5 shows the text sent to people who register and get emailed a message that says that their account shall not be active until approved by an administrator.
To locate this section, navigate to , and locate the section "Emails".
The last text box in this section gives you a place to enter your own message to users filling out the user registration form. It shows up when visitors click the Create new account link. It's a good place to let them know what to expect if they register. If you choose to approve all registrations, for example, you can use this box to tell them that it may take up to 2 days to be approved.
The User email settings section on this page contains a long form on which you can customise emails that get sent out to users by Drupal when certain things happen. For example, here is where you can change the text sent to people who register and get emailed a password (see welcome email in chapter 2). Figure 4-5 shows the list of emails. (In this figure, you're just seeing the title bars for most of the User email settings.)
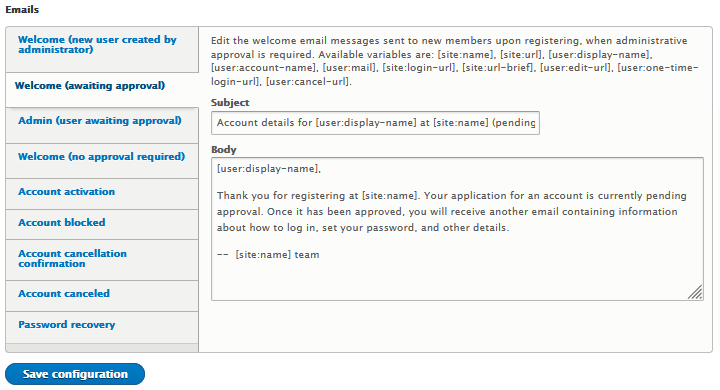
To open the form for any individual email form, click on its title bar.
Take a close look at the email listed under Welcome, awaiting
administrator approval. It starts with the
word !username. Any time you see a word preceded by an
exclamation point in these emails, the word is a stand-in. Since
this email is meant to go to any new registering user, Drupal uses
!username and then replaces it with the appropriate username when it
sends an email to a specific user.
 If you edit these emails, pay special attention to any
words that are placeholders. The most commonly
used are:
[user:account-name]: The account name (username) of the email recipient[user:display-name]: The display name of the email recipient. This is usually the same as the account name, but some extensions let the user alter it.[user:mail]: The email address of the email recipient[user:one-time-login-url]: An URL that allows the user to login once and set the password.[user:edit-url]: An URL to edit the account.[user:cancel-url]: An URL to cancel the account.[site:name]: The site name that you set in the "Basic site settings".[site:url-brief]: The short domain name of the site, without the protocol.[site:url]: The URL of the site. including the protocol (e.g.https://).[site:login-url]: The URL to the site login page.
There are nine emails you can modify here:
- Welcome (new user created by administrator): If you select the first option under the user registration settings, shown in figure 4-5, this is the email that gets sent to the user.
- Welcome (awaiting approval): If you select the third option under the user registration settings, shown in figure 4-5, this email is sent to the user.
Edit this email to let the user know how long the approval will take. - Admin (user awaiting approval): If you select the third option under the user registration settings, shown in figure 4-5, this email is sent to the user.
Edit this email to let the user know how long the approval will take. - Welcome (no approval required): Sent to users if you select the second option under the user registration settings.
This is the email you received, shown in chapter 2, when you created the user account earlier in this chapter. - Account activation: If you are using the third option under user registration settings (administrator approval required), this gets sent to the user when you approve his account.
- Account blocked: If you block a user account, this email informs them that they won't be able to log in to the site.
I show you how to block users in the section “Adding, Editing, and Cancelling users.” - Account cancellation confirmation: Email sent to users when they attempt to cancel their accounts.
- Account cancelled: You can set up your website to notify users when their account is canvelled. Then, if you cansel a user account, that user receives this email. I show you how to cancel users in the section “Adding, Editing, and Cancelling users”.
- Password recovery: When visitors aren't logged in, they see a link to request a new password. After they enter their username or email, this is the email they are sent. It contains a link to a page on which they can reset the password.
 If you accidentally change any of these emails,
or anything else on this page, and you don't like what you've done or you've left out one of the placeholder words, you can restore everything
to Drupal's default settings. Click the Reset to defaults
button at the bottom of this page.
There are two more sections on this page: Signatures and Pictures. I discuss these in Chapter 9, where I show you how to add a forum to your site.
Assigning user permissions
By default, logged-in registered users can add comments to your postings, but unregistered users can't, see figure 4-6. This setting, and many other settings, is controlled by the "Permissions" tab under "People". To see ut, navigate to .
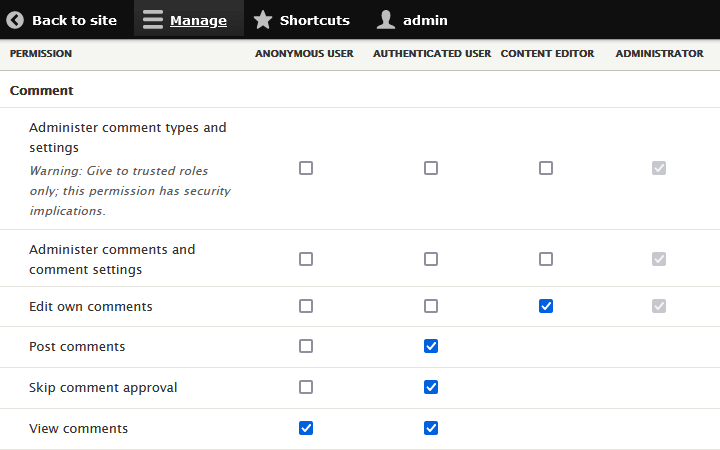
Along the top of the table on this page, there are the table headings "Anonymous user", "Authenticated user", "Content editor" and "Administrator". Anything you check under "Anonymous user" will only apply to anyone who visits the site without signing in. Anything checked under authenticated users will only apply to all users who log on. That's why there are no checkboxes for the "Content editor" and "Administrator" when the "Authenticated user" is checked. The checkboxes for the "Administrator" are grayed out. The "Administrator" always have all permissions on the site.
 Drupal calls users who are logged in to the site authenticated users. From this point
on, I use authenticated users to mean users who are logged in to the system,
and anonymous users to refer
to users who are not logged in.
 It
seems odd, but if you check anonymous user and not authenticated user
on one of these options, only people who haven't logged in will have
that privilege. However, it is actually useful. For instance, You
can create a block (we'll get on to blocks later) on the front page
listing incentives for registering, and only allow anounymous users to
see it. Hide it for authenticated users.
There are lots of options here, but for now I only discuss a few of them.
Most of these permission settings are covered in detail elsewhere in the ebook as I show you more Drupal modules. You should know about these permission settings right now:
- Comment: This section controls whether users can view, create, or administer comments.
- Administer comment types and setting: [TBA].
- Administer comments and comment settings: If selected, users can edit or delete comments. [TBA]
- Edit own comments: If this is selected, users can edit a comment and alter it after it has been saved and published.
- Post comments: If this is selected, users can post comments. They have to be approved by someone with the "Administer comments and comment settings" permission before they are published, unless the next option is also checked.
- Skip comment approval: If you want users to post without prior approval, check this. In general, it's a good idea to not allow anonymous users to skip comment approval. Spammers frequently take advantage of comments to advertise their wares.
- View comments: Controls if users can see comments. By default, the anonymous user has this permission.
- Node: Nodes contain most of the content on a Drupal site. I discuss only a few of these permissions that will be familiar to you at this point. Be cautious about granting permission for most of these.
- Article: Create new content: You may recall that the text I entered that appears on the front page of drupalprimer.com is an Article. This permission allows users to add their own articles to the site. By default, the Authenticated user role is not permitted to do this, the Contet editor role is required.
- Article: Edit any content: Granting this allows users to edit any article posted to the site. For example, with this checked, a user with the required could change the text posted to the front page of the website.
- Article: Edit own content: If you allow users to create articles, you may want to enable this to allow them to edit only articles they have created themselves.
- View published content: This is probably the one permission you will always grant all roles. This allows visitors to see content on your site. They can't do anything except view it, so it's safe to give to anonymous users as well.
- User: In this section, you'll find the permissions that control the administration of users.
- Administer account settings: This permission will allow the user to do all of the things I talk about in the section “Adding, editing and cancelling users”.
- Administer roles and permission: If checked for a role, users with that role can add and remove checkmarks on the page I am discussing right now.
- Change own username: If you check this, users will be able to change their usernames using the "Edit" tab of the account profile, as shown in Figure 4-2. It makes no sense to check this for an anonymous user, but you may wish to allow authenticated users to do so.
- View user information: Allows a user to view other users' profiles.
 You can see many more permissions under the "Permissions" tab, but
until you have a better understanding of what these means, you
shouldn't modify any of these permissions. You can always come back
to this page and tweak permissions later. In general, it's best to
start with as few permissions as possible and add more only when
needed.
Adding, editing, and cancelling users
Drupal gives the administrator (i.e. you) control over the registered users on your site. This means you can add new users, edit all user information, and cancel users.
 I
use the word "administrator" in the preceeding paragraph. But these
actions are not neccesarily restricted to the administrator. Any user
with a role (I'll tell about roles later) that has the permission
to "Administer account settings" will have access to these actions.
This is a very powerful permission. If you assign it to any other role
than the administrator role, you should given that role to people that
cannot be trusted 100 %.
Adding users
To add a new registered user to your site, log in as the site administrator and navigate to . Then click the "+ Add user" button. You will see the "Add user" form.
This looks very much like the "Edit" tab of the your account profile page. But rather than editing an existing user, this creates a new user. Enter a username, email address, password, and status on this page. If you set the status to Active, the new user will be able to log in, and if you check the box next to "Notify user of new account", an email will be sent to the email address you entered for this new user. The email will inform them that his account has been created and explain where they can log in.
 The
username will be displayed as the author for most user created
content. To keep the administrator username secret, do not
create Articles or other content that show information about autrhorship
when logged in as the site's administrator. Instead, create another user for
yourself for the purpose of content creation. For example, use your
full name (e.g. "Bob Smith", including the space) as your
content creator username. Then, when you post
to your site blog or write comments, your full name will appear as the
author.
Editing user information
Before you can edit user information for a particular user, you need to see a list of your users to select the correct account. To edit information for a user, log in as the site administrator and click on . The list of users appears (see figure 4-7).
Over time, your user list will get longer and longer. The table that lists your users can be sorted using the links at the top. For example, if you click on "Username", the list will be alphabetised by username, A to Z. If you click it again, it will be ordered from Z to A. You may also find it useful to sort by the "Member for" heading if you are looking for a user who has just joined.
The section with the "Filter" button (as shown in figure 4-7) allows you to view only users who satisfy particular criteria. You can choose to view a list of users based on the permissions you have granted them. Or if you need to see just your blocked users, use the "Status" option.
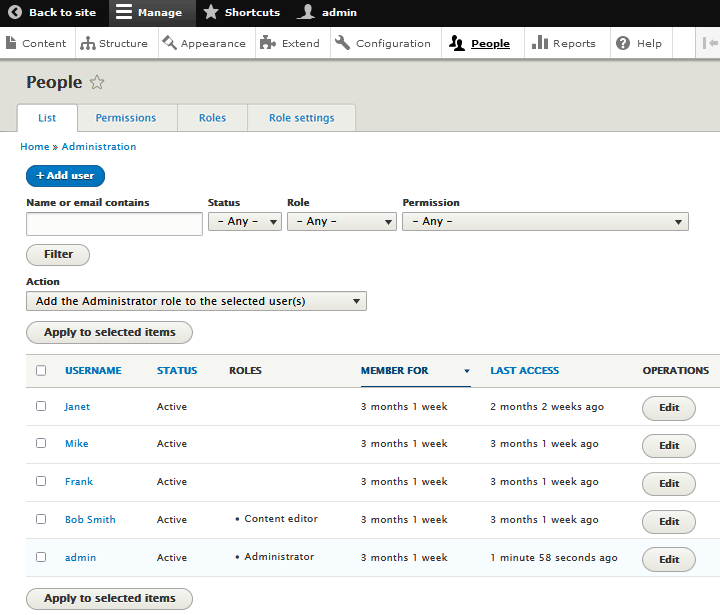
To edit an individual user, click the edit link under the "Operations" heading. You will then be on the "Edit" tab of the your account profile page for that user. This will look like figure 4-2, but with some information about the user already filled in..
 For each registered user, Drupal keeps track of a username,
password, email address, a status (active or blocked), locale, and
choice of theme. It also keeps track of roles, which I discuss in the
next section. This is information that you, as administrator, can
change. Drupal also records information such as when the last time a
user logged in and comments a user has made. You can't edit this
information. You can modify everything else that shows up on the Edit
tab of the your account profile page.
The user edit page you as administrator see is basically the same as the edit page the user sees, with a few exceptions:
- The status section isn't available to the user. Only the administrator can set user status.
- The administrator can specify which roles (explained later in this chapter) the user has.
 If
you as an administrator receive a request from a user to reset the password,
this is the place where you can do it. However, Drupal provides a tab,
"Reset your password", on the login page. This link sends the user an
email with a one time login link that allows the user to reset their
own password. When a user requests a password reset, suggest that they
use this tab instead.
Cancelling users
To canvel a user, follow these steps:
- Log in as the site administrator and click on .
You will see the list of users (refer to figure 4-7). - Click the box next to the user you wish to cancel.
- In the section Update options, click on the drop-down list box, and choose Cansel the selected users.
- Press the Update button to cancel all the users you have selected.
Understanding user roles
Drupal allows you to create new user types with different permissions than Anonymous user, Authenticated user, Content editor or Administrator Drupal refers to these special groups of users as user Roles. For example, imagine that you want to allow a group of people permission to create new articles, but you don't want all the Authenticated user to have permission to do this.
Creating roles
To create a new role, log in as administrator, and then choose (see figure 4-8).
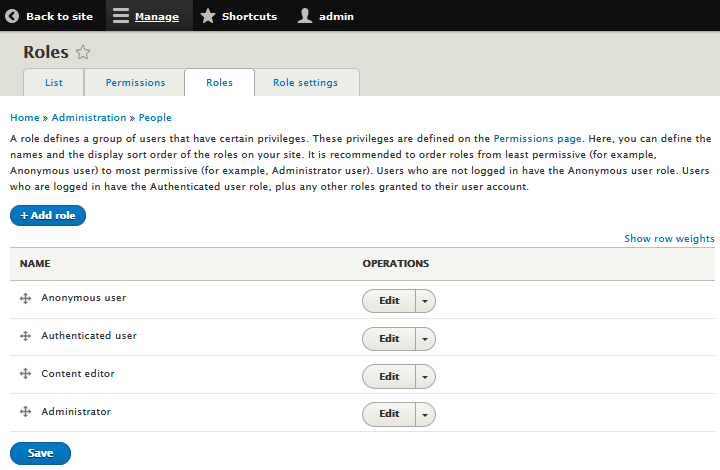
To create a new role, click the "+ Add role" button you'll see a text field where you can type in the name of the new rols, for example: "Site moderator", "Spam hunter", "Site builder".
For example, create the role "Spam hunter" to allow people with that role permission to delete spam Articles on the website.
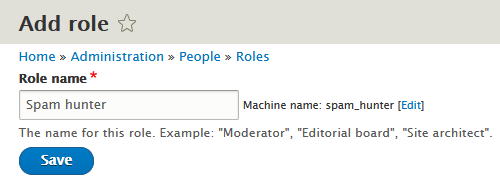
Fill in the name of the new role, and press "Save".
At this point, you have a new role, but it has exactly the same permissions the Authenticated user role has.
In order for this role to be functional, I need to do two things:
- First, the new role need to have the permission "Article: Delete any content" checked. Expand the menu under "Operations" to the right of "Span hunter" when listing the all the roles that exists of the site, and select "Edit permissions".
- Then, acroll down to the "Node" section and check the permission "Article: Delete any content".
- Scroll down to the bottom and press "Save permissions".
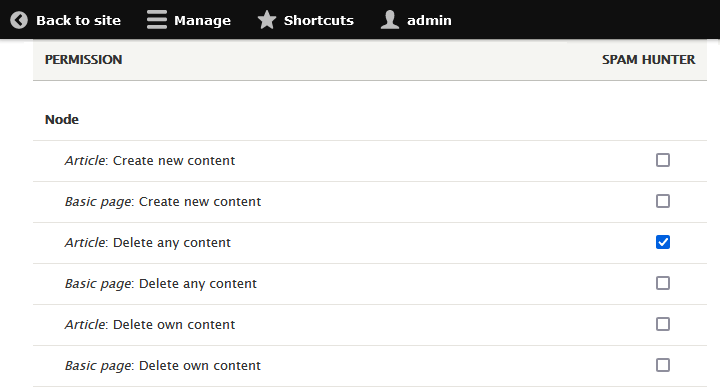
- Finally, the role must be assigned to any users that are trusted and are willing to act as "Spam hunters". This is described in the next section
Although you can edit permissions for your new roles by clicking the "Edit permissions" button for the role, it is usually better to navigate to . This page lets you see all your roles and permissions at once, making it much easier to ensure your new role has the basic permissions that an authenticated user has in addition to the new permissions (for example, "Article: delete any content", which my Spam hunters need).
Assigning roles to users
Users can have as many roles as you wish to give them.
There are two ways to give users an additional role.
The first way is to select the users or users that shall have the role from the list of users, and then use a bulk action to add the role to their user profile. Follow these steps:
- Navigate to .
- Check the checkbox to the left of the user you are assigning the new role to.
- Click on the drop-down box under the Action section and select the add role action. With the Spam hunter example, select "Add the Spam hunter role to the selected users".
- Press the button "Apply to selected items".
The second way is to edit the user profile directly to add the role. Follow these steps:
- Navigate to .
- Click the "Edit" button to the right of the username in the list. Since you created a new role, Drupal displays a "Roles" list in on the Edit page. Only administrators can see this list.
- Check the box next to the name of the new role.
- Scroll to click the "Save" button at the bottom of the page.
 Notice
that the "Authenticated user" checkbox anf greyed out.
all registered users are authenticated by definition, you can't uncheck the
"Authenticated user" checkbox.
Last update: 2022-06-05.