Managing Your Content
This chapter describes how to work with revisions, hiding content from visitors that are not logged in, managing comments and creating web pages
Table of contents
- Introduction
- Controlling Revision Information
- Managing Comment Settings
- Changing Authoring Information
- Publishing Options
- Adding Images
Introduction
Drupal provides a number of options that allow let teh administrator to customise the appearance of the contents on the website. This chapter shows you how to leverage Drupal's options to refine the presentation of the contents further. You'll learn how to include images, and even embed videos in contents.
Also, I shall discuss the comment system and how to control the appearance and behavior of comments.
I shall also show you how to temporarily hide posts while you continue to work on them and how to control who can see them when they are published.
Along the way, I include information about a few other optional tweaks to the presentation of your content that Drupal gives you.
[REMEMBER] The tweaks and settings discussed in this chapter apply to both Basic pages and Articles. They also apply to other node types, including polls, blog posts, and forum posts I discuss in Chapter 9.
Most of the settings I discuss in this chapter are accessed from the form used to create or edit content. They are accessed by clicking on the links under the large Body text box (see figure 6-1).
[REMEMBER] You get to the content editing form for any of your Basic pages or Articles by logging in as administrator and clicking on . Locate the content you want to edit and click the appropriate edit link. The options I discuss in this chapter are also accessible when you first create content by selecting the Create content link and choosing Basic Page or Article.
Authoring information, and Publishing options.
[PICTURE]
Figure 6-1: Content editing Basic page with option links below the Body text box.
Controlling Revision Information
Things change. Maybe you made a mistake, leaving out some important bit of information. Maybe something new happened, making the current content inaccurate. Drupal allows you to revise your content and keep track of both.
- The original version.
- All revisions you make to it.
To create a revision, follow these steps:
- Log in to your site as administrator.
- Navigate to .
- Choose a Basic page or Article you created earlier and click edit.
- Make a change in your content.
- Scroll down to the Revision information link and click on it (see figure 6-4).
- Click the Create new revision checkbox and type something in the Log message box that explains changes you have made to the content. Click Save.
[PICTURE]
Figure 6-4: The Revision information settings available when you create or edit content.
Your revision has been saved, and you will now see a new Revisions tab that you can click to see all saved revisions (see figure 6-5).
[PICTURE]
Figure 6-5: Revision history of content.
Next time you edit the content, you will see the current revision. If you wish to edit the current revision but not create a new revision, don't use the revision settings when editing. To go back to the original version, click on the revert link on the Revisions tab.
Revisions are great for keeping track of changes to the content:
- If you need to make a temporary change to content on your site but eventually want to go back to the original, you can create a revision and then click revert when you no longer need the latest change.
- When more than one person works on the same site, revisions can record when someone else changed something and why.
Managing Comment Settings
You can allow users to submit their thoughts about your content by allowing comments. When you create or edit content, you control whether registered users can add comments by using the Comment settings (see figure 6-6).
When you allow comments, a link appears at the end of your post. When comments are posted, a link to view the comments is visible, as shown in figure 6-7.
[PICTURE]
Figure 6-6: The Comment settings available when you create or edit content.
[PICTURE]
Figure 6-7: Posts with comments allowed and comment links.
To view comments on a post, click on the comment link or the title of the posting. This opens the Article or Basic page node in its own page with the comments visible and a link for users to add a new comment (see figure 6-8).
The user who posted the comment will see links to delete or edit the comment. Users can also reply to comments.
Considerations of allowing comments
Every node you create (for example, each Basic page and Article) has the option of allowing users to comment. For some types of content, this doesn't make sense. My Contact Me Basic page doesn't need to allow comments. But some content you create may be appropriate for allowing user comments.
[WARNING] A setting under allows you to permit anonymous users. It is not recommende to anonymous users to post comments. You leave yourself open to spammers. It is best to allow only authenticated users (people who are logged in) to post comments.
[PICTURE]
Figure 6-8: View of a single post with comment.
Disabling comments
If you disable comments for your post, no comments will be allowed. The link to Add new comment won't be present. If you edit a post and change the option from Read/Write to disabled, all the current comments will be hidden. They will not be deleted; they will show up again if you choose Read only or Read/Write.
This is the default setting for Basic pages.
Allowing Read only comments
The Read only setting removes the Add new comments link and the reply link. Existing comments are readable, but no new ones can be added. Users can't delete comments they have posted.
The Read only setting can be useful when new comments won't add any value to the discussion.
Permitting read/write comments
This allows registered users to post comments and reply to other people's comments. Users can also delete or edit comments they have posted. This is the default setting for Articles.
A primary difference between Basic pages and Articles is whether comments are permitted. By default, Basic Basic pages don't allow comments; Articles do. The Comment settings are how that is controlled by default:
- When you create a Basic page, comments are disabled.
- When you create a Article, read/write comments are permitted.
Changing Authoring Information
Every time you post a Article, Drupal includes information about when the content was posted and who posted it (see figure 6-7). The poster's username (in this case, Gisle Beighley) appears, along with the time and date the Article was posted.
By default, Articles include this information and Basic pages do not.
You can fine-tune your control over this with the Authoring information section when you create or edit your Article (see figure 6-9).
Modifying Authored by information
By default, your username will appear here. You can change it or leave it blank if you don't want an author name to appear.
Modifying Authored on date
This allows you to change the date of the posting. The date is in the format year-month-day hour:minutes:seconds. When you save your post, Drupal takes that date and reformats it to a date in a format like 07/21/2009 11:46.
[PICTURE]
Figure 6-9: The Authoring information settings available when you create or edit content.
To change the format of this date, follow these steps:
- Logged in as administrator, click on . The Date and Time configuration Basic page appears (see figure 6-10).
- Locate the Short date format, in the bottom half of the Basic page. Click on the drop-down menu and select a new format. This is the format used as the Authored on date.
- Click Save configuration.
You can fine-tune the appearance even further by selecting Custom format from the list. This causes a text box to appear, where you can precisely customise the date (see figure 6-11).
[PICTURE]
Figure 6-10: The date and time configuration formatting Basic page.
If you are determined to create a custom date format, I recommend visiting this Basic page: www.tizag.com/phpT/phpdate.php. Scroll down to the heading zzzReference" and use the information there to build your date.
[PICTURE]
Figure 6-11: The Custom format option of the Short date format.
Publishing Options
When you write Articles, they appear on the home Basic page when you click Save (refer to Chapter 5). When they are published, Basic pages and Articles can be visited directly by anyone. But you don't have to automatically publish your content to the Web. You may want to write content but publish it at a later time. The Publishing options section lets you control what happens after you create content. This section is available when you create or edit your Article (see figure 6-12).
[PICTURE]
Figure 6-12: The Publishing options available when you create or edit content.
The options you select here control what happens when you click the Save button.
Publishing
By default, for both Basic pages and Articles, the Published checkbox is selected. This means that your content will be made live on the Web when you click Save.
If you uncheck this box and click Save, your content is saved but not actually published. No one but you, logged in as administrator, will be able to see it. To access unpublished content, log in as administrator, and click on . You will see all of your content with the publishing status listed next to it. If it is unpublished, it will have a Status of not published (see figure 6-13).
[PICTURE]
Figure 6-13: The Content page lists the publication status of all content.
To publish your content without any changes, click in the checkbox next to its title, choose Publish from the Update options drop-down menu, and click Update. To make changes to the content before publishing, click Edit, make your changes, under Publishing options click the Published checkbox, and click Save.
Promoting to front page
Articles appear on the home page by default; Basic pages do not. But if you change the Promoted to front page checkbox, you can change this behavior regardless of node type.
Making content sticky in lists
When you create a new Article and post it to the home page, it ends up as the one on top. Articles are ordered from newest to oldest. In chapter 5, I explained how to use the page listing content to set a Article as sticky, so that it always appears at the top of the home page even when newer Articles are published. This checkbox accomplishes the same thing as modifying the stickiness in the Content page.
Creating a custom summary
The Split summary at cursor button lets you specify precisely where to break your post to create a blurb. It's located just above the Body text box (see figure 6-14).
[PICTURE]
Figure 6-14: The Split summary at cursor button.
[TECH] This button overrides the Length of trimmed post setting that's covered in Chapter 5.
To use the Split summary at cursor button, follow these steps:
- As administrator, open a Article you have posted to the home page in edit mode.
- Inside the Body text block, locate a good spot to trim your content.
Generally, this will be after the first or second sentence. - Move your cursor to this spot and click.
- Without clicking anywhere else on the page, move your mouse to the Split summary at cursor button and click it. Your page changes to show your Body text now split into two fields (see figure 6-15).
[PICTURE]
Figure 6-15: The body content is split in two after you click Split summary at cursor.
- Save your content. Your home page now reflects the new blurb length.
If you edit an existing posting and use the Split summary at cursor option, make sure you click Save to republish your content. You may have to reload the home page to see the changes.
Depending on your content, you may want to write a specific blurb to show up on the home page. You can create a summary of your content in the top box and keep all your content together in the bottom box. If you uncheck the Show summary in full view checkbox, the summary blurb will only show up in the shortened home page version, and only the larger content will appear when someone chooses to view the entire content.
If you decide later that you don't want to split your content, you can rejoin it by clicking the Join summary button.
[WARNING] When you rejoin your content, you may end up with an extra line feed or carriage return at the spot where you originally split your content. Just remove the space and click "Save".
Controlling summary length
Unless your Article is very short Drupal will automatically shorten the summary of it that is posted on the Home page. There will also be a "Read more" link to the full text for users who want to read the entire Article. Instead of a long post taking up the entire screen, and users having to scroll down to see other content on the home page, the first few sentences of the post are displayed. To see the summaries for the two articles I've created so far, refer to at figure 6-7.
You can control how many characters Drupal displays when it truncates your Articles. Follow these steps:
- Log in to the site as the administrator.
- Navigate to . The Post settings form appears (see figure 6-14).
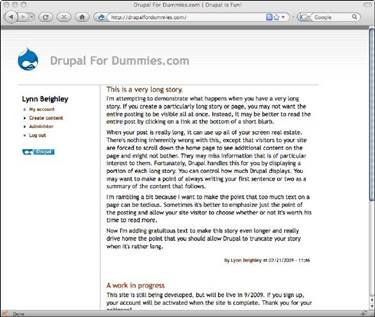
Figure 6-13: Home page with long first Article.
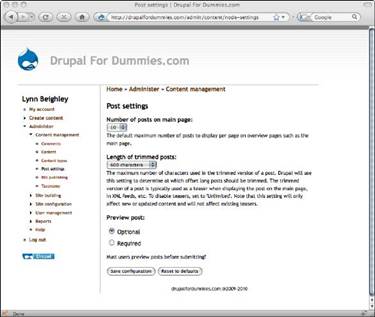
Figure 6-14: Post settings form.
To force Drupal to display entire Articles rather than truncate them, choose "Unlimited#.
[TIP] When you change the Length of trimmed posts setting, it doesn't have any effect on Articles that you have already published. However, anything published after you change this setting will reflect it. If you want old Articles to be shortened to the new setting, you have to edit and save them in order for the new length setting to take affect.
The Post settings form also lets you control how many Articles will be displayed on the main Basic page. By default, 10 Articles are displayed.
Adding Images
You may be eager to include images in your pages. This section involves a bit of HTML coding, but the code is fairly easy to follow and generally is only a line or so. The rest of this chapter shows you how to add images to your pages with HTML code.
If you don't want to use HTML code, you can add images and other media with Drupal modules. Modules are extensions to Drupal that make it easy to do various things. Chapter 13 shows you how.
XXX If you are going to use HTML code, make sure you select the Full HTML option under the Input format section of your content option (discussed in the zzzHandling HTML Content" section, earlier in this chapter). Otherwise, your content will ignore some of the code you place in your content.
You should only use images that you have put on your own Web server. When you use an image that is on someone else's Web server, it's like watering your lawn with your neighbor's hose connected to his faucet. He has to pay for what you are using for your own purposes.
To add an image to your content using HTML, follow these steps:
- As administrator, create a new Article by selecting .
- Enter a title such as Posting an Image.
- In the Body section, enter the following code (see figure 6-16):
<img src="http://lynnbeighley.com/lynn.jpg">
- XXX Click on "Input format" and select the "Full HTML" option.
Without "Full HTML" selected, Drupal will ignore some HTML tags.
[PICTURE]
Figure 6-16: Adding an image to a Article with HTML.
- Click Preview to see the image in your content, then click Save to view it on your home page. Figure 6-17 shows the image on the home page.
[PICTURE]
Figure 6-17: Homepage with a Article containing an HTML coded image.
The HTML code you used is known as an image tag. Here's the syntax again:
<img src="http://lynnbeighley.com/lynn.jpg">
This code consists of an open and close angle bracket containing:
- The code word img, which stands for image and tells the Web browser to display an image.
- The code word src, which stands for the word source and tells the Web browser that the image location or URL follows the equal sign.
- The Web address or URL of an image in quotes.
You aren't confined to posting a single image in a Article with no text. You can add text above or below the image tag, but make sure to place a carriage return or two between your text and the image. Otherwise, the text runs into the edge of the image and can be difficult to read.
Last update: 2022-03-06 [gh].