Creating content: Basic page and Article
In this chapter you'll learn how create and publishing two types of content: Basic pages and Articles.
Table of contents
- Introduction
- Understanding Drupal content
- Drupal terminology
- Creating a Basic page
- Creating an Article
- Editing content
- Deleting content
- Final word
Introduction
What's the point of creating a web site without content? The primary reason to have a web site is to communicate. You need content to get your political message across, to share your knowledge, or to build a community. This chapter is all about content creation and content organization.
The term content in this ebook refers to text, images, and other media intended to communicate information to site visitors. In this chapter, I shall focus on creating web pages and adding text and image content to the pages of your site.
Understanding Drupal content
Drupal has several types of content.
In this chapter, I discuss shall two types of content: Basic pages and Articles.
 Each
Basic page or Article you create for your Drupal site is stored in a
construct called an entity. An entity is a collection of
data, with some preset behaviours. This construct makes it is
possible to let a Basic page have slightly different default
properties compared to an Article.
 Don't
confuse the Drupal entity named Basic page with a web page. Drupal
uses the term Basic page to describe content that by default
is posted without date and authorship information, doesn't allow
comments and is also assumed to be largely static. And while you can
view a Basic page as though it were a single web page, you can do the
same with an Article entity or any of the Drupal entiety types
discussed in this ebook.
To get to the "Add content" page, you need to log in as the site administrator and navigate to . Then, you shall se the page reproduced in figure 5-1.
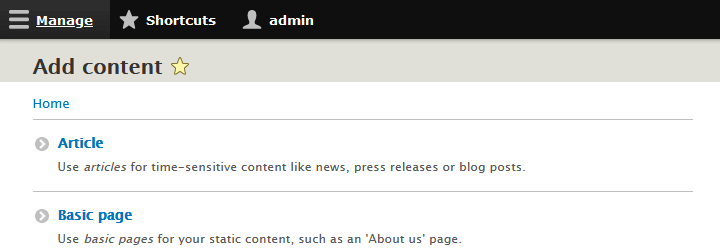
You see a menu allowing you to create a Basic page or an Article along with some text to help you understand the difference between an Article and a Basic page. The important differences between the two are:
- An Article by default shows a byline with tye name of its author and the date it was posted. A Basic page does not.
- Article summaries are automatically displayed on the home page of your site with a link to read the full Article. A Basic Page summary is not automatically displayed. To access a Basic page you need to know its URLs.
- An Article is by default set up with a title field, a body field and also with additional field for images, comments and tags. A Basic page only has a title and body field.
- Articles are best suited for rolling time-sensitive content, such as news and blog posts. Basic Pages are best suited for static content, such as an "About us" page.
Drupal terminology
This is list of five Drupal concepts that are useful to know when creating content:
- Entity: In Drupal, an entity is a general concept that represents a specific type of data collection. There exist a number of different types of entities, such as "User", "Content" and "File".
- Content: An entity that is used to represent the editorial content on a website. All contents belongs to a specific Content type.
- Content type: A subtype of the Content entity. Each content type defines the fields it contains, along with default content settings like submission form and publishing options. This chapter discusses two different content types: Basic page and Article.
- Node: An instance of content.
- Field: A specific type of dats, such "plain text" and "integer" that are the components taht make up an entity.
Creating a Basic page
At this point, your new Drupal website only has a home page. You shall probably need to display some information about yourself, your group or company. If you're web site cater for European visitors, you also need to post a "Privacy policy" document.
 The
Europen Union has privacy laws that require a website that collects
personal data from visitors to provide some
very specific information.
The document providing this information is usually referred to as a
"Privacy policy!".
The
Europen Union has privacy laws that require a website that collects
personal data from visitors to provide some
very specific information.
The document providing this information is usually referred to as a
"Privacy policy!".
Drupal's Basic pagecontent type is ideal for posting:
- Information it is necessary for you to provide to visitors.
- Information that is not changed very often.
- You want to control how the information is linked from the website's home page.
 Examples
of appropriate information for Drupal Basic pages include general
background information about the website, Frequently Asked Questions
(FAQs), privacy policy, and biographies of editors and regular
contributors.
By default a Drupal Basic page doesn't allow visitors to add comments. If you want to allow your site users to comment, it is better to create an Article instead of a Basic page. I cover Articles later in this chapter.
To create a new Basic page, follow these steps:
- Log in to your site as administrator.
- Navigate to .
- Click on the "Basic page" link.
You see the Create Basic Page form (see figure 5-2).
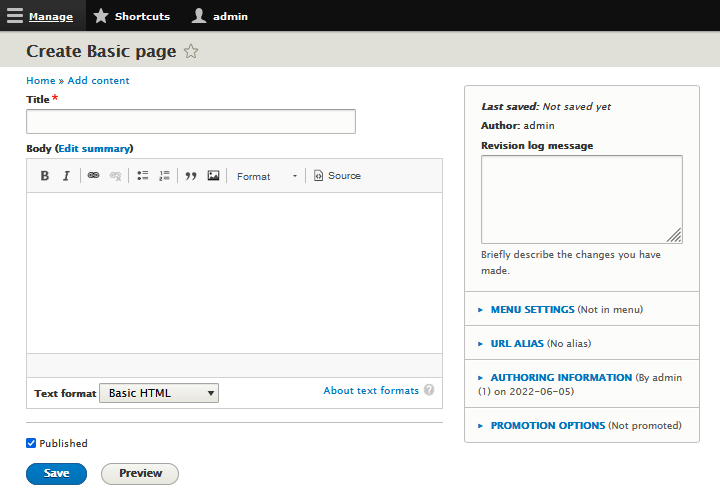
- Enter the title of the Basic page in the Title field.
- Enter the page content in the Body field.
Figure 5-3 shows sample content for a contact Basic page.
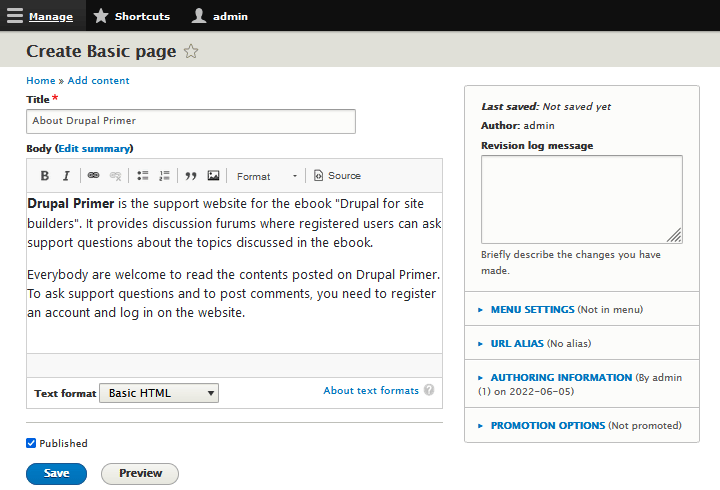
By default, Drupal provides a WYSIWYG (What You See Is What You Get) editor. Above the field to enter text are eight buttons that helps you format the text. These are from left to right:
- B: Make selected text boldface (
<strong>). - I: Make selected text use an italic face (
<em>). - Insert link: This will pop up a modal where you type in the URL to be inserted as a link.
- Remove link: This button is grayed out unless the link to remove has been selected.
- Insert an unordered list
<ul>. - Insert an ordered list
<ol>. - Pulldown menu selecting headings of various sizes, or normal text. Put curesor inside paragraph you want to alter the format of.
- Source: This is a button to toggle between source (HTML) and WYSIWYG.
 Behind
the scences, the formats are created using tags from a markup language
called "HTML" (Hyper Text Markup Lamguage). To see the tags, press the
rightmost button labeled "Source". For some of the buttons, I've indicated in the list above the HTML tag that will be inserted.
Two buttons, "Save" and "Preview", are at the bottom of the "Create Basic page" form (see figure 5-3). If you click "Save", the Basic page will be saved to the database and automatically published to the web. Clicking "Preview" allows you to see what the Basic page will look like before it is published.
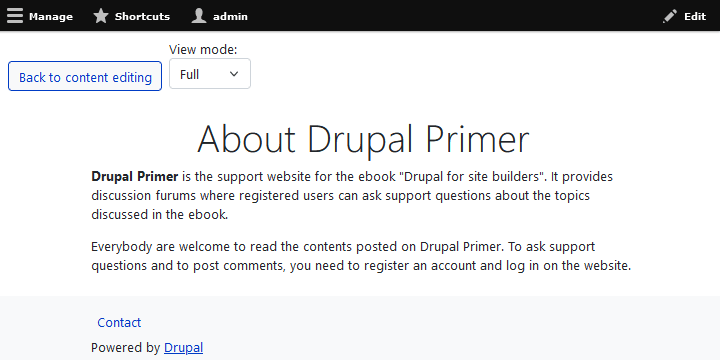
- Click "Preview". Figure 5-4 shows you a preview of the new Basic page you created. There are two view modes: "Full" and "Teaser". I shall drill down into view modes later, but for now, just examine at the "full" view mode. To exit the preview, press "Back to content editing". If you wish to change anything, make your changes and preview again..
- When you are happy with the content on your new Basic page, click the "Save" button.
When you save your new Basic page, you see your new Basic page with a status message, “Basic Page About Drupal Primer has been created.” (see figure 5-5). The status message appears only once after you save your new Basic page. You won't see it again when you later visit the Basic page, and your site visitors will never see it.
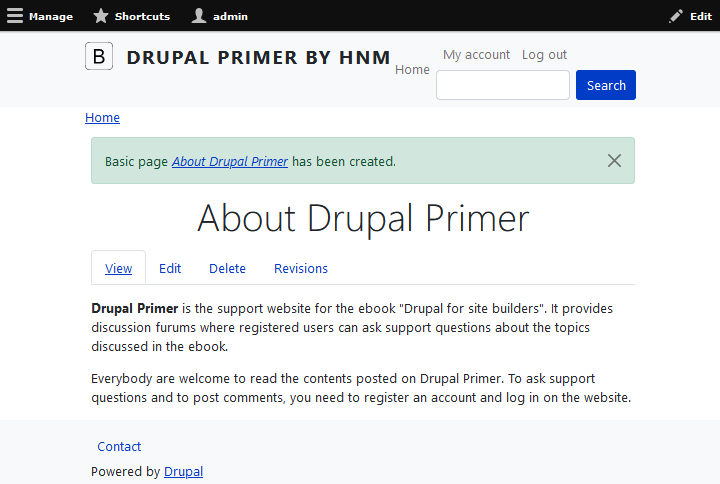
The title you gave the Basic page will appear at the top of your new Basic page as well as part of the title bar at the top of the browser when the Basic page is viewed.
Accessing a Basic page
Even though the Basic page exists on the web, your public facing site doesn't give visitors a link to get to it. Later in this chapter, I shall show you how to add a Basic page to the main menu of the website. By adding it to the main menu, a link to it will show up on every web page of your site.
But for now, you can get to the "About Drupal primer" Basic page by navigating to . This takes you to the page listing all content (see figure 5-6). There click on its title.
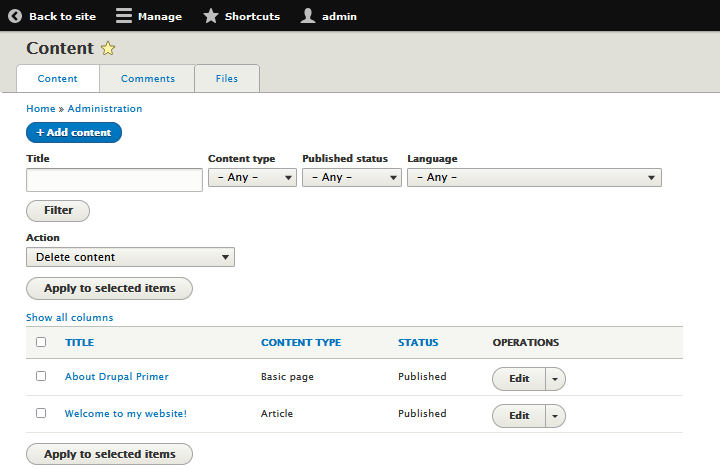
To see how the Basic page will look to visitors to your site, follow these steps:
- Click the its title on the page listing all contents.
- Copy the URL from the address bar in your browser.
- Log out of the site and then paste the URL you just copied into the address bar of your browser. You will then see the Basic page as site visitors will see it.
Setting menu options for a Basic page
If you have, click on and click the edit link next to the Basic page. Look back at figure 5-2; you see a link, Menu settings, between the title and body fields of the form. Click this link to open the Menu settings form (see figure 5-7).
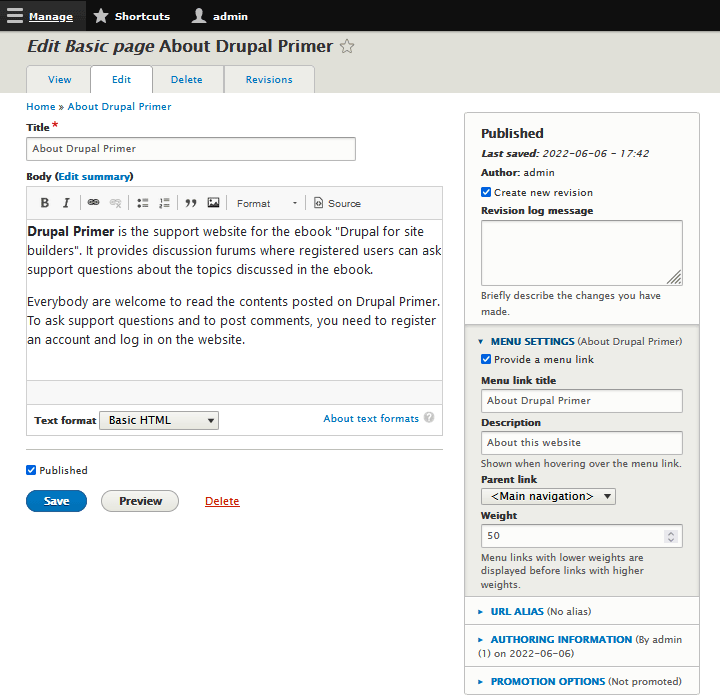
These settings allow you to put a link to the Basic page in a menu that will appear on every Basic page of your site.
Giving your entity a menu link title
[TIP] Your Basic page already has a title. In my example, my Basic page title is Contact Me. The Menu link title field is where you specify what text to use to link to the Basic page. In my case, Contact Me is appropriate. Most of the time, the Basic page title will be the perfect text to use as the link. It's possible, however, that the Basic page title is too long to be a good link title, and this is how you can reword it to be more succinct.
Enter some sort of title in the Menu link title field. If you don't enter text here, the Basic page will not have a link in the main site menu.
Choosing a parent item
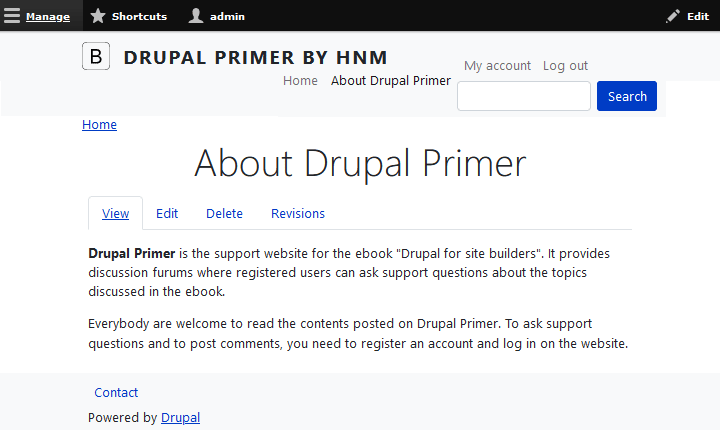
The menu you want to put your current Basic page link in is called the primary menu. The primary menu appears on every Basic page of the site. It isn't visible right now because it contains no links. When I add this link, it will appear just under the site header (see figure -5-8). Your new link will appear in a menu after you complete this form and save the Basic page.
Choose the option <Primary links> from the Parent item drop-down menu. This puts your new link to the Basic page in the primary menu.
Setting the link weight
The weight setting controls where in the menu your link appears. If you choose -50 from this menu, your link will be at the top of the primary menu. Choosing 50 will make your link appear on the bottom of the menu. In my case, it makes sense to choose a higher number, or heavier weight, so my link will always be the last one in my primary menu.
[TIP] When choosing a weight for your menu items, consider the big picture. Will your site have several primary links? Does it make sense to put the About Us link in front of the Contact Us link? Make a list of links and assign a weight to each before you actually create them. If you know you want Contact Us to always be the rightmost link, give it a weight of 50. If you know you want your Products link to always appear on the left, because people will see it first, give it a weight of -50.
[TIP] When you create or edit an Article, you also have a Menu settings section on the form. It works exactly the same way as it does for Drupal Basic pages.
Creating an Article
I've aready shown how to create an Article in Chapter 3. I then did it just to have some content on my inital home page.
Remember: An article will show up on the home page of the site by default. By default, it also allows logged-in users to comment on it.
 Even
though an Article can allow user comments, it need to. You may want
your Article to contain press releases from your company, but are not
interested in getting user comments about those press releases. Later
on, I'll show you how to stop users from commenting.
- Log in to your site as administrator.
- Navigate to .
- Click on the "Article" link.
- Add a "Title" and "Body" for your new Article. Leave the other fields empty.
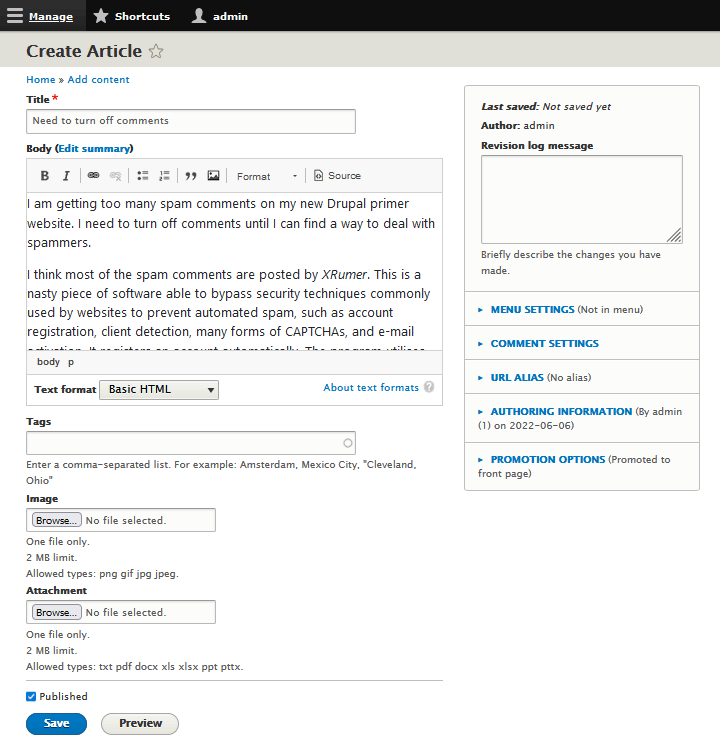
- Click the "Save" button at the bottom of the Form to save and publish the new Article.
I created an article about all the spam I am getting because Drupal by default allows people to register an account, log in and comment. If you're working your way through the examples in this ebook, you any of course choose a very different topic for your second article.
The new Article will appear above any Article you created earlier (see figure 5-10).
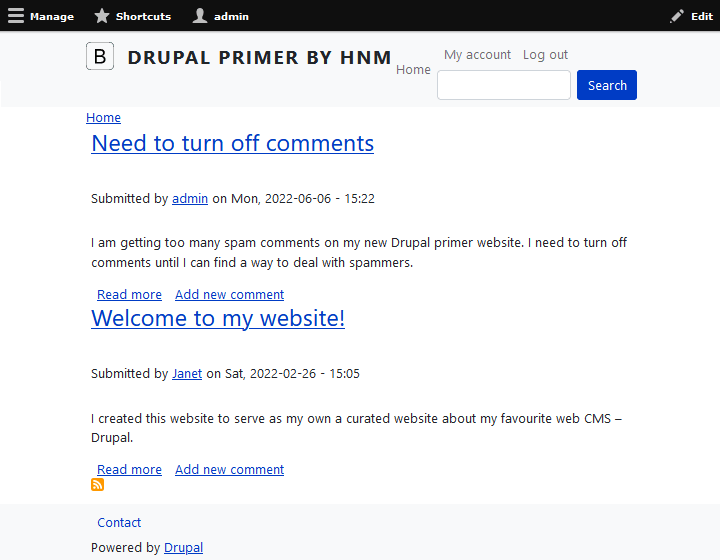
Note that the articles that apprear on the home page only display the first part of each article. To read the full article, visitors need to click on the link "Read more" (or the title, which also automatically links to the full text). Drupal will automatically shorten the article, in chapter 6, I'll show how to control what goes into the sumamry.
Preventing comments
Whatever the reason, you control whether users are allowed to comment or not. Here is how to turn off the permissions for visitors to comment on an Article that has already been published;
- Log in to your site as administrator.
- Navigate to .
- Locate the Article you want to turn off comments for and press "Edit".
- Locate "Comment settings" link in the verticle tabs on the right. Click on the link.
- Select the "Closed" radio button to turn off the permission for user comments for this Article in the future. If comments already exists, they will appear. A third radio button labeled "Hiden" will do the same as "Closed", but will hide existing comments from visitors.
Turning off the permissions for visitors to comment article by article may be cumbersome. Drupal also provide a global setting to turn this permission off, that will affect all Articles that shall be created in the future.
Putting an Article on top of the home page
The default behavior of an Article is to show up on the home page. They are automatically sorted so that the newest Articles are higher up on the home page. As new Articles appear, Older ones move towards the bottom of the home page.
You can override this default behaviour by making an Article alway appear on or near the top by making it sticky. Here is how you do this:
- Log in to the site as the administrator.
- Navigate to .
- Click in the checkbox next to the Article you want to always appear at the top of the home page.
- Choose "Make content sticky" from the drop-down box in the "Action" section.
- Press "Apply to selected items".
If you no longer want an Article to be sticky, follow the same procedure to select the Article, Choose "Make content unsticky" from the drop-down box in the "Action" section, before you press "Apply to selected items".
An alternative method for making content sticky is discussed in chapter 6.
Editing content
When you view content you create as an administrator, there is an "Edit" tab next to the "View" tab (see figure 5-5). Site visitors will not see this tab. It exists to allow you, the site administrator, to make changes to the content you've created. In the example Basic page I created, I misspelled the word "forums". To go fix this, I need to edit the page again. Here is how to reopen content for editing:
- Log in to the site as the administrator.
- Navigate to . You see a list of the content already created, including the "About Drupal primer! (see figure 5-6).
- Press on the "Edit" button next to the content you want to edit. You will see the same form you used to create the content, but this time it has four tabs: a "View" tab, the currently selected "Edit" tab and two tabs labeled "Delete" and "Revisions"(see figure 5-11).
Only you, as the administrator, will see these tabs. Ordinary visitors will not see them, unless they have permission to edit this piece of content.
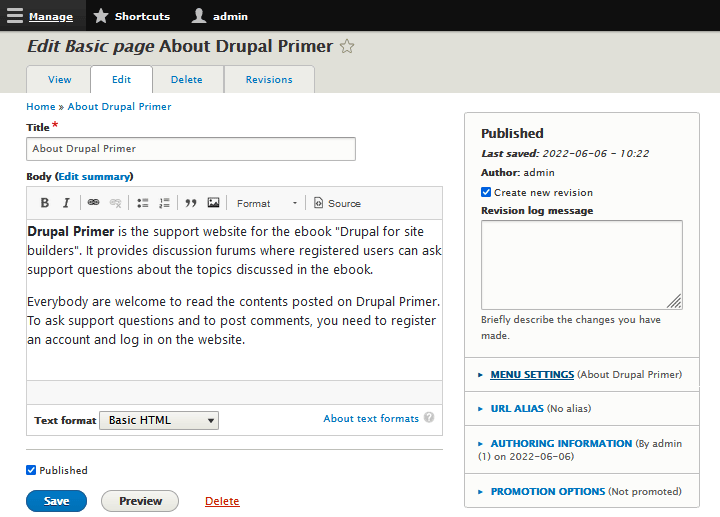
- When you are on the "Edit" tab, you can edit the page (in this example, I correct the misspelled "furum" to "forum". You can save and publish this piece of content in the same way you did when you created it. I.e.: by pressing "Save". Or you can use "Preview" to preview without saving until you are happy with the contents.
Deleting content
You can use the "Delete" that appear to the right of the "Edit" tab to delete the content you're currently editing.
You can also delete contents from the list of content shown in figure 5-6. To delete contents, follow these steps:
- Log in to the site as the administrator.
- Navigate to . There is the list of content (see figure 5-6).
- Check checkbox to the left of the title of the content you want to delete.
- Choose "Delete content" from the "Action" drop-down box and press the "Apply to selected items" button. As a safeguard, you will be asked to confirm the deletion. Click the "Delete" button to delete the content.
You can delete as much contents as you wish at the same time. You can click in the checkboxes next to multiple nodes (i.e. instances of contet) you wish to delete at the same time.
There are lots of additional options for managing the content you
create, and I discuss them in Chapter
6. Last update: 2022-02-18. When content is deleted, it is also purged from the database and can no longer be accessed.
Drupal also let you unpublish content. This will hide the content from visitors, but will this can ve reversed. Unpublishing and republishing content will be discussed in
Final word