CKEditor
The core CKEditor module will let users edit Drupal textarea fields with CKEditor. This is a so-called «WYSIVYG» (what you see is what you get) editor that lets users input rich text without having to use HTML markup. This chapter describes how to configure CKEditor on a Drupal 9 and later website.
Table of contents
- Introduction
- Enabling CKEditor for a text format
- Using Image styles
- Drupal-specific classes
- Advanced Content Filter
- Create a WYSIWYG text format
- Installing foreign plugins
- Copying and pasting
- Troubleshooting
- Final word
[Partially updated. Needs more updating for D9.]
/**
 * Alignment classes for block level elements (images, videos, blockquotes, etc.)
 */
.align-left {
  float: left;
}
.align-right {
  float: right;
}
.align-center {
  display: block;
  margin-right: auto;
  margin-left: auto;
}
Introduction
In Drupal 9 the default content editor named CKEditor. It is a so-called «WYSIWYG» (what you see is what you get) editor that uses JavaScript in the textarea input field to provide an interactive editor interface that allows users to create and format their posts the same way you would in a typical word processor.
It comes with an image upload widget for inline images pre-installed. If the core Media module is used to manage media, including images, it should be replaced with the Media module's upload widget. See the chapter Managing media to learn to replace the widget and manage inline images and embedded media.
 Unlike
Drupal 7 and earlier, in Drupal 9, the CKEditor bridge module
is in core, and updates of the module and the library is managed by composer.
The version shipped can be found by examining
/core/assets/vendor/ckeditor/CHANGES.md. As of 2021-11-18, it is 4.17.1.
Enabling CKEditor for a text format
CKEditor are installed by default and the text formats "Full HTML" and "Basic HTML" have it enabled by default.
It has to be enabled and configured separately for each individual text format. To inspect the configuration and change it, navigate to . For more information, see the Text Editor help page and Filter help page.
[D7]
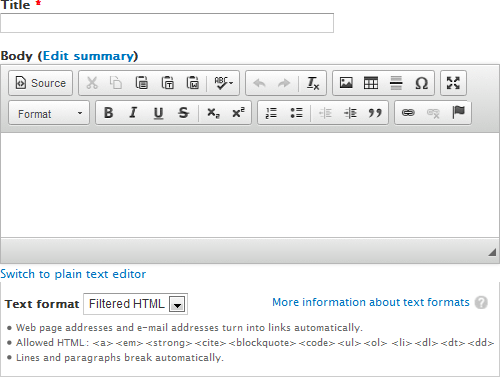
Then go ahead and create some content and be sure to select a text format recognised by CKEditor (e.g. Basic HTML or Full HTML). You should now see the default text area replaced with CKEditor like in the screenshot below:

If you navigate to , you'll set that CKEditor already has been linked to two of the built-in text formats: Basic HTML and Full HTML [D7].

However, if you use filtered text formats to secure the site from bad markup by non-trusted users (and you should), using CKEditor without first configuring it is going to provide a strange user experience. Out of the box CKEditor will present the user with a larger repertoire of styles than the default text format for untrusted users (i.e. Basic HTML) allows. If ACL is disabled (see below), all will appear to work fine inside the editor, but it will not be rendered on the site after the node has been saved. This means what the user will get (after saving her work) is not what she saw in the WYSIWYG editor.
As already noted the Basic HTML text format permits the following markup:
<a> <em> <strong> <cite> <blockquote> <code>
<ul> <ol> <li> <dl> <dt> <dd>
What is permitted and possible in CKEditor is not synchronised with what is permitted and possible in Drupal 9. If you want this to be consistent, you must fix it yourself.
CKEditor, by default, supports several HTML elements that
are not recognised by Drupal's Basic HTML, including
images. On the other hand it is not (yet) capable of rendering
descriptions list tags correctly, and also misses out on some other
markup such as <cite> and
<code>. To remedy this, you need to configure a
Drupal text format to match the capabilities of CKEditor, and
then adjust the GUI of CKEditor to match this format.
 Since
the editor emulates a typical browser using JavaScript, what is
rendered by the editor may not exactly match how a given browser will
render the same markup. For one thing, CKEditor knows
nothing about how your site is styled with CSS. The CKEditor
will give the user a good idea of what the output will look like when
published, but it is really a wysiawyg (What You See Is Almost What
You Get) editor.
Using Image styles
To make styles available in CKeditor, navigate to . Click "Configure" for the text format you want to configure image styles for. Enable the filter "Display image styles". Under "Filter setting", select the image styles that shall be available in the editor.
"Scale and crop" will maintain the aspect-ratio of the original image, then crop the larger dimension. This is most useful for creating perfectly square thumbnails without stretching the image.
Drupal-specific classes
The Drupal bridge module comes with some Drupal-specific classes that is in the subdirectory css of the module. To learn more about this, see the CKeditor support site.
Advanced Content Filter
[The ACF settings are not available in Drupal 9.]
Disable ACF
By default, CKEditor will filter content. To provide a consistent user experience, the “Advanced content filter” (ACF) should be enabled.
However, setting up CKEditor to use media plugins with ACF enabled is difficult. Until everything is confirmed is set up right and working correctly, ACL makes troubleshooting plugins harder.
So before configuring CKEditor for to use a plugin media file upload, navigate to both the CKEditor profiles (“Advanced” and “Full”), and disable the “Advanced content filter”.

It will be enabled again later.
Enable ACF
After confirming that you're able to insert media content, you should turn ACF back on.
Navigate to and open the Advanced and Full profiles, and then for each expand the tab for “Advanced content filter”. Click the radio button to make ACF “Enabled”. Then click “Save”.
By default ACF works in automatic mode. This means that allowed content is automatically determined by whatever plugins, buttons, and commands are enabled in the GUI under the “Advanced content filter” for the profile.
However, you may want to allow more elements, attributes, styles
and classes than what is automatically allowed. You do this by adding
extra allowed content to the JavaScript configuration
variable config.extraAllowedContent. The syntax is:
elements[attributes]{styles}(classes)
For details about the syntax see under the heading “Custom mode example” on this page.
The Drupal CKEditor bridge module let you do this by filling in the text box with the title “Extra allowed content” under the tab “Advanced content filter”. Example:
div[*](*);iframe[*](*);img[!src,alt,title,width,height](*);code;dl;dt;dd
The example above allows the <div>
and <iframe> with any attributes and classes,
the <img> with the attributes listed and any classes, and the
<code>, <dl>, <dt> and
<dd> tags without any attributes, classes and styles.
 Some
may be surprised to see the
 <iframe> here, given that the <iframe>
HTML element is insecure. However, ACL is not a text sanitation whitelist filter,
so excluding it from ACL will not really improve the security of the site. Since we are going to
permit allowlisted iframe URLs, we also need to tell ACL about it.
To adjust the Format pull-down menu of the CKEditor GUI, adjust text box with the title “Font formats” under the tab “Cleanup and output”. The default is:
p;div;pre;address;h1;h2;h3;h4;h5;h6
I prefer to exclude <h1> because this tag is
reserved by Drupal for the title field and I don't want to
encourage users to create a one or more <h1>
headlines within the body of a node. I also prefer to exclude
the <address>-tag since it is not much used. The
following setting is what I use:
p;div;pre;h2;h3;h4;h5;h6
The Drupal bridge module also provide a text box for JavaScript assignments. This is “Custom JavaScript configuration” under the tab “Advanced options”. This means that you can also set configure “Extra allowed content” and “Font formats” here. The following assignmnts is equivalent to those set above:
config.extraAllowedContent
   = 'div[*](*);iframe[*](*);img[!src,alt,title,width,height](*);code;dl;dt;dd';
config.format_tags = 'p;div;pre;h2;h3;h4;h5;h6';
However, you use JavaScript to set these if these values are already set under “Extra allowed content” and “Font formats”.
After you've configured the ACL, you must click “Save” to save the CKEditor configuration.
 ACL
is not a text sanitation whitelist filter. Users
can bypass it by using CKEditor is source mode. However, ACL can be
configured to purge the junk markup that is included when content is
pasted into CKEditor from MS Word and other sources with messy markup. Unfortunately, ACL is not well understood, and many tutorials
about setting up CKEditor suggest you disable ACL (typically
suggesting the following JavaScript
assignment:
 config.allowedContent = true;). Don't do
this. Take the time it takes to configure ACL correctly for your
site.
Finally, we want to adjust the editor appearance for the Advanced profile to make it correspond to the Basic HTML text format: Click on the edit “edit” link for the Advanced profile and expand the “Editor appearance” tab. Scroll down to the toolbar area and load the sample toolbar named “Basic”. This toolbar is a much better match for the Basic HTML text format that by default is linked to the Advanced profile, so to save it, scroll down and click on “Save” to save the modified Advanced profile.
Create a WYSIWYG text format
Both the predefined text formats that is defined by the core has
the text filter “Convert line breaks into HTML”, enabled. This filter
replaces a <br><br> with
a </p><p>. This misfeature breaks up the
paragraph. If the content author uses <br> to make
a class such as rtecenter apply to multiple lines, this
replacement implemented by this filter only makes the first line
centered.
Changing predefined text formats is undesirable. To create a new text format, without this misfeature, navigate to and click on “Add text format”. Select a name for the format (e.g. call it “Wysiwyg”). Enable it for all user roles.
As for enabled filters:
- Optional: “Convert URLs into links” and “Correct faulty and chopped off HTML”.
If you use all filters, the recommended filter processing order is the following:
- Convert URLs into links
- Correct faulty and chopped off HTML
After configuring the text format, scroll down to the bottom of the acreen and press “Save configuration”.
Installing foreign plugins
There exists plugins for CKEditor that doesn't have a supporting Drupal module for easy integration and don't work with the toolbar drag & drop feature. It is still possible to add such plugins to an existing Drupal CKEditor configuration.
 First,
you need to review installation instructions that comes with
the plugin. These do not take the Drupal CKEditor
bridge module into account and will typically suggest that you add lines
like
 config.extraPlugins to CKEditor's config.js.
You should not follow such instructions to the letter. They need to be adapted for Drupal.
It is recommended to not edit the config.js
configuration file that is distributed with CKEditor, because you may
overwrite it accidentally when you update the editor.
The CKEditor module is designed to allow for most configuration
through the configuraton section in the Drupal administrative GUI.
If you need to, you can adjust CKEditor to your needs by changing the ckeditor.config.js configuration file
in the main module directory.
As an example, I shall install the commercial plugin Bootstrap Panel that adds a widget to insert a Bootstrap panel in the text. This particular plugin that does not work with the toolbar drag & drop feature that can be used for most plugin installs, so we need to add the widget icon for this plugin to the toolbar manually.
First, after downloading the plugin, unpack it in the plugins directory inside the Drupal CKEditor directory
(after doing this, the directory /sites/all/modules/ckeditor/plugins/bootstrapPanel should exist).
Now you're ready to add the plugin to your CKEditor configuration. If you're unable to add the plugin by means of the toolbar, you may turn off the toolbar and add the plugin-icon manually.
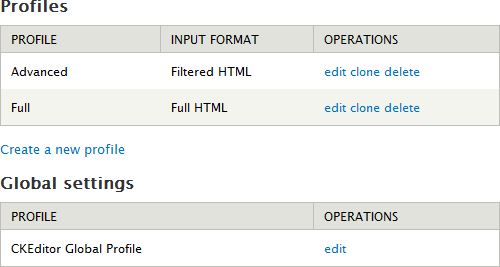
To turn off the toolbar, visit the adiministrative GUI on your Drupal site and navigate to . Under “Global settings”, click on “edit” for the “CKEditor Global Profile”. Scroll down to the bottom of the screen and select “Disabled” for “Use toolbar Drag&Drop feature”. Then press “Update the global profile”.
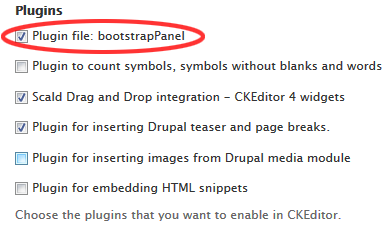
You can now navigate to . Under “Profiles”, click on “edit” for the profile you want to change Expand “Editor apperance” and scroll down to the “Plugins” section. Enable the “bootstrapPanel” plugin by ticking its checkbox, as shown in the screenshot below.

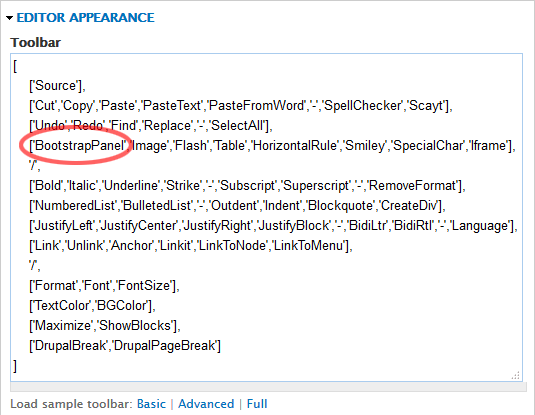
Next, scroll up to the “Toolbar” section. This section is now a text field exposing the plugins that shall appear on the toolbar. Add “BootstrapPanel” as shown in the screenshot below:

Finally, press “Save” to save your changes, and clear all Drupal caches.
If you've updated a plugin, you also need to clear the browser’s cache for the changes to have any effect.
 For a more extensive discussion of how to add plugins manually,
may also want to read Adding CKEditor Plugins Manually in Drupal
by Margot Kapačs. He describes how to add a plugin as part of the CKEditor module, how to create a standalone module for adding
a plugin, plus some really helpful hints about troubleshooting a plugin installation.
Copying and pasting
Press Ctrl+V to paste. Your browser doesn't support pasting with the toolbar button or context menu option.
Troubleshooting
One of the most common errors with CKEditor is a JavaScript error where the node edit-body field does not display. Instead there is just an unresponsive gap. What this tells you is that the JavaScript is not working, but not why it is not working. Unfortunately, there is a lot of things that can go wrong. Below are some troubleshooting suggestions.
- First make sure that JavaScript works on the site and in the user's browser. Test some other site feature that uses JavaScript.
- In the CKEditor profiles, expand the “Editor appearance” section and make sure “Language” is set to “English”.
Hints for troubleshooting inline images:
- If images appear inside the WYSIWYG editor, but not on the saved page, check “Text formats”. Make sure your format does not use a filter that strips images.
Final word
TBA
Last update: 2021-04-23 [gh].