Introduction to media
This chapter discusses media management in Drupal 9 and later. It also desgribes how to configure media management using the Drupal core and some contributed extensions, and how to cofigure responsive and fluid images.
Table of contents
Drupal core modules discussed in this chapter: CKEditor, Media, Media Library.
Drupal contributed extensions discussed in this chapter: Easy Responsive Images, Inline Responsive Images.
Introduction
This chapter discusses how to manage media assets in Drupal.
 There is an excellent webinar
from February 2020 by Ivan Zugec of Webwash.net: Managing Media Assets using Core Media in Drupal 8 (1:15).
To managing media assets the content editor needs access to three functions:
- Store the media asset in the local file system.
- Browse the asset library.
- Embed the asset into content.
All three are provided by the core Media module. The Media Library module adds improved browsing to easily find and reuse existing media items.
By default, the Drupal core provides an "Image" field. Enabling the Media module adds a new field named "Media" that out of the box provides five types of media assets:
- Audio – a locally hosted audio file.
- Document – an locally hosted document file, e.g. a PDF.
- Image – a locally hosted reusable image.
- Remote video – a remotely hosted video from YouTube or Vimeo.
- Video – a locally hosted video file.
Drupal media store
The wrappers public:// and private:// can
be used as synonyms for the public file system path and private file
system path, respectively. The setting is configured
in settings.php, but can be inspected if you navigate to:
(see also Working with files in Drupal).
Media assets are by default stored in the public file system. Original files are in these three directories:
The original download direcory for managed file attachments such as
images is public://YYYY-MM, where
“YYYY-MM” is the current year and month (e.g. “2021-11”).
public://YYYY-MM/– image field uploads.public://inline-images/– uploaded inline images (no month subdirectory).public://pictures/YYYY-MM– uploaded user portrait images.
Images resized using image styles are below a directory
named /styles/stylename/public/, where
the /stylename is the machine of an image style:
- Large (480x480)
large - Medium (220x220)
medium - Thumbnail (100x100)
thumbnail - Wide (1090)
wide
Below that, they are named the same as the directories holding the originals. I.e.:
YYYY-MM/. – image field uploads.inline-images/– uploaded inline images (no month subdirectory).pictures/YYYY-MM/– uploaded user portrait images.
To flush all generated styles:
$ drush image-flush
 Choose a style to flush [all]:
  [0] Cancel
  [1] all
  [2] large
  [3] medium
  [4] thumbnail
  [5] wide
 > 1
 For
unmanaged assets (those not managed by Drupal, but uploaded to the
file system without using Drupal) create
“
For
unmanaged assets (those not managed by Drupal, but uploaded to the
file system without using Drupal) create
“public://unmanaged” to hold them. Keeping them in a
subdirectory makes for a tidy root of the public file sytem.
Media
The core Media module is a drop-in replacement for the Drupal core image field with a unified user interface where content editors can upload, manage, and reuse media assets.
There is a full chapter about configuring and using the Media module.
CKEditor
Drupal 9 and later ships with a WYSITYG editor in core. This is CKEditor, a JavaScript rich text editor used by a number of CMSs, including WordPress.
There is a full chapter about configuring and using CKEditor.
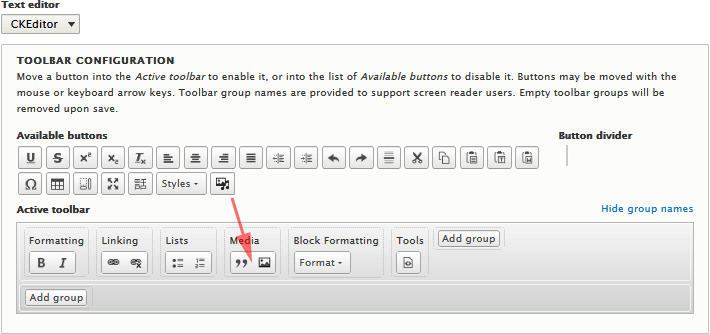
To set up CKEditor to use the button for the Media Library, navigate to , and press "Configure" for the relevant text formats. Then replace the image insert button with buton to insert with an set from the media library:

Source DO: Embedding media with CKEditor.
Inserting inline images
To configure CKeditor to insert inline images, navigate to , and press "Configure" for the relevant text format. Make sure the text editor is set to "CKEditor" and use the following settings under "CKEditor plugin settings":
- Tick "Enable image uploads". Defaults are usually OK.
- Enable "Track images uploaded via a Text Editor".
- Enable "Align images".
- Disable "Caption images" (aspect ratio goes awry if this is enabled).
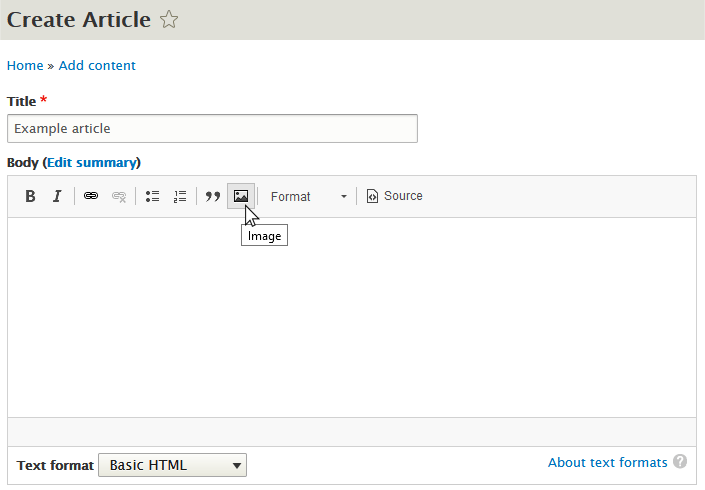
By default the core Media and Media Library modules are not installed. Neither are any of the contributed extensions discussed elsewhere in this chapter. This section explains how media uploads and management works in CKEditorwithout any addiotional modules.
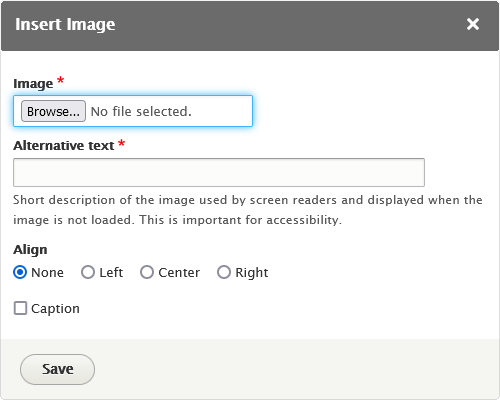
The default image upload image looks like the screenshot below:

Clicking allow you to browse your computer for an image to upload. By default the text filters "Align images" and "Caption images" are enabled for the text format. This provides you with an alignment option and a cpation checkbox. With core alone, there is no provision for setting an image style.
The upload widget also requires you set an alternative text to be shown if the image cannot be displayed. For example, it will be used if image file referenced do not exist, the user uses a screen reader.

The image will be uploaded full size, and will be fluid (i.e. it will be resized to the viewport by the browser).
The alignment attribute have the following effect:
- None: Left edge of viewport, no wrapping.
- Left: Left edge of viewport, text wraps.
- Center: Centered in viewport, no wrapping.
- Right: Right edge of viewport, text wraps.
 To learn about extensions that improves UX for uploading inline images,
a good place to start is:
SE.DA: Append image style to an inline image in CKEditor.
Responsive images
Responsive images are images that have been specifically sized for the user screen based on breakpoints. This is different than fluid images which are large images scaled down client side with CSS.
Because of the large number of screen sizes, site builders can not store all screen size variations. But they could store two, three and maybe even four sizes of each image. Only one of these stored images (the roughly right size one) will get transmitted to the device. Then CSS fluid image adjusts the image to fit the exact device size to make it look good.
Using the core alone
The core Responsive Image and Breakpoint modules provides an image formatter that maps the breakpoint of the original image to render a responsive image.
Here is how to set up responsive images using what is provided by the core alone:
- Install the Responsive Image and Breakpoint modules.
- Make sure that the breakpoints file exist for your theme. It should be in the theme root directory and have a name like
mytheme.breakpoints.yml. - Navigate to a and set up image styles. You shall be able to selct these in the next step.
- Navigate to and create a responsive image style for the theme. Two exists: "Narrow" and "Eide". Click “+ Add responsive image style” to add more.
[TBA]
- Assign the responsive image style to an image field in "Manage display" for the image field [Seems to have no effect.].
- DO documentation: Responsive Images
- specbee.com: Setup Responsive Images in Drupal 8
- DO forum: How to add a responsive image style to an image field?
 However,
this does not work for inline images.
Inserting an image in the text editor dialog today do not let the user control image dimensions. It doesn't even have aspect ratio locking.
Eventually, this shall be resolved by this core issue.
In the meantime, add one of the contributed modules that provide this feature.
Easy Responsive Images
This contributed module provides media view modes defined by aspect ratio, combined with a bunch of different image styles for the images in that specific aspect ratio creates the correct size image files that are pulled by a custom twig template.
[Not tested]
Inline Responsive Images
This contributed module provides two text filters that can be added to a text format (e.g. “Full HTML”):
- Display image styles: Do not use breakpoints, works with the core "Image styles" nodule.
- Display responsive images: Uses breakpoints, works with the core "Responsive image styles".
In addition:
- Disable the "Track images uploaded via a Text Editor" filter.
- Enable "Display image styles" or "Display responsive images" – not both. Make it the last filter.
Then enable the image styles that shall be available in the editor.
I believe it is an implementation of the patch in this core issue: Allow image style to be selected in Text Editor's image dialog.
The module is not well maintained, and the dev version (2022-03-09) must be used. There is also a quirk wbout the ordering of text filters. See this DO issue for background:
[It is not great for the authoring experience nor for structured content reasons that users are defining the specific dimensions of every single image they insert. It'd be much better to allow them to choose from image styles - just like we do for image fields.]
Final word
In Drupal 7 and earlier, Media was a contributed project and very hard to configure as use. Therefore, I preferred to use other projects to manage media. Those I've used in the past include:
- Scald
- (Scald is Content, Attribution, Licensing Distribution) was a comprehensive package for Drupal 7 media management. However, the project has not been upgraded to Drupal 8 and later. See DO issue: "Is Drupal 8 version planned?" for migration information.
- IMCE
- This is both a file uploader and a file browser. It is badly suited for casual users, but provides some of the image library management functions an editorial team may need.
- Insert
- This is a simple tool that allows the casual user to insert an image attached to an image field inline in the editing area of a WYSIWYG editor with the click of a button.
The Media module that is part of core is a total rewrite from the ground up. It is much better than the contributed module.
Last update: 2022-04-16 [gh].