Introduction to extensions
This chapter gives a short introduction to how to extend Drupal. It also lists some of the useful extensions the site builder may be interested in, along with a brief description of each extension and the module or modules it contains. It also explains how to install, enable, update and uninstall an extension.
Table of contents
- Introduction
- What is a contributed extension?
- Working with extensions
- Documentation and support
- Troubleshooting
- Final word
Introduction
In the past, one of the key characteristics of Drupal was that the core was deliberately kept lightweight and that site building was done by adding a dozen or so modules to extend the configuration. The general idea was that the developer should install exactly the collection of modules needed for each wanted feature.
Unfortunately, this did not scale very well. Some contributed modules where not well-made and would break the site. Others had unwanted side-effects that conflicted with other modules. Some modules where silently abandoned by their maintainers and died a slow death due to software rot.
As a result, the more recent versions of Drupal a number of functions that in previous releases had only been available as contributed modules, were moved into core. In addition, many of the contributed modules that are available for these recent versions of Drupal tend to be larger and more general in scope than previous offerings.
The result of all this is that Drupal 9 relies much less on contributed extensions than any previous version of Drupal.
 For instance, in
Drupal 9 and later, Views, Date and other key modules has been
moved from contributed modules and into core. A Drupal 9 and later website
requires about 4 times more memory and CPU as an equivalent Drupal 7
website to offer a similar performance.
This means that when developing with Drupal, you need to focus more on how to implement the site using core features correctly, and less on adding extensions. Nevertheless, every Drupal developer need to know about contributed extensions and what they offer. That means that the developer need to know about the contributed extensions that are available as module projects through the Drupal download & extend selector.
 If
you are familiar with Wordpress, the term “plugin” there is roughly
equivalent to the term “module project” in the Drupal community.
The word “extension” is used by the Drupal community as a term that covers both module projects
(functional extensions), and themes (visual extensions).
What is a contributed extension?
A contributed extension for Drupal is “something” that may be downloaded from Drupal.org and installed to extend the functionality or appearance of a Drupal website. Each contributed extension have its own project page on Drupal.org.
 See also
Drupal.org: Contributed versus custom code and everything in between.
Most extensions either implements a single module (or a set of related modules), a theme or a profile. The word “extension” to refers to all of these. This chapter only discussing extensions that are module projects. For contributed theme projects, see the introduction to themes. Profiles are not covered in this ebook.
A project is usually shared by uploading it to the project git repository on Drupal.org. A packaging script creates a downloadable archive in the form of a so-called tarball and makes it available for download on the projects sub-site at Drupal.org, or to be fetched by composer.
A typical module project may support a specific function
or feature, or define additional data types and methods for processing
them. For instance, the Drupal core does not come with
an address field type. However, by enabling the contributed
Address
module, a very versatile set off addressfield becomes available. If you already know the shortname of the
project you want to use, you can find it by going directly by
appending the shortname to the path of the Drupal project
sub-site (https://www.drupal.org/project).
The address project, for example, is located on the
following URL:
https://www.drupal.org/project/address.
In Drupal literature, the words “project”, “module”, “package” and “extension” are sometimes used interchangeably. Strictly speaking, a project is the full monty, (the project page, git repository, commit history, etc.), while a module. package or extension is something in you may enable or disable after you've downloaded it.
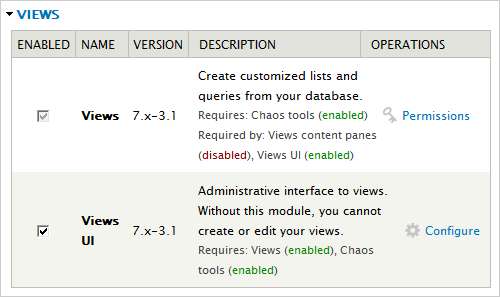
After you've downloaded, installed, and unpacked a project, its contained modules will show up in the list that appears when you navigate to in Drupal 7.
In Drupal 9 and later, navigate to and enter “views” in the text field to filter the list of modules.
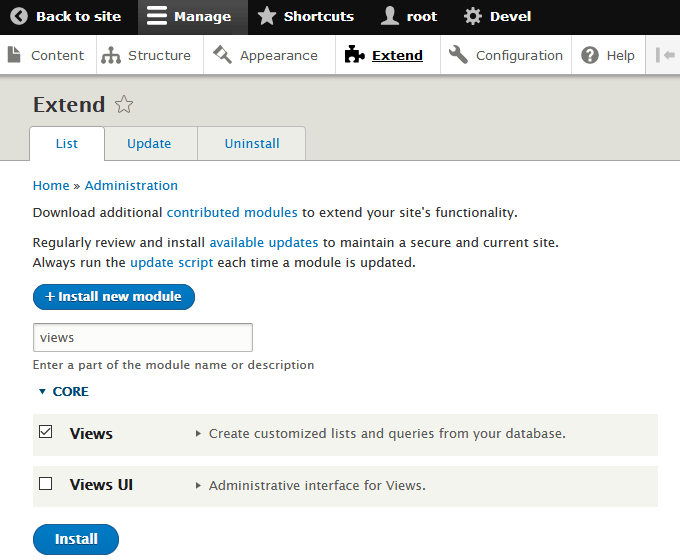
One project repository can contain more than one module. The names of the modules in a project will appear in the list of modules after you've installed it. The screen shots above shows the two modules Views and Views UI as they appear in the Drupal administrator's GUI after both modules has been enabled (Drupal 7) or installed (Drupal 9 and later)
 If
clicking the blue button with the text “+ Install new module” visible in the screenshot results
in this error message:
“Installing modules and themes requires FTP access to your server.”,
you're working om a website where ftp has been disabled for
security reasons. The recommended practice is to always
use drush or composer to install module projects and
themes.
On Drupal 7, you enable or disable a module by setting or removing a tick mark in the column and clicking .
On Drupal 9 and later, you install a module by setting a tick mark to the left of its name under the “List” tab and clicking the “Install” button at the bottom of the screen. It is no longer possible to just “disable” an module. To uninstall, select the “Unistall” tab, set a tick mark to the left of its name and click “Uninstall”.
Working with extensions
Drupal comes with a core that contains all the the essential components required to create a WCMS. A component is referred to as a module.
You may extend the functionality of this by downloading contributed and custom extensions that contain one or more additional modules.
Contributed extensions are hosted in the the official Drupal.org repository and can be downloaded and automatically placed correctly in the site's folder structure by drush (Drupal 7) or composer (Drupal 9 and later).
Custom projects are projects that are hosted elsewhere, and must be installed manually.
Adding an extension to your site
There are two CLI tools you nay use to manage a Drupal website to add contrubuted projects: drush and composer.
 If
you click on from the black administation toolbar on your Drupal website,
and see this statement: “Installing modules and themes requires FTP access to your server.”,
you're working om a website where ftp has been disabled for security reasons.
The recommended practice for Drupal is to always use a CLI tool to install extensions.
On Drupal 7, the simplest and fastest way to install and enable an extension is to use drush. On Drupal 9 and later, the best practice is to use composer to install an extension and its dependencies.
Both drush and composer are command line tools. To use them, you must use the terminal emulator.
To use drush on Drupal 7 to download, install and enable an extension, make sure you are positioned in or below the webroot of your website and give the following CLI command:
$ drush en shortname -y
The project's shortname is always the last element in
the project's path at Drupal.org. E.g., the path to the
Localization update project is
“/project/l10n_update” so the project's shortname is
“l10n_update”.
 If
you do this and get an error message saying: “Command pm-enable needs a higher boostrap level to run …”,
the most likely cause is that you're not positioned in or below
the webroot. Make sure you are, and try again.
To download and install a Drupal extension and its dependencies with composer, check out the extension's release page on Drupal.org. It will tell you exactly what command to use to install with composer.
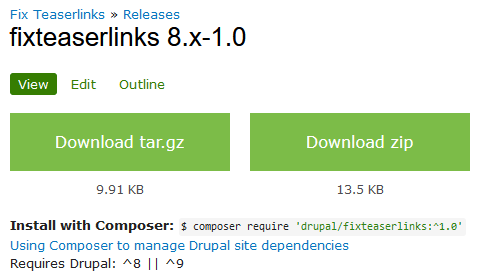
The release page shown above tells you to use this command to release version 8.x-1.0 of the extension named Fix Teaserlinks:
$ composer require 'drupal/fixteaserlinks:^1.0'
This will download the extension, and place it in
the modules/contrib directory. It will also recurse through
all external dependencies it defines, and download those as well and
install them in the vendor directory. It will also merge
those dependencies into the consolidated composer.json
that is kept in the webroot directory.
Specifying a version is optional:
$ composer require drupal/advanced_help
$ composer require 'drupal/pathauto:^1.0'
If you leave out the version, compsoer will download be
the most recent version of the project that fits the other constraints
in your composer.json (e.g.: prefer-stable:
true).
 Do
not use the require command in a directory that
already contain a file named
 composer.json (except the
siteroot). It will use that instead of the one in the siteroot
without any warning. This will download dependencies in a new vendor directory below
that directory, which is probably not what you want.
 Also
see documentation on Drupal.org:
Using Composer to Install Drupal and Manage Dependencies.
Installing a custom project
To install a custom module that is not hosted at Drupal.org or any other loction that allow it to be installed with drush or composer, you need to install it manually.
This will typically be the case for a custom extension that you've developed for a project, and that is not contributed back to the Drupal.org repo.
To install a project manually, you first download the
project's tarball by some means, and the unpack it with the
Gnu/Linux tar command. If you do this manually, make sure it
is placed in the “custom” folder
(see below for more about project folder
structure).
To do the same thing (i.e. install and enable a project) manually, carry out the following procedure:
[NOTE: Needs to be updated.]
- Download the project's tarball.
- Place it in the right directory.
- Place site in offline mode.
- Make a full backup of the site.
- If you are replacing the project with a newer version, start by disabling it in the panel.
- Remove the outdated version of the project (if it exists).
- Unpack (
tar -xvzf) the tarball with the current version of the project. - Navigate to the panel and enable the module(s) you want to use. You do this by checking the checkbox in the column (left of the module's name).
- Scroll down to the bottom and click .
- Place the site in online mode.
[TBA: Doing it on a site managed by composer.]
Updating an extension
Please see the section “Updating extensions” for Drupal 7 or Drupal 9 and later.
Removing a project
In Drupal you cannot remove a project by just deleting all its associated files. Modules make database modifications and these are not reversed when the project's files are deleted. Unless you follow the correct procedure when removing the project, those modifications will remain after the files are erased. In worst case, this may result in a corrupt database.
 Drupal
7 distinguishes between disabling and
uninstalling. They are not the same thing. When
you disable a module, all its tables and data are untouched.
You should be able to enable it again and continue where you left
off. When you uninstall a module, its tables are erased and
special clean-up functions may run. This confused many people, and
Drupal 9 and later just let you install and uninstall. There
is no longer a separate disable step. To be able to roll back
to before you uninstalled, you need to make a backup of the
database.
Drupal
7 distinguishes between disabling and
uninstalling. They are not the same thing. When
you disable a module, all its tables and data are untouched.
You should be able to enable it again and continue where you left
off. When you uninstall a module, its tables are erased and
special clean-up functions may run. This confused many people, and
Drupal 9 and later just let you install and uninstall. There
is no longer a separate disable step. To be able to roll back
to before you uninstalled, you need to make a backup of the
database.
Before removing any files, you must uninstall them. To do this using the administrative UI, you do as follows:.
In Drupal 7 navigate to …
Then, from the webroot chang directory to the directory where the contributed modules directory and use the CLI to recursively remove the files. For example, to remove the files of the Pathauto project:
$ cd sites/all/modules/contrib/
$ rm -rf pathauto
In Drupal 9 and later, navigate to , locate the name of the module in the list, and place a tickmark to the left of the name in the column “Uninstall”. Then press the “Uninstall” button at the bottom of the screen and theb “Uninstall” again to confirm.
Removing a package using composer is almost the same as installing, but we don't need to specify a version. So to remove the Pathauto, we'd simply type:
$ composer remove 'drupal/pathauto'
This will remove the entry from composer.json as well
as dependencies. The project is deleted from the
contributed modules directory and, if its dependencies are
not required by any other project, they are deleted from
the vendor directory.
Sources: Drupal.org, ModulesUnraveled.com.
In order to preserve the integrity of your installation, the following steps should be kept in mind when removing (uninstalling) a module from your site:
- Disable the various interdependent modules in order. Drupal keeps track of dependencies and may not let you disable all modules in a single run. In that case, update and make another pass until Drupal has allowed you to disable all modules you want to remove.
- Once all the modules have been disabled, click on the tab at the top of the page and select the modules you wish to remove from the database. Then click .
- Drupal will list the modules you've selected and warn that all the data held in these modules' tables will be permanently lost. If you are happy with this, click to clean out the data.
- When the database clean-up is complete, you can remove the files from the modules folder.
You should make sure you completely uninstall all the parts of a project rather than leaving bits and pieces of data and files lying around. Most of the time, the changes the modules in a project makes to the database should not harm the site if left in place. However, it is recommended that you remove unused projects completely. You never know if they may cause problems later.
Extension folder structure
For extensions to be shared by all sites sharing a Drupal
configuration, the default for Drupal 7 is that they are installed
in sites/all/modules/ by drush. For Drupal 9 and later, the
default is that contributed extensions hosted on Drupal.org are
installed by composer in the
modules/contrib directory in the webroot.
If your site is also using custom extensions, the recommended practice is to install these in a separate directory for custom modules. In that case, the following two directories should hold extension directories:
Drupal 7:
sites/all/modules/contrib/– contributed extensionssites/all/modules/custom/– custom extensions
Drupal 9 and later:
modules/contrib– contributed extensionsmodules/custom– custom extensions
Unless the site is
a multi-site,
all extension directories must be placed below the the
modules sub-directory. In Drupal 7, this directory is
in sites/all/. In Drupal 9 and later, it is just below the Drupal
root.
By keeping it there, when you update your Drupal installation – which is necessary to apply security updates and bug fixes – having it organised like this allows you to update core, or update s single contributed or custom extensions without interfering with the rest of the site's code.
If you run a multi-site: On Drupal 7, a project may also be placed
in sites/<site>/modules/ (to only be available for one
specific site). On Drupal 9 and later, there is a sites subdirectory
just below the webroot that serves the same purpose.
On Drupal 7, there is always a directory named
sites/default/modules/, for projects that belongs to
the default site. [Drupal 9 and later TBA]
Documentation and support
For documentation, first look for a file named
README.md or README.txt among the files that make up the project. It
should contain documentation about installation, configuration and use
of the project.
In addition, you may look in the section called (in the right margin) on the project page. If there is a link there saying “Read documentation”, there exists a user contributed documentation for the project.
Some projects also come with documentation that appears if you click the or links in the administrator's menu. (To get the "Advanced help" tab, you must install the Advanced help module.)
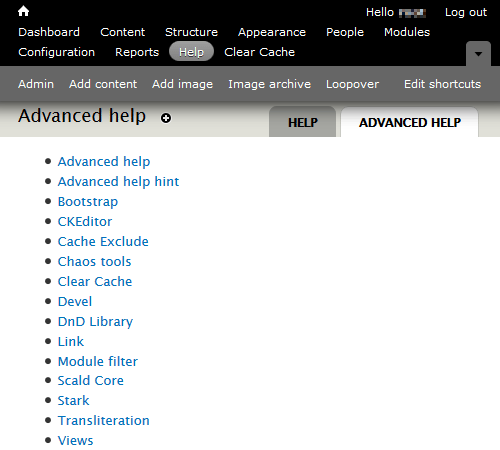
If you have a problem with using a project, support is provided by means of the issue queue. The issue queue is not only for bug reports, but can also be used to post a support request or a feature request.
There is a link for issues in the right margin of the project page. Clicking on it brings you to a page where you can search the issue queue (to see if the problem you have is already in the queue). If the problem is not already in the queue, you can create a new issue by clicking on the appropriate link.
Every Drupal project has at least one maintainer (listed in the right margin on the project page). Sometimes, it happens that a maintainer will stop maintaining a project without explanation. The Drupal community has outlined this procedure for dealing with unsupported and abandoned projects.
Troubleshooting
When you enable a module, and your SQL server crashes, the top of
the screen of death typically looks like this, and the main error
message is: “Got packet bigger than "max_allowed packet" bytes”:
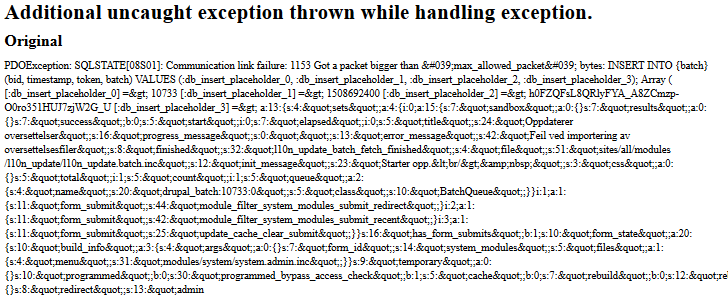
max_allowed packet”.If your site has other languages than English enabled, the most common cause of this is that importing translation strings killed the SQL server.
If this is the case, the quick fix is to disable additional languages, and try again.
A long term solution is to increase the size of max_allowed_packet.
First, determine the present value. Example:
$ mysql -u root -p
…
> SHOW VARIABLES LIKE 'max_allowed_packet'
…
+--------------------+---------+
| Variable_name      | Value   |
+--------------------+---------+
| max_allowed_packet | 1048576 |
+--------------------+---------+
1 row in set (0.00 sec.)
On RHEL7, the default is 1 Mbyte (1048576 bytes) On Ubuntu 16.04, the default is 16 Mbyte (16777216 bytes).
To increase the size, edit the MySQL configuraton file. This is usually one of:
/etc/my.cnf
/etc/mysql/my.cnf
Read the documentation for your system to determine the correct configuration file.
For example, to increase the size to 32 Mbyte, put the following line in it:
max_allowed_packet=32M
Then restart the SQL server.
RHEL7:
sudo systemctl restart mariadb
Ubuntu:
sudo service mysql restart
Query the database afterwards to make sure the value has changed.
Final word
The projects listed in this chapter is not necessarily those that contain the best or most suitable modules for a particular purpose. There exists thousands of user contributed projects for Drupal, and I have not read the description of all of them, and tested even fewer. In this chapter, I've listed the projects that I personally have found useful and that I've successfully used when developing Drupal-based websites for myself and clients without serious issues.
 For
reviews of extension, please see
Drupal Module Review.
There is also a dutch website that provides an overview of Drupal modules:
Module overview.
There is a language switcher in the top right corner.
Last update: 2022-05-20 [gh].