Basic administration
This chapter helps you getting started building a Drupal website: How to log in and out, how to edit your own account, and how to get started creating content. It also explains some Drupal terminology.
Table of contents
- Introduction
- Setting a strategy for your Drupal site
- Using your website
- Creating your first content
- The Manage section
- Drupal terminology
- Configuring Your Site
Introduction
In this chapter, I'll show you some easy – but essential – asks to get your site into shape. You should have set up a working Drupal site where you can try out things before you start to read this chapter. It is written to encurage you to dive in and start building your website. You make changes and immediately get to see the results of those changes.
I cover some of the nitty gritty Drupal configuration settings that you need to know. And I introduce Drupalese – that is, I go over some of the language that Drupal uses and explain what it means in nontechnical terms. This is especially important because these terms are used frequently in the rest of the chapters. Understand them here, and you won't be in the dark later.
Setting a strategy for your Drupal site
It's never too early to think about the purpose of your site. The site I use to illustrate concepts in this chapter is know as drupalprimer.com. In my case, this site exists to support this ebook and give its readers a place to discuss the information that appears in this ebook. Having a discussion forum helps creating a community.
In this chapter, when you see screen shots of drupalprimer.com, they are early ones, taken when the site was first being put together. I was still considering the site configuration options that Drupal offers and which choices made the most sense for this particular site. With every decision I made, I had to consider the purpose of the site and the audience of the site.
When you visit the site now, you may see it in a different state. This is very much a work in progress. Eventually, it will have a blog where I share my personal Drupal experiences, and forums that allow site visitors to comemnt on the topics posted here. But before I could build those into drupalprimer.com, I had to become familiar with the Drupal administrative menus and take care of some initial administrative tasks. As I made my preliminary decisions, I had to keep in mind my eventual objective: A website to help me build a community for readers of this ebook. Your objective might be to raise awareness of a cause or to build a community. These things matter as you make your decisions. Throughout this chapter, I mention how my personal site goals influenced my administrative decisions.
Using your website
You've visited your brand new website and created an administrator account. Now it's time to get down to work and customise this site to suit your needs. But before you can, you have to become familiar with the interface. Browse to your new website and take a look at the current default home page (see figure 3-1).
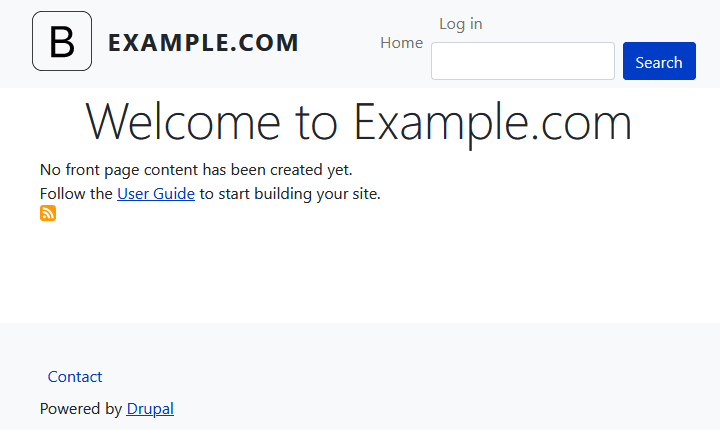
There's not much to see yet. It's still a default Drupal installation and needs lots of work.
Logging in and logging out
To do everything in this chapter, begin by logging in with the administrative username and password you set up in chapter 2. Type your username and password and click the "Log in" link that is sitting in the top right corner.
When you're logged in, it is replaced by a link that says "Log out" (see figure 3-2). Click on that to log out.
But for now, stay logged in. We are going to take a look at the current default home page as it appaears to a logged in administrator.
Anatomy of the home page
After you've logged in as an administrator, you will see a menu with a black background on top of the page. That is the administrators menu. The last item in this menu is your username (see figure 3-2).
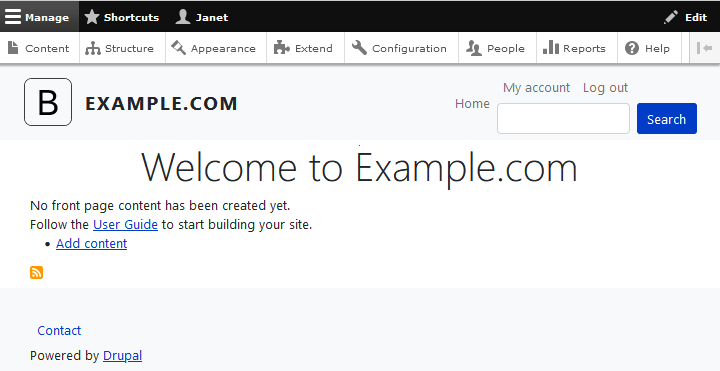
The administrator menu contains four links:
- Manage: This is the main entry to administer
the website. In figure 3-2, that is the active menu item. The
links with white background on the line below are the the elements
that can be managed. I'll just through them here. In the secton
The Manage section below, we'll drill down
into just a few of them.
- Content: Takes you to a mange to add new content, and to manage the content that already exists on the website..
- Structure: Takes to a page to mange the structural elements (e.g.: blocks, content types, comment types, contact forms, display modes, menus, taxonomies and views). Most site features can be configured under the "Configuration" element, but structural elements are configured under this element.
- Appearance: Takes you to a page to manage the apperance of site.
- Extend: Takes you to a page to install or remove extensions.
- Configuration: Takes to a page to manage most of the site configuration.
- People: Takes to a page to manage the people that are registered on the website.
- Reports: Takes to a page that links to the reports about the website that exists, including a status report that gives a overview over overall website health.
- Help: Takes you to an overview of help pages for the installed extension (provided they have one).
- Shortcuts: This is a set of shortcut links to frequently used functions that you can customise. Intitally, it just has two links:
- Add content: Add new content to the website.
- All content: Show links to all content that exists on the website.
- Your username: In figure 3-2, the username is "Janet", but on your website, it will be your username
- View profile: View your own user profile.
- Edit profile: Edit your own user profile. THis also lets you add personal shortcuts to the "Shortcut" menu.
- Log out: This does exactly what you think it does – it logs you out. Make sure to log out if you plan on leaving your computer unattended in a public place for any length of time.
The "Edit" link on the right causes all page element to show an edit link (a pencil symbol). If you click the pencil, you can edit (configure) or remove the element. Use with caution.
Click the vertical bar and left pointing arrow symbol on the right to flip this from a horizontal to a vertical menu.
In addition to the adminstrative menu described above, some additional menu links can be seen in figure 3-2. These are:
- My account: Click on this to edit your profile All users see this link.
- Administer: This also expands into many more links when clicked. This section is concerned with how the site behaves and looks rather than the content on it. Only when you are logged in as the administrator will you see this link.
- Log out: Logs out. All users see this link.
- Home: This is the first (and so far only) item in the website's main menu. It link to the home page..
- Search: Clicking the search button initiates a serach in all content for the term typed in the text box to the left of the button..
- Contact: Link to the website's contact form.
- Drupal: Link to the Drupal.org website.
The two links described below only appear if there is no content on the home page of the website and you're logged on as the website's administrator or a content creator.
- User guide: This is a link to the official Drupal user guide.
- Add content: Add new content to the website.
The orange symbol just under "Add content" links to the site's default RSS feed, named "rss.xml.
Beyond that, there's not much to see yet. It's still a default Drupal installation and needs lots of work.
Editing your account
Click on your username in the black administrative menu, and then on "Edit profile". Or click on the "My account" menu link on top right,, and the on "Edit".
Both takes you to the form to edit your user profile settings, as seen in figure 3-3.You are logged in as the administrator, and can change all settings for the account as well as cancel the account. Users that are not administrators will also be able to click on the "My account" link and then the "Edit" tab, but may not be able to change all these settings.
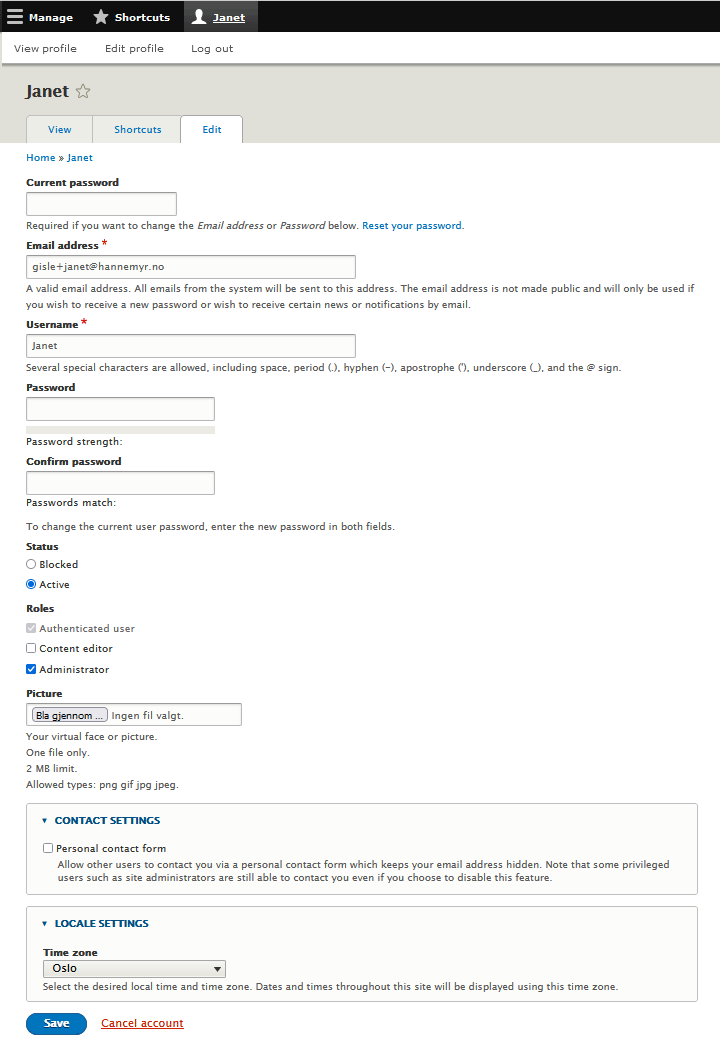
The top "Current password" field is to enter your current password. You don't need to fill in this to change most settings, but if it is required if you want to change the "Email" or the "Password" setting.
The user profile settings are:
- Email address: This is the email address for the current user.
- Username: You can change your current username here.
- Password: If you want to change the password for this account, enter it here.
- Confirm password: Type the new password again to confirm.
- Status: You can change the status here from “Active”, which allows you to post on the site, to “Blocked”, where you can't. You should not set this to “Blocked” for your own account. Later in this ebook I shall talk about how you, as the site's Administrator, to manage this setting for any other user on the site.
- Roles: TBA.
- Picture: TBA.
- Contact settings: TBA.
- Locale settings: No matter what the site time zone is set to, when you are logged in you will see the time zone selected here.
Creating your first content
Enough about the important, but not very interesting, account settings. After setting up and administering your site in the first two chapters, you're ready to make a visual change to your Drupal site. I discuss the content link in this section and show how to add some content to the site.
But I shall cover content creation in much more detail in Chapter 5 including the concept of content types, such as Article and Basic page.
For now, I'll just pass on instructions about adding tour first Article to the home page of your new Drupal site. Please follow these steps:
- If you aren't logged in to the site, log in with your administrator username and password.
- Click the "Manage" in the black administrator menu if the white administrator menu is not visible.
- Click the "Content" link in the white administrator menu.
- Click on the button labeled "+ Add content".
- You see two new links appear: "Article" and "Basic page".
- Click the "Article" link.
- You see a form that allows you to create your first Article (see figure 3-4). There are lots of other options and settings on this form, but I won't discuss those until Chapter 5.
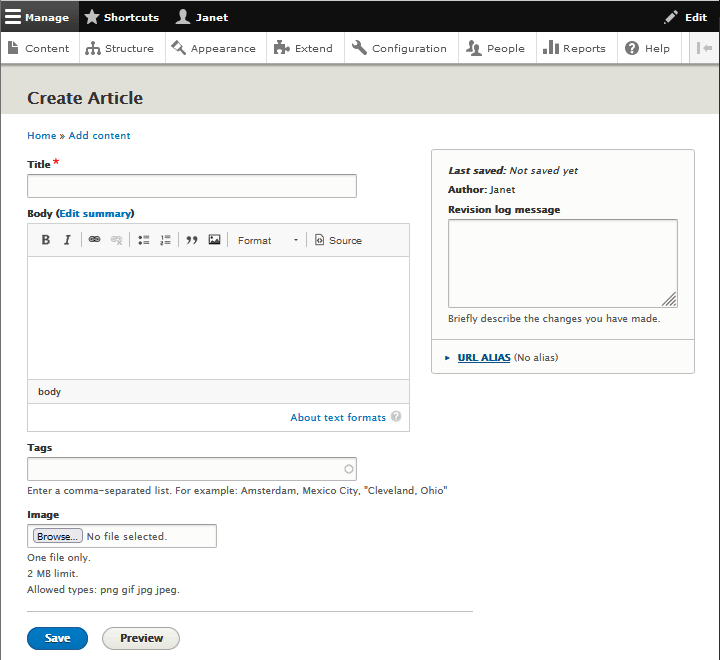
- Type something in the title and body text boxes. Scroll down to
the very bottom of the page, and click the "Preview" button.
You will see a preview of your Article (see figure 3-5).
Your Article will not yet appear on your website; this just gives you an idea of what it will look like when it is published and gives you the chance to make changes before it appears on your website.
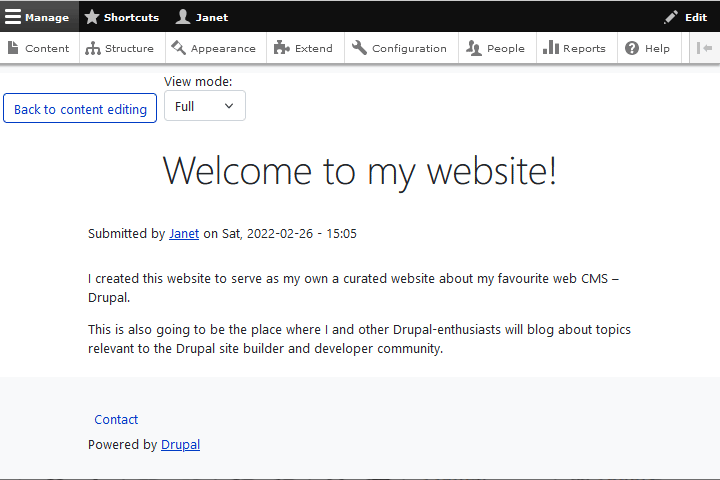
- Click the button "Back to content editing" to get back to the page where you can continue editing if there is something you want top change, or "Save" if you're done.
- After you've made any additions or changes to it, and when you are happy with it, click the "Save" button at the bottom of the page.
You can use the "Preview" button again and again as you change the Article. Preview your Article as often as you wish without saving it. It won't appear on your website until you click the "Save" button.
That's it! You will see a confirmation message (see figure 3-6) that your Article has been published, but that message won't show up on the site when you reload, and anybody else visiting your site will not see it.
To see your new Article, reload the browser. Your Article is visible to anyone who browses to your site, whether they are logged in or not.
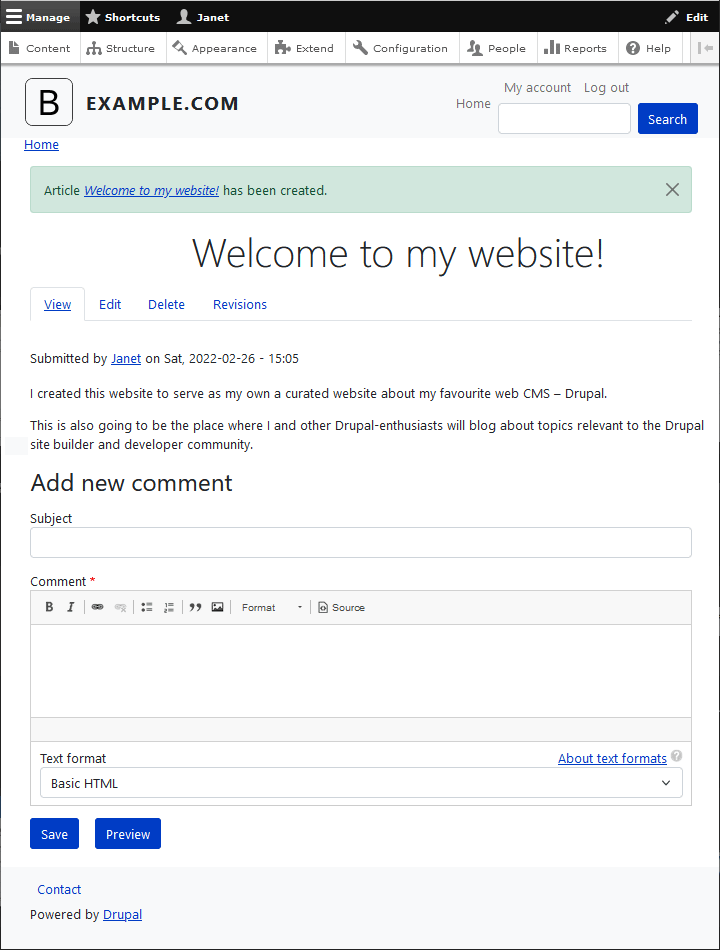
By default, your Article has gives "Add new comment"-field under it. Unless you set up the site so that only registered users can add comments, you shall get spammed to death.
The Manage section
The most important section of the administrative menu is named "Manage". It is contains a number of interesting menu items that you use to manage your website.
First, make sure you are logged in with your administrator username and password. You should see the word "Manage" as the first item in the administrative menu at the top of the screen. If it is not expanded (there should be an additional menu right below it with "Content" as its first item, click on "Manage" to expand it.
I'll now go through the items you shall find in the "Manage" section:
- Content: Here is where you create and manage the
content on your website. You may use the "+ Add content" button to
create new content. But you shall also use this to manage existing
content. It will list all content that exist, including unpublished
text that cannot be accessed by any other means, and provide means to
bulk-manage content pull-down menu with a number of "Actions" that
will apply to all selected item. These are:
- Publish content
- Unpublish content
- Promote content to the front page
- Remove content from the front page
- Make content sticky
- Make content unsticky
- Delete content
- Structure: This item let you manage the structural elements of your website. For example, the "Block layout" item controls where on the page various content will appear. For example, I could move editorial content to the region named "Sidebar first" and system messages to the region named "sidebar second". This is also where you go to place menus and add navigation links, and where they appear. For example, if you create an "About us" Basic page, you could place a link to that Basic page in the website's main menu.
- Appearance: The overall set of styles, graphics and layouts that give a Drupal website a distinctive look is determined by something called a "Theme". Here you can change the overall look of your website in one sweep by selecting a new theme. Most themes also has controls that let you change individual theme settings (e.g. background colours or whether to use a fluid or fixed page width).
- Extend: The specific functionality of a Drupal website. For example, Contact form that you encountered in Chapter 1 is provided by the Contact module. Basically you add specific functionality to your website by new installing modules that extends functionality.
- Configuration: This section controls some basic but important options that determines how your site operates. The section “Configuring your site”, below, shows a few important site configuration options you should set.
- People: This section is the entry point to managing the registered users on your website. If you want to add, edit, or delete users, this is the place to do it. You can also control what the user can see on the site and what she or he can't. I cover the user management in detail in the next chapter.
- Reports: The reports section helps you keep tabs on how much and what kind of activity is happening on your site. This becomes very important as your site gets more visitors.
- Help: Most modules comes with instructions about how to use them. All those instructions can be found under this item.
I shall go through all this in more detail later in this ebook, but bo it is time to try stuff out. I am going to show you gow to change the apperance if your site by changing its theme.
First, navigate to . This is a page that shows you all themes available for your website, both installed themes, and those that are available, but not installed. Take a note of the default theme. In figure 3-7, it is named B5 subtheme (i.e. a subtheme of Bootstrap5 – subtheming will be discussed in Chapter 11).

To change the default theme to Bartik, do the following:
- Scroll down and find the Bartik theme under "Uninstalled themes".
- Click on the link "Install and set as default" below Bartik.
- Scroll down to the bottom of the page and click the "Save configuration" button.
- Click on the "Back to site" menu link on top left.
When you're back on the site's Home page, you'll see ho your site looks with the Bartilk theme (see figure 3-8). Only the appearance has changed. The content is still there.
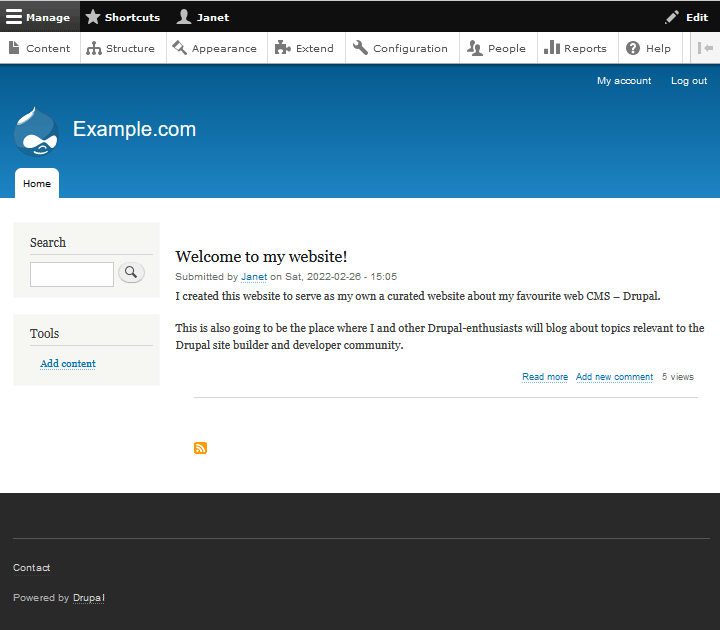
This was just a demonstration of how you can change themes. Now, go back to B5 subtheme (or whatever the default theme was before you replaced it). Navigate to and click on the link "Set as default". Or you may experiment and try one of the others that are available. Changing the theme do not impact on the content, only on how it is rendered.
Drupal terminology
You've already used menus to move around the website. You've also had a brief introduction to the Contact module. And you probably have an idea of what theme means by now.
This is list of three Drupal concepts that you should know, since you're going to encounter them many times in this ebook:
- Menu: A Drupal menu is a collection of links that let the user navigate to other parts to other parts of the website.
- Module: A specific computer program that can be installed on a Drupal website to extend its functionality. A module is sometimes called "an extension".
- Theme: This is a set of styles, graphics, and layouts that give the website a distinctive look.
Configuring Your Site
Start out by navigating to .
Figure 3-9 shows the top of the Configuration page. Scroll down to see more configuration sections.
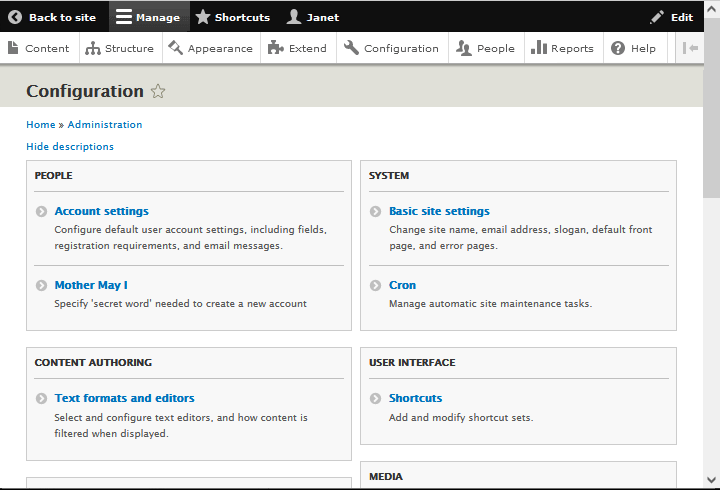
The configuration page usually consists of nine major sections. In each section, there are links to pages where you can change the configuration. I'll list that by default exist on a managed Drupal site provided by HNM. These are all from the Drupal core, unless it is pointed out that it is a contributed extension that HNM enable for its subscribers by default.
- People
- Account settings
- Mother May I – contributed extension
- Content authoring
- Text formats and editors
- Development
- Performance
- Logging and errors
- Maintenance mode
- Backup and Migrate – contributed extension
- Configuration synchronization
- Search and metadata
- Search pages
- Url aliases
- Web services
- RSS publishing
- System
- Basic site settings
- Cron
- User interface
- Shortcuts
- Media
- File system
- Image styles
- Image toolkit
- Regional and language
- Regional settings
- Date and time formats
For each configuration page, there is a brief description of what you can do, just below the link.. Below, we also explain what you can do with some of them. However, for the time being, I recommend that you stay with the default configuration for most of them. Make a support request if you need to change the configuration of the site, and HNM will provide guidance.
- Development » Maintenance mode: If you want to work on your site but don't want anyone to see the changes or log in while you are making changes, you can take your site offline here. This means that visitors will see a message about the site being maintained and temporarily available. You will still be able to see the site when you log in with your administrator username and password.
- System » Basic site settings: This contains a number of text boxes where you can enter information that will, if you wish, appear on every page of your site. I explain how to use it in the next section.
- Media » File system: Here you configure the default upload method and how long to keeptemporary files.
- Regional and language » Date and time formats: Here you edit how long, meduim and short dates appear on the site.
Basic site settings
So far, the name of the site is still what it was when it was handed over to you (as described in chapter 2). In this ebook, I've used the name "Example.com", but for your actial site, it may be something different (maybe your own domain name).
 A "domain name" is the main
address of a resource on the Internet. It consists of two parts
separated by a dot (.): The name of the site, and the
top level domain. The name is something that is chosen by
the website's owner. So-far in this ebook I've just used the name "example".
The top level domain is a short string that is defined by those that
govern the Internet. It may be something indicating use, such as "com" (for "commercial"),
ot it may be something indicating national governance, such as "no" (for "norway").
In this section, I am going to show you how to change the name of the website.
There are quite a few settings in the Site information form to fill out. For now, we are just going to change the site's name, and leave the rest alone.
Make sure you're logged in with your administrator username and password. Then follow these steps:
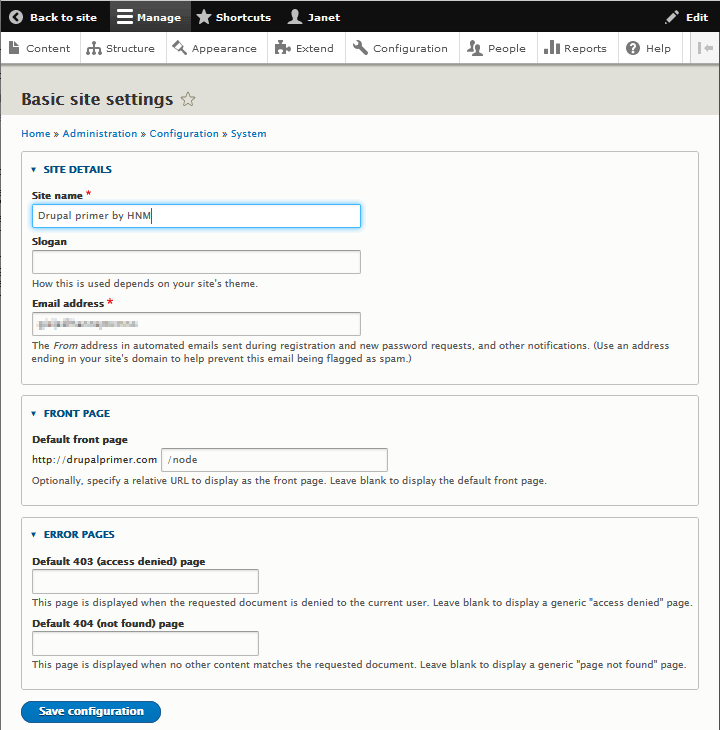
- Navigate to You see the form displayed in figure 3-10.
- Enter the name in the "Site name" text box. I am going to name my site "Drupal primer by HNM". You should use whatever name you've decided to use for your own site.
- Check that the email address in the "Email address" field is correct. This is the address that will be used as the "From:" address for all email sent by the site."
- Go to the bottom of the screen and click "Save configuration".
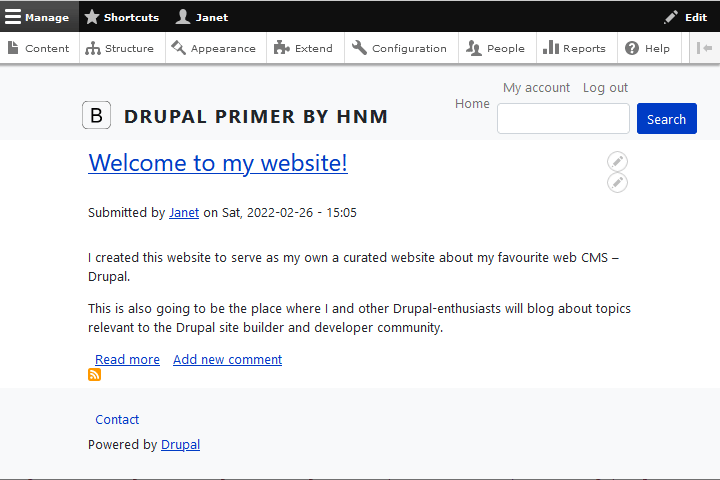
Your site will now have a new title (see figure 3-11).
Later in this ebook, I show you how to make the slogan appear on the site, change the default page, and create custom error pages.
At this point, your site should begin to look like your site, not the default site that initially was provided by HNM.
Last update: 2022-02-20.